A GUI for making 'Title Blocks' ... with text, fonts, colors, images
uniquename - 2012oct30
I recently made a GUI for doing sketches/drawings/paintings --- using an image file as a guide, if necessary. The code for that Tk script is posted at A 'Sketch On' GUI ... for drawing on an image or colored background.
That Tk script got me 'over-the-hump' in learning how to put objects (in that case, lines and points/dots/dashes) onto a canvas --- and to move them around and delete them --- with really simple 'mouse gestures'.
I was recently thinking about how it would be nice to have a 'drawing' utility that put lines of text on a canvas --- with or without images to enhance the text.
Some of the applications that I had in mind were
- a title block at the top of a web page
- a decorative (or message-conveying) image in the body of a web page
- a decorative (or message-conveying) image to be attached to an email sent to someone
- an image to convey a design for a T-shirt
- an image to be used as a title in a movie or slideshow presentation
- an image to make a greeting/birthday/whatever card
- etc. etc. etc. (I'm sure you/I will think of more)
I would want to have the option of choosing lots of fonts and lots of colors for the text --- and lots of colors for the background (the canvas).
I realized that I could use the 'Sketch On' Tk script as a starting point, so I went into heavy coding and testing mode for a couple of days and came up with the following GUI.
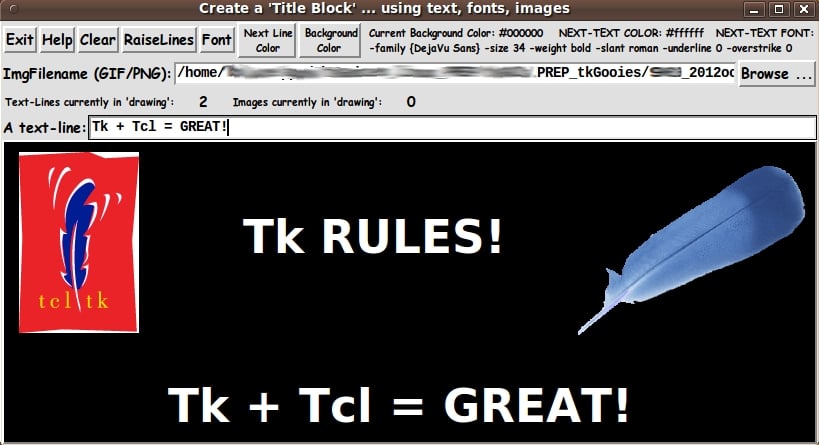
The GUI actually has a blank canvas when it is first started up. This image demonstrates that one can load a combination of multiple text-lines and multiple images onto the canvas.
The two images are from GIF files. And the image on the right demonstrates that you can use transparent GIF files. The transparency IS recognized.
The 'Help' button of the GUI shows text like the following, which indicates how one can ADD, MOVE, DELETE objects (text-lines or images) on the canvas.
This utility puts 2 types of objects on the canvas:

             text-lines   and/or    images

You put text-lines and images on the canvas the same way:

Either
   - press the Return/Enter key with the text cursor in the
     entry field for a text string or the entry field for
     an image filename (after there is an entry in the
     field, of course)
OR
   - click MB3 (mouse button 3) on the entry field for a
     text string or the entry field for an image filename.

The text-line or image will be placed on the canvas in the upper
left corner of the canvas.  You can DRAG the object where you
want it by pressing MB1 on the object and dragging it
elsewhere on the canvas.

To DELETE an object (text-line or image) from the canvas,
press-and-release MB3 (mouse button 3) on the canvas-object
to be deleted.

You can click and release MB3 on the filename in the entry field,
to (re)LOAD the image from the image file to the canvas. If the
image covers up your text-lines, click on the 'RaiseLines' button
to reveal the text again.

You can use a screen/image capture utility (such as
'gnome-screenshot' on Linux) to capture your 'title block'.

You can 'crop' the image and process it with 'blur' or 'bevel'
or 'gamma correct' or whatever with an image editor (such as
'mtpaint' on Linux).

And you can print the image with an image view-print utility
(such as 'eog' = 'Eye of Gnome' on Linux).
How to change colors is not mentioned in this help, but it should be fairly obvious that those capabilities are available (and how to make the color changes) from the presence of the 'Next Line Color' and 'Background Color' buttons on the GUI.
Those 2 color buttons call on a color-selector-GUI script to set those colors. You can make that color-selector script by cutting-and-pasting the code from the page A non-obfuscated color selector GUI on this site.
Furthermore, the 'Font' button calls on a font-selector-GUI script. You can make that font-selector script by cutting-and-pasting the code from the page YAFSG - Yet Another Font Selector GUI. In fact, the code presented below offers a good example of how one can code the call to, and use the output from, that font-selector script.
_____________________________________________________________________
Below is the code that produced this GUI.
There are comments above the sample code, in a section titled 'USING THE GENERATED IMAGE', that describe how one could make use of images produced by this GUI.
I follow my usual 'canonical' structure for Tk code, for this Tk script:
  0) Set general window & widget parms (win-name, win-position,
     win-color-scheme, fonts, widget-geometry-parms, win-size-control).

  1a) Define ALL frames and sub-frames.
  1b) Pack   ALL frames and sub-frames.

  2) Define & pack all widgets in the frames.

  3) Define keyboard or mouse action BINDINGS, if needed.

  4) Define PROCS, if needed.

  5) Additional GUI initialization (typically with one or more of
     the procs), if needed.
This structure is discussed in more detail on the page A Canonical Structure for Tk Code --- and variations.
This structure makes it easy for me to find code sections --- while generating and testing a Tk script, and when looking for code snippets to include in Tk scripts (code re-use).
_________________________________________________________________
As in all my scripts that use the 'pack' geometry manager (which is all of my 100-plus Tk scripts, so far), I provide the four main pack parameters --- '-side', '-anchor', '-fill', and '-expand' --- on all the 'pack' commands for the frames and widgets.
I think I have found a good setting of the '-side', '-anchor', '-fill', and '-expand' parameters on the 'pack' commands for the various widgets of this GUI. In particular ...
The 'canvas' widget expands/contracts appropriately when the window size is changed --- and button and label widgets stay fixed in size and relative-location as the window size is changed.
If anyone wants to change the way the GUI configures itself as the main window size is changed, they can experiment with the '-side', '-anchor', '-fill', and '-expand' parameters on the 'pack' commands for the various widgets --- to get the widget behavior that they want.
You might want to change the fonts used for the various GUI widgets. For example, you could change '-weight' from 'bold' to 'normal' --- or '-slant' from 'roman' to 'italic'. Or change font families.
In fact, you may NEED to change the font families, because the families I used may not be available on your computer --- and the default font that the 'wish' interpreter chooses may not be very pleasing.
I use variables to set geometry parameters of widgets --- parameters such as border-widths and padding. And I have included the '-relief' parameter on the definitions of frames and widgets. Feel free to experiment with those 'appearance' parameters as well.
_____________________________________________________________________
That said, here's the code --- with plenty of comments to describe what most of the code-sections are doing.
Essentially all of the code involved in manipulating the objects (text-lines and images) on the canvas are in the procs named 'add_text_line', 'add_image', 'object_delete', and 'object_move'.
And the code that demonstrates how to call on the font-selector utility is in the proc 'set_font'.
It is my hope that the copious comments in the code will help Tcl-Tk coding 'newbies' get started in making GUI's like this. Without the comments --- especially in the 'delete' and 'move' procs, the code might not look very friendly.
Without the comments, potential young Tcler's might be tempted to return to their iPhones and iPads and iPods --- to watch videos of skateboarders breaking and crushing various parts of their anatomy (beaucoup Schadenfreude).
Code for the Tk script 'make_titleBlock_fontsANDimages.tk' :
#!/usr/bin/wish -f
##
## Tk SCRIPT NAME: make_titleBlock_fontsANDimages.tk
##
##+#######################################################################
## PURPOSE: This TkGUI script provides a GUI for creating 'TITLE BLOCKS'
## using FONTS (i.e. text) AND IMAGES placed on a Tk canvas ---
## with canvas 'create text' and 'create image' commands.
##
## The GUI provides an 'entry' widget so that the user
## can specify LINES OF TEXT for the title block.
##
## And the GUI provides an 'entry' widget and 'Browse...' button
## so that the user can select ONE OR MORE IMAGES to be placed
## on the canvas.
##
## This GUI provides the capability for the user to DRAG the
## TEXT-LINES AND IMAGES to position them as-desired on the
## canvas.
##
## The GUI also provides the capability for the user to quickly
## DELETE A TEXT-LINE OR IMAGE. This provides for a 'try again'
## option --- for example, if the user wants to try again with
## another font or color for the text --- or if the user decides
## to use a different image or to, say, crop the image and then
## put it on the canvas again.
##
## This GUI calls on a separate FONT-SELECTOR GUI to set the
## FONT FOR THE NEXT TEXT-LINE to be placed on the canvas.
##
## The font-selector GUI facilitates the selection of a set of
## Tcl-Tk FONT SPECIFICATION VALUES (6 of them):
##
## - font-family
## - font-size (pixels or points ; negative or positive integers)
## - font-weight: bold or normal
## - font-slant: roman (erect) or italic
## - underscore: off or on
## - overstrike: off or on
##
## There is no write-the-finished-title-block-to-an-image-file
## option. A more general option is available:
## The user can use a screen/window capture utility
## (such as 'gnome-screenshot' on Linux) to capture the
## image in an image file format such as PNG or GIF or JPEG.
##
## An image editor (such as 'mtpaint' on Linux) can be used to
## 'crop' the captured image if necessary --- and can be used
## to apply processing options such as 'blur' or 'emboss' or
## 'bevel' or whatever.
##
## The resulting image file(s) can be printed with an image
## view-and-print utility (such as 'eog' = 'Eye of Gnome' on
## Linux).
##
## -----------------------------------------------------------------------
## USES OF THE IMAGES:
##
## The images from this utility can be used for such things as:
## - a title block at the top of a web page
## - a decorative or message-conveying image in the body
## of a web page
## - a decorative or message-conveying image to be attached
## to an email sent to someone
## - an image to convey a design for a T-shirt
## - an image to be used as a title in a movie or slideshow
## presentation
## - etc. etc. etc.
##
##+###########
## GUI DESIGN:
##
## This script provides a Tk GUI with the following widgets.
##
## 0) There is a CANVAS widget on which to load the text-lines
## and images --- and on-which to drag those items.
##
## 1) There is a FILENAME-ENTRY FIELD and 'Browse ...' BUTTON with
## which to get one or more image files to load onto the canvas
## widget of this GUI.
##
## 2) There is a set of BUTTONS --- 'Exit', 'Help', 'Clear',
## 'RaiseText', 'Font' and a couple of COLOR buttons
## to set the current text color --- and to set a
## background (canvas) color.
##
## The background color shows if the user chooses to
## remove an image that covered the canvas or if the
## user did not use an image or if the image(s)
## do not cover the canvas.
##
## 3) An ENTRY widget, in which to enter one or more lines of text.
## This entry widget is intended to be 're-usable':
## One can place one line of text, from this entry widget, onto
## the canvas, then replace the text in the entry widget, and
## then place THAT line of text onto the canvas.
## (Note: This utility is for TITLES --- relatively
## short lines of text. Typically just one or two or
## three lines.)
##
## 4) Other widgets may be added:
## - LABELS to show 'Ntxtlines' and 'Nimages', where $Ntxtlines is
## the number of text objects (lines) in the current 'drawing',
## and $Nimages is the number of images currently placed on
## the canvas. (These counts can help when an image is
## covering objects. The user will be aware that other objects
## exist in the 'drawing'.)
##
##+##########
## REFERENCES:
##
## This code is largely based on the code in my Tk script for a
## 'SketchOn' utility. Reference: The web page https://wiki.tcl-lang.org/37120
## titled:
## "A 'Sketch On' GUI ... for drawing on an image or colored background".
##+########################################################################
## 'CANONICAL' STRUCTURE OF THIS CODE:
##
## 0) Set general window parms (win-name,win-position,color-scheme,
## fonts,widget-geom-parameters,win-size-control).
## 1a) Define ALL frames (and sub-frames).
## 1b) Pack ALL frames and sub-frames.
## 2) Define & pack all widgets in the frames.
##
## 3) Define key and mouse/touchpad/touch-sensitive-screen action
## BINDINGS, if needed.
## 4) Define PROCS, if needed.
## 5) Additional GUI INITIALIZATION (typically with one or two procs
## from section 4), if needed.
##
####################################
## Some detail on the code structure of this particular Tk script:
##
## 1a) Define ALL frames:
##
## Top-level :
## 'fRbuttons' - to contain buttons such as 'Exit', 'Help', 'Clear',
## 'RaiseText', 'Font' --- and 2 color selection
## buttons --- for next text-line color and for canvas
## (background) color.
## 'fRfile' - to contain a triplet: label-entry-button widgets
## 'fRstatus' - to contain labels showing Ntxtlines and Nimages.
## 'fRentry1' - to contain an entry widget for a text-line
## 'fRcanvas' - to contain the canvas widget.
##
## (We use just one text-entry widget, although the user may find it
## handy to have all/most of his lines of text be in view, available
## for quick changes, in several entry widgets.
## Multiple entry fields, rather than one large text widget, would
## facilitate applying of different text sizes and/or colors, per text-line.)
##
## Sub-frames: none
##
## 1b) Pack ALL frames.
##
## 2) Define & pack all widgets in the frames -- basically going through
## frames & their interiors in top-to-bottom and/or left-to-right order:
##
## 3) Define bindings:
## - Return/Enter key - on the text-line entry field - to put line on canvas
## - Return/Enter key - on the filename entry field - to put img on canvas
## (We also allow a button3-release on these 2 entry fields, for speed.)
##
## - bind <Button1-Motion> - on the canvas - calls proc 'object_move'
##
## - bind <ButtonRelease-3> - on the canvas - calls proc 'object_delete'
##
## Two Button3 Enter/Leave bindings could be added to change the color of a
## text-line (say, to orange) when the mouse is over a text-line --- to let
## the user know which object has been detected --- to help with deleting
## objects --- so that the wrong object is not deleted.
##
## However, since the text lines are few and ordinarily not over-lapping,
## the high-lighting-before-delete is probably not really needed.
##
##
## 4) Define procs:
## - 'get_img_filename' - to get the image filename
## - 'add_text_line' - to add a text-line and update counts
## - 'add_image' - to add an image and update counts
## - 'object_delete' - to delete a 'closest' object (text-line or image)
## - 'object_move' - to move an object (text-line or image)
## - 'set_text_color' - to set the color for creating the next text-line
## - 'set_background_color' - to set the background (canvas) color
## - 'update_colors_font_label' - to set a Colors-Font label to current values
## - 'update_status_labels' - to set 2 counts labels to current values
## - 'clear' - to remove all objects from the canvas (text & imgs)
## and reset a couple of counts
## - 'remove_all_lines' - to remove all text-lines (not images) from the canvas
## and reset a couple of counts (NOT implemented, yet)
## - 'popup_msg_var_scroll' - to show help (could be used to show
## other msgs, as needed)
##
## 5) Additional GUI initialization:
## - set a tolerance parm, used in selecting objects (text-line or image)
## - set an initial canvas color
## - set a color and font to use for the next text-line placed on canvas
## - initialize the 2 entry fields (for image and text-line)
## - initialize 2 counts (for images and text-lines)
## - initialize a label that displays 'next' values for text color and font
## - initialize a label that displays the 2 counts
##
## Other than the background color setting, the canvas is blank,
## waiting for the user to (optionally) select an image and to
## start entering text in the text-entry-field and start
## placing text lines on the canvas.
##
##+#######################################################################
## DEVELOPED WITH: Tcl-Tk 8.5 on Ubuntu 9.10 (2009-october, 'Karmic Koala')
##
## $ wish
## % puts "$tcl_version $tk_version"
##
## showed
## 8.5 8.5
## but this script should work in most previous 8.x versions, and probably
## even in some 7.x versions (if font handling is made 'old-style').
##+########################################################################
## MAINTENANCE HISTORY:
## Started by: Blaise Montandon 2012oct29 Started development, on Ubuntu 9.10,
## based on my code shown at
## https://wiki.tcl-lang.org/37120 - titled:
## A 'Sketch On' GUI ... for drawing on
## an image or colored background.
## Changed by: Blaise Montandon 2012nov03 Specify a cursor for the canvas.
## Change location/name of font &
## color selector scripts. Add
## procs 'set_text_button_color'
## and 'set_background_button_color'.
## Chgd '-expand' from 1 to 0 for
## '.fRentry1'.
##+#######################################################################
##+#######################################################################
## Set general window parms (titles,position).
##+#######################################################################
wm title . "Create a 'Title Block' ... using text, fonts, colors, images"
wm iconname . "TitleBlock"
wm geometry . +15+30
##+######################################################
## Set the color scheme for the window and its widgets ---
## such as entry field background color.
##+######################################################
tk_setPalette "#e0e0e0"
set entryBKGD "#ffffff"
# set listboxBKGD "#ffffff"
# set radbuttBKGD "#f0f0f0"
## Initialize the line-drawing color
## and the background color for the canvas.
set COLOR1r 0
set COLOR1g 0
set COLOR1b 0
# set COLOR1r 255
# set COLOR1g 255
# set COLOR1b 0
set COLOR1hex [format "#%02X%02X%02X" $COLOR1r $COLOR1g $COLOR1b]
# set COLORbkGNDr 60
# set COLORbkGNDg 60
# set COLORbkGNDb 60
set COLORbkGNDr 255
set COLORbkGNDg 255
set COLORbkGNDb 255
set COLORbkGNDhex \
[format "#%02X%02X%02X" $COLORbkGNDr $COLORbkGNDg $COLORbkGNDb]
##+########################################################
## We use a VARIABLE-WIDTH font for text on label and
## button widgets.
##
## We use a FIXED-WIDTH font for text in entry & listbox widgets
## and for the text in a text widget, such as help text.
##+########################################################
font create fontTEMP_varwidth \
-family {comic sans ms} \
-size -14 \
-weight bold \
-slant roman
font create fontTEMP_SMALL_varwidth \
-family {comic sans ms} \
-size -10 \
-weight bold \
-slant roman
## Some other possible (similar) variable width fonts:
## Arial
## Bitstream Vera Sans
## DejaVu Sans
## Droid Sans
## FreeSans
## Liberation Sans
## Nimbus Sans L
## Trebuchet MS
## Verdana
font create fontTEMP_fixedwidth \
-family {liberation mono} \
-size -14 \
-weight bold \
-slant roman
font create fontTEMP_SMALL_fixedwidth \
-family {liberation mono} \
-size -10 \
-weight bold \
-slant roman
## Some other possible fixed width fonts (esp. on Linux):
## Andale Mono
## Bitstream Vera Sans Mono
## Courier 10 Pitch
## DejaVu Sans Mono
## Droid Sans Mono
## FreeMono
## Nimbus Mono L
## TlwgMono
##+###########################################################
## SET GEOM VARS FOR THE VARIOUS WIDGET DEFINITIONS.
## (e.g. width and height of canvas, and padding for Buttons)
##+###########################################################
set initCanWidthPx 300
set initCanHeightPx 300
set minCanWidthPx 24
set minCanHeightPx 24
# set BDwidthPx_canvas 2
set BDwidthPx_canvas 0
## BUTTON widget geom settings:
set PADXpx_button 0
set PADYpx_button 0
set BDwidthPx_button 2
## LABEL widget geom settings:
set BDwidthPx_label 2
## ENTRY widget geom settings:
set BDwidthPx_entry 2
set initImgfileEntryWidthChars 20
## SCALE geom parameters:
set BDwidthPx_scale 2
set initScaleLengthPx 200
## LISTBOX geom settings:
# set BDwidthPx_listbox 2
# set initListboxWidthChars 30
# set initListboxHeightChars 8
##+#######################################################################
## Set a MINSIZE of the window (roughly).
##
## For width, allow for the minwidth of the '.fRbuttons' frame:
## about 7 buttons (Exit,Help,Clear,RaiseText,Font,TextColor,BkgndColor),
## and a label with current color-font values info.
##
## For height, allow for
## 2 chars high for the widgets in the '.fRbuttons' frame
## 1 char high for the '.fRfile' frame
## 1 char high for the '.fRstatus' frame
## 1 char high for the text entry-widget frames
## a canvas at least 24 pixels high.
##+#######################################################################
set minWinWidthPx [font measure fontTEMP_varwidth \
"Exit Help Clear RaiseText Font TextColor BkgndColor Colors: Text - #FF00FF Bkgnd - #000000"]
## Add some pixels to account for right-left-side window decoration
## (about 8 pixels), about 8 x 3 pixels/widget for borders/padding for
## 8 widgets --- 7 buttons and 1 label.
set minWinWidthPx [expr {32 + $minWinWidthPx}]
## MIN HEIGHT ---
## for the 5 frames 'fRbuttons' 'fRfile' 'fRstatus'
## 'fRentry1' 'fRcanvas'.
## Allow
## 2 char high for 'fRbuttons'
## 1 char high for 'fRfile'
## 1 char high for 'fRstatus'
## 1 chars high for 1 entry-widget frame
## 24 pixels high for 'fRcanvas'
set charHeightPx [font metrics fontTEMP_fixedwidth -linespace]
set minWinHeightPx [expr {24 + (5 * $charHeightPx)}]
## Add about 28 pixels for top-bottom window decoration,
## about 4x5 pixels for each of the 5 stacked frames and their
## widgets (their borders/padding).
set minWinHeightPx [expr {$minWinHeightPx + 48}]
## FOR TESTING:
# puts "minWinWidthPx = $minWinWidthPx"
# puts "minWinHeightPx = $minWinHeightPx"
wm minsize . $minWinWidthPx $minWinHeightPx
## We allow the window to be resizable and we pack the canvas with
## '-fill both' so that the canvas can be enlarged by enlarging the
## window.
## If you want to make the window un-resizable,
## you can use the following statement.
# wm resizable . 0 0
##+################################################################
## DEFINE *ALL* THE FRAMES:
##
## Top-level : '.fRbuttons' '.fRfile' '.fRstatus'
## '.fRentry1' '.fRcanvas'
##
## Sub-frames: none
##+################################################################
# set RELIEF_frame raised
# set BDwidth_frame 2
set RELIEF_frame flat
set BDwidth_frame 0
frame .fRbuttons -relief $RELIEF_frame -bd $BDwidth_frame
frame .fRfile -relief $RELIEF_frame -bd $BDwidth_frame
frame .fRstatus -relief $RELIEF_frame -bd $BDwidth_frame
frame .fRentry1 -relief $RELIEF_frame -bd $BDwidth_frame
# frame .fRentry2 -relief $RELIEF_frame -bd $BDwidth_frame
# frame .fRentry3 -relief $RELIEF_frame -bd $BDwidth_frame
frame .fRcanvas -relief raised -bd 2
##+######################################
## PACK the FRAMES.
## NOTE: We can experiment with the order
## in which the frames are stacked.
##+######################################
pack .fRbuttons \
-side top \
-anchor nw \
-fill none \
-expand 0
pack .fRfile \
-side top \
-anchor nw \
-fill x \
-expand 0
pack .fRstatus \
-side top \
-anchor nw \
-fill none \
-expand 0
pack .fRentry1 \
-side top \
-anchor nw \
-fill x \
-expand 0
pack .fRcanvas \
-side top \
-anchor nw \
-fill both \
-expand 1
## OK, frames are defined. Now start defining-and-packing widgets.
##+#########################################
## In FRAME '.fRbuttons' -
## DEFINE-and-PACK 7 'BUTTON' WIDGETS
## --- and a label widget.
##+#########################################
button .fRbuttons.buttEXIT \
-text "Exit" \
-font fontTEMP_varwidth \
-padx $PADXpx_button \
-pady $PADYpx_button \
-relief raised \
-bd $BDwidthPx_button \
-command {exit}
button .fRbuttons.buttHELP \
-text "Help" \
-font fontTEMP_varwidth \
-padx $PADXpx_button \
-pady $PADYpx_button \
-relief raised \
-bd $BDwidthPx_button \
-command {popup_msg_var_scroll "$HELPtext"}
button .fRbuttons.buttCLEAR \
-text "Clear" \
-font fontTEMP_varwidth \
-padx $PADXpx_button \
-pady $PADYpx_button \
-relief raised \
-bd $BDwidthPx_button \
-command {clear}
## NOT implemented. Not needed?
##
# button .fRbuttons.buttREMOVELINES \
# -text "RemoveLines" \
# -font fontTEMP_varwidth \
# -padx $PADXpx_button \
# -pady $PADYpx_button \
# -relief raised \
# -bd $BDwidthPx_button \
# -command {remove_all_lines}
button .fRbuttons.buttRAISELINES \
-text "RaiseLines" \
-font fontTEMP_varwidth \
-padx $PADXpx_button \
-pady $PADYpx_button \
-relief raised \
-bd $BDwidthPx_button \
-command {.fRcanvas.can raise TAGline}
button .fRbuttons.buttFONT \
-text "Font" \
-font fontTEMP_varwidth \
-padx $PADXpx_button \
-pady $PADYpx_button \
-relief raised \
-bd $BDwidthPx_button \
-command "set_font"
button .fRbuttons.buttCOLOR1 \
-text "\
Next Line
Color" \
-font fontTEMP_SMALL_varwidth \
-padx $PADXpx_button \
-pady $PADYpx_button \
-relief raised \
-bd $BDwidthPx_button \
-command "set_text_color"
button .fRbuttons.buttCOLORbkGND \
-text "\
Background
Color" \
-font fontTEMP_SMALL_varwidth \
-padx $PADXpx_button \
-pady $PADYpx_button \
-relief raised \
-bd $BDwidthPx_button \
-command "set_background_color"
label .fRbuttons.labelCOLORS \
-text "" \
-font fontTEMP_SMALL_varwidth \
-justify left \
-anchor w \
-relief flat \
-bd $BDwidthPx_label
## Pack ALL the widgets in frame 'fRbuttons'.
pack .fRbuttons.buttEXIT \
.fRbuttons.buttHELP \
.fRbuttons.buttCLEAR \
.fRbuttons.buttRAISELINES \
.fRbuttons.buttFONT \
.fRbuttons.buttCOLOR1 \
.fRbuttons.buttCOLORbkGND \
-side left \
-anchor w \
-fill none \
-expand 0
# .fRbuttons.buttREMOVELINES \
pack .fRbuttons.labelCOLORS \
-side left \
-anchor w \
-fill x \
-expand 0
##+###############################
## In FRAME '.fRfile' -
## DEFINE-and-PACK 3 widgets -
## LABEL, ENTRY, BUTTON:
##+###############################
label .fRfile.labelFILE \
-text "ImgFilename (GIF/PNG):" \
-font fontTEMP_varwidth \
-justify left \
-anchor w \
-relief flat \
-bd 0
## We initialize this widget var (and others)
## in the GUI initialization section at the
## bottom of this script.
##
# set ENTRYfilename ""
entry .fRfile.entFILENAME \
-textvariable ENTRYfilename \
-bg $entryBKGD \
-font fontTEMP_fixedwidth \
-width $initImgfileEntryWidthChars \
-relief sunken \
-bd $BDwidthPx_entry
button .fRfile.buttBROWSE \
-text "Browse ..." \
-font fontTEMP_varwidth \
-padx $PADXpx_button \
-pady $PADYpx_button \
-relief raised \
-bd $BDwidthPx_button \
-command {get_img_filename}
## Pack ALL the widgets in frame 'fRfile'.
pack .fRfile.labelFILE \
-side left \
-anchor w \
-fill none \
-expand 0
pack .fRfile.entFILENAME \
-side left \
-anchor w \
-fill x \
-expand 1
pack .fRfile.buttBROWSE \
-side left \
-anchor w \
-fill none \
-expand 0
##+#########################################
## In FRAME '.fRstatus' -
## DEFINE-and-PACK 4 'LABEL' WIDGETS
## --- for 2 counts (text-lines, images).
##+#########################################
label .fRstatus.label4COUNTtxtlines \
-text "Text-Lines currently in 'drawing':" \
-font fontTEMP_SMALL_varwidth \
-justify left \
-anchor w \
-relief flat \
-bd $BDwidthPx_label
label .fRstatus.labelCOUNTtxtlines \
-text "" \
-font fontTEMP_varwidth \
-justify left \
-anchor w \
-relief flat \
-bd $BDwidthPx_label \
-padx 20
label .fRstatus.label4COUNTimages \
-text "Images currently in 'drawing':" \
-font fontTEMP_SMALL_varwidth \
-justify left \
-anchor w \
-relief flat \
-bd $BDwidthPx_label
label .fRstatus.labelCOUNTimages \
-text "" \
-font fontTEMP_varwidth \
-justify left \
-anchor w \
-relief flat \
-bd $BDwidthPx_label \
-padx 20
## Pack ALL the widgets in frame 'fRstatus'.
pack .fRstatus.label4COUNTtxtlines \
.fRstatus.labelCOUNTtxtlines \
.fRstatus.label4COUNTimages \
.fRstatus.labelCOUNTimages \
-side left \
-anchor w \
-fill none \
-expand 0
##+###################################################
## In FRAME '.fRentry1' -
## DEFINE-and-PACK an ENTRY widget.
##+###################################################
label .fRentry1.labelENT1 \
-text "A text-line:" \
-font fontTEMP_varwidth \
-justify left \
-anchor w \
-relief flat \
-bd 0
## We initialize this widget var (and others)
## in the GUI initialization section at the
## bottom of this script.
# set ENTRY1string ""
entry .fRentry1.ent1 \
-textvariable ENTRY1string \
-bg $entryBKGD \
-font fontTEMP_fixedwidth \
-width 30 \
-relief sunken \
-bd $BDwidthPx_entry
## Pack ALL the widgets in frame 'fRentry1'.
pack .fRentry1.labelENT1 \
-side left \
-anchor w \
-fill none \
-expand 0
pack .fRentry1.ent1 \
-side left \
-anchor w \
-fill x \
-expand 1
##+###################################################
## In FRAME '.fRentry2' -
## DEFINE-and-PACK an ENTRY widget.
## (NOT IMPLEMENTED. Maybe someday?)
##+###################################################
##+###################################################
## In FRAME '.fRentry3' -
## DEFINE-and-PACK an ENTRY widget.
## (NOT IMPLEMENTED. Maybe someday?)
##+###################################################
##+###################################################
## In FRAME '.fRcanvas' -
## DEFINE-and-PACK a CANVAS widget:
##+###################################################
## We set '-highlightthickness' and '-borderwidth' to
## zero, to avoid covering some of the viewable area
## of the canvas, as suggested on page 558 of the 4th
## edition of 'Practical Programming with Tcl and Tk'.
##+###################################################
canvas .fRcanvas.can \
-width $initCanWidthPx \
-height $initCanHeightPx \
-relief raised \
-highlightthickness 0 \
-borderwidth 0
pack .fRcanvas.can \
-side top \
-anchor nw \
-fill both \
-expand 1
##+##################################################
## END OF DEFINITION of the GUI widgets.
##+##################################################
## Start of BINDINGS, PROCS, Added-GUI-INIT sections.
##+##################################################
##+#######################################################################
##+#######################################################################
## BINDINGS SECTION:
## - For Return-key press with text cursor in the TEXT-LINE
## entry field, load the text-line onto the canvas.
## - For Return-key press with text cursor in the IMAGE-FILENAME
## entry field, load the image onto the canvas.
##
## - <ButtonRelease-3> on canvas calls proc 'object_delete'
##
## - <Button1-Motion> on canvas calls proc 'object_move'
##+#######################################################################
## For filename-entry-field:
bind .fRfile.entFILENAME <Return> { add_image }
bind .fRfile.entFILENAME <ButtonRelease-3> { add_image }
## For text-entry-field:
bind .fRentry1.ent1 <Return> { add_text_line }
bind .fRentry1.ent1 <ButtonRelease-3> { add_text_line }
## FOR DELETING LINES:
## We give the user the opportunity to bail out of the delete, by moving
## the mouse cursor off of the canvas before releasing button3.
## And we only delete the line nearest the current cursor location.
## (The 'object_delete' proc may need some improvement to make sure
## that we delete precisely the object desired.)
bind .fRcanvas.can <ButtonRelease-3> {object_delete %W %x %y}
## We could high-light (in orange, say) a text-line, to help the user when
## they want to delete a text-line ... to make sure they delete the right one.
## We would need to get the item's current color and restore it on
## leaving the item.
# .fRcanvas.can bind TAGline <Button3-Enter> \
# "Put the item's current color in $prevCOLOR, then do
# .fRcanvas.can itemconfig current -fill #ffaa00"
# .fRcanvas.can bind TAGline <Button3-Leave> \
# ".fRcanvas.can itemconfig current -fill $prevCOLOR"
## Provide a way to move the TEXT-LINES and IMAGES on the canvas.
bind .fRcanvas.can <Button1-Motion> {object_move %W %x %y}
##+#############################################################################
##+#############################################################################
## DEFINE PROCS SECTION:
##
## - 'get_img_filename' - gets the filename of an image (GIF/PNG) file
## and places the image on the canvas
##
## - 'get_chars_before_last' - used in 'get_img_filename' to set curDIR
##
## - 'add_text_line' - puts a line of text from the text entry field
## onto the canvas
##
## - 'add_image' - puts an image from the image-filename in the
## filename-entry-field onto the canvas
##
## - 'object_delete' - delete a 'closest' object (text-line or image)
##
## - 'object_move' - move an object (text-line or image)
##
## - 'set_text_color' - set the color for creating the next text-line
## - 'set_background_color' - set the background (canvas) color
##
## - 'set_font' - set the font for creating the next text-line
##
## - 'update_colors_font_label' - updates the colors in the label widget
## '.fRbuttons.labelCOLORS'.
##
## - 'update_status_labels' - updates the counts on 2 counts labels
##
## - 'clear' - removes all objects from the canvas (text-lines & imgs)
##
## - 'remove_all_lines' - removes all text-lines (not images) from the canvas
## (NOT implemented. Not needed?)
##
## - 'popup_msg_var_scroll' - to show help, and to show other msgs as needed
##+############################################################################
##+#########################################################################
## proc 'get_img_filename'
############################################################################
## PURPOSE: To get the name of an image file (GIF/PNG) and put the
## filename into global var 'ENTRYfilename'.
##
## Also, go ahead and load the image onto the canvas. (?)
##
## USED BY: the '-command' option of the 'Browse ...' button.
##+#########################################################################
# set curDIR "$env(HOME)"
## FOR TESTING:
set curDIR "pwd"
proc get_img_filename {} {
global ENTRYfilename env curDIR imgID Nimages
## Provide the user a way to select an image file.
set fName [tk_getOpenFile -parent . -title "Select GIF/PNG file to load" \
-initialdir "$curDIR" ]
## FOR TESTING:
# puts "fName : $fName"
## Load the image file contents onto the canvas.
## (Since there is only one image on the canvas at any time, we will
## always use the string 'imgID1' as the image ID in this script.)
if {[file exists $fName]} {
set ENTRYfilename "$fName"
set curDIR [ get_chars_before_last / in "$ENTRYfilename" ]
# catch { image delete imgID1 } (not needed?)
set imgID [image create photo -file "$ENTRYfilename"]
## Place the image on the canvas.
.fRcanvas.can create image 0 0 -anchor nw -image $imgID -tag TAGimg
incr Nimages
## Update counts in the status frame label widget.
update_status_labels
## Set the canvas size according to the size of the image.
## No. Let the user manage this --- OR only reset the canvas size
## if the new image will not fit in the current canvas size.
# set imgWidthPx [image width $imgID]
# set imgHeightPx [image height $imgID]
# .fRcanvas.can configure -width $imgWidthPx -height $imgHeightPx
## FOR TESTING:
# puts "get_img_filename > imgWidthPx: $imgWidthPx imgHeightPx: $imgHeightPx"
## Force the resizing of the canvas, esp. if a new image is
## loaded that is taller than the previous image.
pack forget .fRcanvas.can
pack .fRcanvas.can \
-side top \
-anchor nw \
-fill both \
-expand 1
## We could automatically raise any lines already drawn
## so that they are not hidden by the newly loaded image.
# catch {.fRcanvas.can raise TAGline}
}
## END OF if {[file exists $fName]}
}
## END OF PROC 'get_img_filename'
##+######################################################################
## proc 'get_chars_before_last'
##+######################################################################
## PURPOSE: Gets the chars before the last occurrence of a char in a string.
##
## INPUT: A character and a string.
## Note: The "in" parameter is there only for clarity.
##
## OUTPUT: Returns all of the characters in the string "strng" that
## are BEFORE the last occurence of the characater "char".
##
## EXAMPLE CALL: To extract the directory from a fully qualified file name:
##
## set directory [ get_chars_before_last "/" in "/home/abc01/junkfile" ]
##
## $directory will now be the string "/home/abc01"
##
##+######################################################################
proc get_chars_before_last { char in strng } {
set endIDX [ expr {[string last $char $strng ] - 1} ]
set output [ string range $strng 0 $endIDX ]
## FOR TESTING:
# puts "From 'get_chars_before_last' proc:"
# puts "STRING: $strng"
# puts "CHAR: $char"
# puts "RANGE up to LAST CHAR - start: 0 end: $end"
return $output
}
## END OF PROC 'get_chars_before_last'
##+##################################################################
## proc 'add_text_line'
##+##################################################################
## PURPOSE: Puts a text-line on the canvas (in the upper left corner)
## based on the text string currently in the
## text-line-entry-field.
##
## Also augments the Ntxtlines count.
##
## CALLED BY: two bindings on the text-entry-field ---
## one binding for Return-key and one for button1-release.
##+##################################################################
proc add_text_line {} {
global Ntxtlines COLOR1hex curFONTspecs ENTRY1string
if {"$ENTRY1string" == ""} {return}
.fRcanvas.can create text 0 0 -anchor nw \
-fill $COLOR1hex -font "$curFONTspecs" \
-text "$ENTRY1string" -tag TAGline
incr Ntxtlines
## Update counts in the status frame label widget.
update_status_labels
}
## END OF PROC 'add_text_line'
##+##################################################################
## proc 'add_image'
##+##################################################################
## PURPOSE: Puts an image on the canvas (in the upper left corner)
## based on the image filename currently in the
## image-filename-entry-field.
##
## Also augments the Nimages count.
##
## CALLED BY: two bindings on the image-filename-entry-field ---
## one binding for Return-key and one for button1-release.
##+##################################################################
proc add_image {} {
global Nimages ENTRYfilename imgID
set imgID [image create photo -file "$ENTRYfilename"]
.fRcanvas.can create image 0 0 -anchor nw -image $imgID -tag TAGimg
incr Nimages
## Update counts in the status frame label widget.
update_status_labels
}
## END OF PROC 'add_image'
##+##################################################################
## proc 'object_delete'
##+##################################################################
## PURPOSE: Deletes an object (text-line or image) nearest the
## current cursor position.
##
## Also decrements the appropriate count (Ntxtlines or Nimages)
## and calls proc 'update_status_labels'.
##
## CALLED BY: bind .fRcanvas.can <ButtonRelease-3>
##+##################################################################
## We set this var in GUI-init section at bottom of this script.
# set pixelTol 3
proc object_delete {w x y} {
global pixelTol Ntxtlines Nimages
## Map from view coordinates to canvas coordinates, per
## page 559 of 4th edition of 'Practical Programming in Tcl & Tk'.
set x [$w canvasx $x]
set y [$w canvasy $y]
## Find canvas object nearest $x $y. This returns the 'last one'
## (uppermost) in the display list.
set objID [$w find closest $x $y $pixelTol]
## We could popup a prompt to the user here indicating the
## item that will be deleted and ask the user if it is OK
## to do the delete.
## Get the object tag(s), to determine which count to decrement.
set objTAGs [$w gettags $objID]
## We delete the object.
$w delete $objID
## FOR TESTING:
# puts "'object_delete' > w: $w objID: $objID objTAGs: $objTAGs"
## objTAGs typically contains TWO tags:
## 'TAGline current' when a text-line is detected by 'closest'
## and
## 'TAGimg current' when an image is detected.
## We decrement the appropriate count --- text-lines or images.
if { $objTAGs == "TAGline current" || $objTAGs == "TAGline" } {
incr Ntxtlines -1
}
if { $objTAGs == "TAGimg current" || $objTAGs == "TAGimg" } {
incr Nimages -1
}
## Update counts in the status frame label widget.
update_status_labels
}
## END OF proc object_delete
##+#########################################################
## proc 'object_move'
##+#########################################################
## PURPOSE: Moves a 'nearest-object' on the canvas.
##
## CALLED BY: bind .fRcanvas.can <Button1-Motion>
##+#########################################################
proc object_move {w x y} {
global pixelTol
## Map from view coordinates to canvas coordinates, per
## page 559 of 4th edition of 'Practical Programming in Tcl & Tk'.
set x [$w canvasx $x]
set y [$w canvasy $y]
## Find canvas object nearest $x $y. This returns the 'last one'
## (uppermost) in the display list.
set objID [$w find closest $x $y $pixelTol]
## FOR TESTING:
# set objTAGs [$w gettags $objID]
# puts "'object_move' > objID: $objID objTAGs: $objTAGs"
## Reset the location of the object on the canvas, by objectID.
$w coords $objID $x $y
## FOR TESTING:
# puts "'object_move' > Moving image to $x $y"
}
## END OF PROC 'object_move'
##+#####################################################################
## proc 'set_text_color'
##+#####################################################################
## PURPOSE: This procedure is invoked to get an RGB triplet
## via 3 RGB slider bars on the FE Color Selector GUI.
##
## Uses that RGB value to set a 'fill' color for the
## next text-line created on the canvas.
##
## ARGUMENTS: none
##
## OUTPUT: in global vars COLOR1r COLOR1g COLOR1b COLOR1hex
##
## CALLED BY: .fRbuttons.buttCOLOR1 button
##+#####################################################################
proc set_text_color {} {
global COLOR1r COLOR1g COLOR1b COLOR1hex
# global feDIR_tkguis
## FOR TESTING:
# puts "COLOR1r: $COLOR1r"
# puts "COLOR1g: $COLOR1g"
# puts "COLOR1b: $COLOR1b"
set TEMPrgb [ exec \
../SELECTORutils/select_RGBcolor_standAlone.tk \
$COLOR1r $COLOR1g $COLOR1b]
# $feDIR_tkguis/select_RGBcolor_standAlone.tk \
## FOR TESTING:
# puts "TEMPrgb: $TEMPrgb"
if { "$TEMPrgb" == "" } { return }
scan $TEMPrgb "%s %s %s %s" r255 g255 b255 hexRGB
set COLOR1hex "#$hexRGB"
set COLOR1r $r255
set COLOR1g $g255
set COLOR1b $b255
## Update the colors-label.
update_colors_font_label
## Update the colors of the text-color button.
set_text_button_color
}
## END OF PROC 'set_text_color'
##+#####################################################################
## proc 'set_text_button_color'
##+#####################################################################
## PURPOSE:
## Update the background (and foreground) color of the text-button.
##
## CALLED BY: proc 'set_text_color' and the GUI-init section at the
## bottom of this script.
#######################################################################
proc set_text_button_color {} {
global COLOR1r COLOR1g COLOR1b COLOR1hex
.fRbuttons.buttCOLOR1 configure -bg $COLOR1hex
.fRbuttons.buttCOLOR1 configure -activebackground $COLOR1hex
set RGBsum [expr {$COLOR1r + $COLOR1g + $COLOR1b}]
if { $RGBsum < 255 } {
.fRbuttons.buttCOLOR1 configure -fg "#f0f0f0"
.fRbuttons.buttCOLOR1 configure -activeforeground "#f0f0f0"
} else {
.fRbuttons.buttCOLOR1 configure -fg "#000000"
.fRbuttons.buttCOLOR1 configure -activeforeground "#000000"
}
}
## END OF proc 'set_text_button_color'
##+#####################################################################
## proc 'set_background_color'
##+#####################################################################
## PURPOSE: This procedure is invoked to get an RGB triplet
## via 3 RGB slider bars on the FE Color Selector GUI.
##
## Uses that RGB value to set the color of the canvas ---
## on which all the objects (text-lines & images) lie.
##
## ARGUMENTS: none
##
## OUTPUT: in global vars COLORbkGNDr COLORbkGNDg COLORbkGNDb COLORbkGNDhex
##
## CALLED BY: .fRbuttons.buttCOLORbkGND button
##+#####################################################################
proc set_background_color {} {
global COLORbkGNDr COLORbkGNDg COLORbkGNDb COLORbkGNDhex
# global feDIR_tkguis
## FOR TESTING:
# puts "COLORbkGNDr: $COLORbkGNDr"
# puts "COLORbkGNDg: $COLORbkGNDb"
# puts "COLORbkGNDb: $COLORbkGNDb"
set TEMPrgb [ exec \
../SELECTORutils/select_RGBcolor_standAlone.tk \
$COLORbkGNDr $COLORbkGNDg $COLORbkGNDb]
# $feDIR_tkguis/select_RGBcolor_standAlone.tk \
## FOR TESTING:
# puts "TEMPrgb: $TEMPrgb"
if { "$TEMPrgb" == "" } { return }
scan $TEMPrgb "%s %s %s %s" r255 g255 b255 hexRGB
set COLORbkGNDhex "#$hexRGB"
set COLORbkGNDr $r255
set COLORbkGNDg $g255
set COLORbkGNDb $b255
## Set the color of the canvas.
.fRcanvas.can config -bg $COLORbkGNDhex
## Update the colors-label.
update_colors_font_label
## Update the colors of the background-color button.
set_background_button_color
}
## END OF PROC 'set_background_color'
##+#####################################################################
## proc 'set_background_button_color'
##+#####################################################################
## PURPOSE:
## Update the background (and foreground) color of the background-button.
##
## CALLED BY: proc 'set_background_color' and the GUI-init section at the
## bottom of this script.
#######################################################################
proc set_background_button_color {} {
global COLORbkGNDr COLORbkGNDg COLORbkGNDb COLORbkGNDhex
.fRbuttons.buttCOLORbkGND configure -bg $COLORbkGNDhex
.fRbuttons.buttCOLORbkGND configure -activebackground $COLORbkGNDhex
set RGBsum [expr {$COLORbkGNDr + $COLORbkGNDg + $COLORbkGNDb}]
if { $RGBsum < 255 } {
.fRbuttons.buttCOLORbkGND configure -fg "#f0f0f0"
.fRbuttons.buttCOLORbkGND configure -activeforeground "#f0f0f0"
} else {
.fRbuttons.buttCOLORbkGND configure -fg "#000000"
.fRbuttons.buttCOLORbkGND configure -activeforeground "#000000"
}
}
## END OF proc 'set_background_button_color'
##+#####################################################################
## proc 'set_font'
##+#####################################################################
## PURPOSE: This procedure is invoked to get a font to
## use for the next text-line that is created on the canvas.
##
## The FE Font Selector GUI is used to return the
## 6-components of a font specification.
##
## ARGUMENTS: none
##
## OUTPUT: in global var 'curFONTspecs'
## (and in font-name 'fontTEMP_text'?)
##
## CALLED BY: .fRbuttons.buttFONT button
##+#####################################################################
## Initialize the global curFONTspecs var.
## We do this in the GUI-init section at the bottom of this script.
##
# set curFONTspecs [ font actual fontTEMP_varwidth ]
proc set_font {} {
global curFONTspecs
# global feDIR_tkguis
## FOR TESTING:
# puts "set_font > curFONTspecs: $curFONTspecs"
## Start up a version of the FE font selector GUI with
## the current font specs passed as the default. Put the
## font specs that the user chooses in 'newFONTspecs'.
set newFONTspecs [ exec \
../SELECTORutils/select_tkFont_standAlone.tk \
$curFONTspecs ]
# $feDIR_tkguis/select_tkFont_standAlone.tk \
if { "$newFONTspecs" == ""} {
return
}
## FOR TESTING:
# puts "newFONTspecs: $newFONTspecs"
if { "$newFONTspecs" == "" } { return }
## Save the chosen font specs for the next default.
set curFONTspecs "$newFONTspecs"
## Update the colors-label (which also shows cur-font).
update_colors_font_label
}
## END OF PROC 'set_font'
##+#####################################################################
## proc 'update_colors_font_label'
##+#####################################################################
## PURPOSE: Updates the colors (and the cur-font info) in
## the label widget '.fRbuttons.labelCOLORS'.
##
## ARGUMENTS: none
##
## OUTPUT: updates the text in the label widget
##
## CALLED BY: two color-setting procs and the 'set_font' proc and
## the GUI init section at the bottom of this script.
##+#####################################################################
proc update_colors_font_label {} {
global COLOR1hex COLORbkGNDhex curFONTspecs
.fRbuttons.labelCOLORS configure -text "\
Current Background Color: $COLORbkGNDhex NEXT-TEXT COLOR: $COLOR1hex NEXT-TEXT FONT:
$curFONTspecs"
}
## END OF proc 'update_colors_font_label'
##+#####################################################################
## proc 'update_status_labels'
##+#####################################################################
## PURPOSE: Updates the counts in the label widgets
## '.fRstatus.labelCOUNTtxtlines' and
## '.fRstatus.labelCOUNTimages'.
##
## ARGUMENTS: none
##
## CALLED BY: the procs that add and delete objects (text-lines or images)
## on the canvas --- and by the GUI init section at the
## bottom of this script.
##+#####################################################################
proc update_status_labels {} {
global Ntxtlines Nimages
.fRstatus.labelCOUNTtxtlines configure -text "$Ntxtlines"
.fRstatus.labelCOUNTimages configure -text "$Nimages"
}
## END OF PROC 'update_status_labels'
##+#####################################################################
## proc 'clear'
##+#####################################################################
## PURPOSE: Removes all objects (text-lines and images)
## from the canvas.
##
## Resets some counts accordingly.
##
## ARGUMENTS: none
##
## CALLED BY: a 'Clear' button.
##+#####################################################################
proc clear {} {
global Ntxtlines Nimages
.fRcanvas.can delete all
set Ntxtlines 0
set Nimages 0
}
## END OF proc 'clear'
##+#####################################################################
## proc 'remove_all_lines' (NOT USED --- yet. Not needed?)
##+#####################################################################
## PURPOSE: Removes all text-line objects
## from the canvas and resets some counts accordingly.
##
## ARGUMENTS: none
##
## CALLED BY: a 'RemoveLines' button. (commented out, for now)
##+#####################################################################
proc remove_all_lines {} {
global Ntxtlines
.fRcanvas.can delete TAGline
set Ntxtlines 0
update_status_labels
}
## END OF PROC 'remove_all_lines'
##+########################################################################
## PROC 'popup_msg_var_scroll'
##+########################################################################
## PURPOSE: Report help or error conditions to the user.
## CALLED BY: 'help' button
##+########################################################################
## To have more control over the formatting of the message (esp.
## words per line), we use this 'toplevel-text' method,
## rather than the 'tk_dialog' method -- like on page 574 of the book
## by Hattie Schroeder & Mike Doyel,'Interactive Web Applications
## with Tcl/Tk', Appendix A "ED, the Tcl Code Editor".
##+########################################################################
proc popup_msg_var_scroll { VARtext } {
## global fontTEMP_varwidth #; Not needed. 'wish' makes this global.
## global env
# bell
# bell
#################################################
## Set VARwidth & VARheight from $VARtext.
#################################################
## To get VARheight,
## split at '\n' (newlines) and count 'lines'.
#################################################
set VARlist [ split $VARtext "\n" ]
## For testing:
# puts "VARlist: $VARlist"
set VARheight [ llength $VARlist ]
## For testing:
# puts "VARheight: $VARheight"
#################################################
## To get VARwidth,
## loop through the 'lines' getting length
## of each; save max.
#################################################
set VARwidth 0
#############################################
## LOOK AT EACH LINE IN THE LIST.
#############################################
foreach line $VARlist {
#############################################
## Get the length of the line.
#############################################
set LINEwidth [ string length $line ]
if { $LINEwidth > $VARwidth } {
set VARwidth $LINEwidth
}
}
## END OF foreach line $VARlist
## For testing:
# puts "VARwidth: $VARwidth"
###############################################################
## NOTE: VARwidth works for a fixed-width font used for the
## text widget ... BUT the programmer may need to be
## careful that the contents of VARtext are all
## countable characters by the 'string length' command.
###############################################################
#####################################
## SETUP 'TOP LEVEL' HELP WINDOW.
#####################################
catch {destroy .topmsg}
toplevel .topmsg
# wm geometry .topmsg 600x400+100+50
wm geometry .topmsg +100+50
wm title .topmsg "Note"
# wm title .topmsg "Note to $env(USER)"
wm iconname .topmsg "Note"
#####################################
## DEFINE & PACK TEXT WIDGET.
#####################################
text .topmsg.text \
-wrap none \
-font fontTEMP_varwidth \
-width $VARwidth \
-height $VARheight \
-bg "#f0f0f0" \
-relief raised \
-bd 2 \
-yscrollcommand ".topmsg.scrolly set" \
-xscrollcommand ".topmsg.scrollx set"
scrollbar .topmsg.scrolly \
-orient vertical \
-command ".topmsg.text yview"
scrollbar .topmsg.scrollx \
-orient horizontal \
-command ".topmsg.text xview"
## Pack the scrollbars BEFORE the text widget,
## so that the text does not monopolize the space.
pack .topmsg.scrolly \
-side right \
-anchor center \
-fill y \
-expand 0
## DO NOT USE '-expand 1' HERE on the Y-scrollbar.
## THAT ALLOWS Y-SCROLLBAR TO EXPAND AND PUTS
## BLANK SPACE BETWEEN Y-SCROLLBAR & THE TEXT AREA.
pack .topmsg.scrollx \
-side bottom \
-anchor center \
-fill x \
-expand 0
## DO NOT USE '-expand 1' HERE on the X-scrollbar.
## THAT KEEPS THE TEXT AREA FROM EXPANDING.
pack .topmsg.text \
-side top \
-anchor center \
-fill both \
-expand 1
#####################################
## DEFINE & PACK OK BUTTON WIDGET.
#####################################
button .topmsg.butt \
-text "OK" \
-command "destroy .topmsg"
pack .topmsg.butt \
-side bottom \
-anchor center \
-fill none \
-expand 0
#####################################
## LOAD MSG INTO TEXT WIDGET.
#####################################
## .topmsg.text delete 1.0 end
.topmsg.text insert end $VARtext
.topmsg.text configure -state disabled
}
## END OF PROC 'popup_msg_var_scroll'
##+########################
## END of PROC definitions.
##+########################
set HELPtext "\
\ \ \ \ \ ** HELP for the 'Title Block Maker' utility **
This utility puts 2 types of objects on the canvas:
text-lines and/or images
You put text-lines and images on the canvas the same way:
Either
- press the Return/Enter key with the text cursor in the
entry field for a text string or the entry field for
an image filename (after there is an entry in the
field, of course)
OR
- click MB3 (mouse button 3) on the entry field for a
text string or the entry field for an image filename.
The text-line or image will be placed on the canvas in the upper
left corner of the canvas. You can DRAG the object where you
want it by pressing MB1 on the object and dragging it
elsewhere on the canvas.
To DELETE an object (text-line or image) from the canvas,
press-and-release MB3 (mouse button 3) on the canvas-object
to be deleted.
You can click and release MB3 on the filename in the entry field,
to (re)LOAD the image from the image file to the canvas. If the
image covers up your text-lines, click on the 'RaiseLines' button
to reveal the text again.
You can use a screen/image capture utility (such as
'gnome-screenshot' on Linux) to capture your 'title block'.
You can 'crop' the image and process it with 'blur' or 'bevel'
or 'gamma correct' or whatever with an image editor (such as
'mtpaint' on Linux).
And you can print the image with an image view-print utility
(such as 'eog' = 'Eye of Gnome' on Linux)."
##+######################################################
##+######################################################
## Additional GUI INITIALIZATION:
## (for APPLICATION-SPECIFIC initialization; i.e. for
## app or widget VARIABLES --- NOT widget PARAMETERS
## like button padding or '-relief' settings.)
##+######################################################
## Initialize some count variables and some
## entry fields that are shown on the GUI and
## set via the GUI.
set Ntxtlines 0
set Nimages 0
set ENTRYfilename ""
set ENTRY1string "This is a test."
## Initialize the color variables --- for text and background.
##
## (To avoid overpowering the user's eyes with a white background,
## we start with background=black and text=white.)
set COLOR1r 255
set COLOR1g 255
set COLOR1b 255
set COLOR1hex "#ffffff"
set_text_button_color
set COLORbkGNDr 0
set COLORbkGNDg 0
set COLORbkGNDb 0
set COLORbkGNDhex "#000000"
set_background_button_color
## Initialize the tolerance used in procs
## 'object_delete' and 'object_move'.
# set pixelTol 1
set pixelTol 3
## Initialize var 'curFONTspecs', used by the 'set_font' proc.
## See the font-section near the top of the code
## for some other font family names, such as
## { new century schoolbook }
set curFONTspecs [list -family {Liberation Mono} -size -34 \
-weight bold -slant roman -underline 0 -overstrike 0]
## Set the background color of the canvas.
.fRcanvas.can configure -bg $COLORbkGNDhex
## Put the initial colors in the colors (and font) label.
update_colors_font_label
## Put the initial counts in the counts labels.
update_status_labels
## Set a cursor for the canvas.
##
## Some crosshair-type cursors:
## crosshair,plus,tcross,cross,cross_reverse,diamond_cross,
## Some empty-center-type cursors:
## circle,heart,star,icon,target,box_spiral,dotbox,draped_box,rtl_logo
## Some 'specialty' cursors:
## spraycan,watch,dot,fleur,exchange,hand2,man,pencil,pirate,sizing,xterm
.fRcanvas.can configure -cursor crosshair
Here is an image that shows that you can put many, many text lines on the image --- with many, many different fonts. And the font on the upper left shows that you can drag a text-line partway off the canvas. (In fact you can 'cast' a text-line off the canvas and not be able to retrieve it.)

Note that although this utility was originally motivated by the desire to put several text lines (with nice fonts and colors, and possibly different sizes) on a canvas background, you could use it to make 'photo/image collages' --- i.e. put multiple images on the canvas and no text at all.
For example, you could make collages of family photos (after converting them to PNG or GIF files), cartoons, favorite paintings, favorite jewelry items, animals, etc. etc.
___
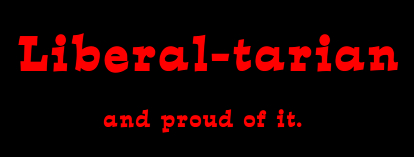
Here is an image that shows that you can combine an image with colored text.

(Whoops. I noticed, during the copy-editing of this posting, that the images-count in the 2 screenshots above with images in them was not incremented. It was stuck on zero. I have made the fix. The 'get_img_filename' proc was written to go ahead and put the image on the canvas when the entry-field was loaded with the filename. This saves the user from having to press the Enter key or do a mouse-button-3 click-release on that entry field. I simply forgot to increment the count and put the count in the label widget.)
(Whoops again. I noticed that in the image above, I had only one text-line on the canvas, but the text-line count shows 5. That is because I experimented with 4 other colors for the text-line before settling on the magenta color. The 4 deletes that I performed did not decrement the text-lines counter. I found that I had to move a statement up a few lines, in the 'object_delete' proc. The code above is fixed.)
___
Here is an image that shows how one might want to crop the image from a screen capture --- say, to take it to a screen-printer to have T-shirts made.
If one wanted to print this image, to save on ink, one could make the image with a white background instead of black. Then capture the GUI window with a screen/window capture utility (such as 'gnome-screenshot' on Linux) and, if necessary, crop the image with an image-editor (such as 'mtpaint' on Linux). And, finally, read the cropped image file into an image-file viewer-printer (such as 'eog' = 'Eye of Gnome' on Linux) to print the image.
____
In summary, I think Tcler's (and their kids) can have some fun times with this 'Title Block' utility.
But it is not just a 'toy'. It can be used as a 'productivity' tool. And, fortunately for many of us, it doesn't take a lot of skill to make really nice images for work --- or really nice images for home.
Like the 'SketchOn' Tk script, this is a Tk utility that is both simple-to-use and free-to-use. Simple and free. What's not to like? And if there IS something to 'not-like' --- the source is available if you want to make changes.
____
uniquename 2012nov03 UPDATE
In using the 'TitleBlock' utility recently, I found that it would be helpful to make a few improvements.
One improvement is to make it clearer what are the current color settings --- for next-text-line and for canvas background --- other than by displaying the hex codes. I have colored the two color buttons to indicate the current settings, as seen in the image below.

And I made a few other changes.
- I now specify a crosshair cursor for the canvas, instead of the default arrow cursor. I found that the pixel to which the arrow points is in the middle of the arrow, not the tip of the arrow. This can be misleading. (The cursor is set at the bottom of the script. I have included some comment lines indicating other built-in Tk cursor types that you might want to try.)
- To apply the colors to the color-changing-buttons there are two new procs: 'set_text_button_color' and 'set_background_button_color'.
- The text-entry widget was hogging space from the canvas. I changed '-expand' from 1 to 0 on the pack command for that entry widget.
- I changed the directory-location and/or filename for the font & color selector scripts. In any case, you will probably have to set those names to match where you put them and how you name them.
The code above has been replaced by code with these changes.
Furthermore, in using the 'TitleBlock' utility recently, I saw an enhancement that I might want to make someday. It would be nice to be able to click on a text-line to get the current font-size and color of the text-line (and maybe some other info, such as font-family). I find that unless you are taking notes as you put text on the canvas, you may not remember what font or color you used for a line and yet you may want to add a line in that very same size and color (and family). I may add that feature someday. It would probably be better to add it as a button-release event rather than a 'mouse-over' event. You may get too many unwanted popups (or label changes) if it is implemented based on a mouse-over of any text-line.