GUI for Drawing 'Gradient Spheres' (lighted disks), with lots of control
uniquename - 2012sep06
I am interested in making nice images for 'toolchest' and 'drawer' backgrounds (and other GUI embellishments), as I have indicated at Experiments in making embellished GUI's and at A color-gradient-button-maker GUI.
In doing some searches on this wiki with keywords including 'canvas', I ran across the Gradient Spheres page of Keith Vetter. I assembled the code from that page and ran it --- yielding the GUI shown in the following image.
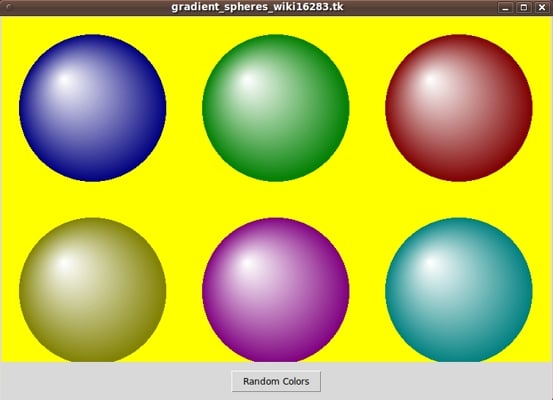
It struck me that I might find some use for such images in the future --- for unusual 'bullet' images and icon backgrounds --- for use in Tk GUI's or in web pages.
But there is obviously little control on the GUI --- just a 'Random Colors' button.
Color control:
I will probably not need 6 spheres at a time --- one sphere/disc will usually be sufficient. But I would like to be able to control the colors. There are 3 involved here --- the color of the 'sphere', the color of the light for the simulated lighting highlight, and the background (canvas) color.
By the way, Vetter draws the 'sphere' with a sequence of non-concentric circles. Their centers migrate across the interior of the disc.
The word 'gradient' comes into play because he draws the circles with colors that gradiate from a given 'disk' color to a given 'lighting' color.
Control of the location of the 'hi-lite' :
Vetter imagined the lighting being applied at a location within a bounding box whose 2 dimensions go from -1 to +1. He assigned a fixed location of -0.4,-0.4.
I noticed that it would not be hard to allow that location to be changed. But we do not really need fine-grained control on the location of the 'hi-lite'. It would be enough to locate it via the points of the compass --- nw, n, ne, e, se, s, sw, w, and center.
Radius control:
Furthermore, on looking at his code it became clear that it would be easy to make the radius of the disk controllable by a 'scale' widget on the GUI.
Aspect control (circle/ellipse) :
One more thing: Since I had some experience in making a canvas image that was either 'square' or could be 'squashed' by allowing it to have the aspect ratio of the current canvas (see A two-color rounded-POLYGON-maker GUI (equilateral and not so equilateral)), I figured that I should be able to put a circle/ellipse checkbox on the GUI.
Having those goals in mind, I ended up with a GUI that looks like this.

Note that I have supplied 3 buttons on the GUI with which to set the 2 gradient colors and the 'background' (canvas) color. Those 3 buttons call on a color-selector-GUI script to set those colors. You can make that color-selector script by cutting-and-pasting the code from the page A non-obfuscated color selector GUI on this site.
I used a 'minilistbox' widget to provide the choice of compass points, for location of the lighting high-light. I have used that 'minilistbox' widget in the script at A two-color rounded-POLYGON-maker GUI (equilateral and not so equilateral).
As I mentioned on that page, I got the technique for making a new widget from existing, built-in Tk widgets from the 'spinner' widget of Richard Suchenwirth that he presented on the spinbox page. As he described it, the 'spinner' is "a concoction of a 1-line high listbox with two tiny buttons, to approximate the effects of a spinbox.".
My 'minlistbox' widget is more like a 3-line listbox, and I had to enhance Suchenwirth's demo code with font variables and width variables and other parameters.
As I mentioned on the A two-color rounded-POLYGON-maker GUI (equilateral and not so equilateral) page, I may extract the 'minilistbox' code someday and put it in a simpler demo script, like Suchenwirth did with his 'spinner' proc. For now, people who want to use this 'minilistbox' --- or make a similar widget --- can extract the proc and the calling code from this much larger script.
_____________________________________________________________________
Below is the code that produced this GUI.
There are comments above the sample code, in a section titled 'USING THE GENERATED IMAGE', that describe how one could make use of images produced by this GUI.
I follow my usual 'canonical' structure for Tk code, for this Tk script:
  0) Set general window & widget parms (win-name, win-position,
     win-color-scheme, fonts, widget-geometry-parms, win-size-control).

  1a) Define ALL frames (and sub-frames).

  1b) Pack ALL the frames.

  2) Define & pack all widgets in the frames.

  3) Define keyboard or mouse action BINDINGS, if needed.

  4) Define PROCS, if needed.

  5) Additional GUI initialization (typically with one or more of
     the procs), if needed.
This structure is discussed in more detail on the page A Canonical Structure for Tk Code --- and variations.
This structure makes it easy for me to find code sections --- while generating and testing a Tk script, and when looking for code snippets to include in Tk scripts (code re-use).
To make the 'minilistbox' widget to be used in step (2), I essentially inserted a new step:
1c) Define any procs to be used in making widgets.
_________________________________________________________________
As in all my scripts that use the 'pack' geometry manager (which is all of my scripts, so far), I provide the four main pack parameters --- '-side', '-anchor', '-fill', and '-expand' --- on all the 'pack' commands for the frames and widgets.
I think I have found a good setting of the '-side', '-anchor', '-fill', and '-expand' parameters on the 'pack' commands for the various widgets. In particular ...
The 'canvas' widget expands/contracts appropriately when the window size is changed --- and button and label widgets stay fixed in size and relative-location as the window size is changed.
If anyone wants to change the way the GUI configures itself as the main window size is changed, they can experiment with the '-side', '-anchor', '-fill', and '-expand' parameters on the 'pack' commands for the various widgets --- to get the widget behavior that they want.
_____________________________________________________________________
That said, here's the code --- with plenty of comments to describe what most of the code-sections are doing.
I have used Vetter's 'GradientSphere' and 'Gradient' procs with essentially no change.
I have provided a 'ReDraw' proc that calls 'GradientSphere' after setting up the lighting-location parameter (in the -1 to +1 square) from the user-specified compass point.
The copious comments might help Tcl-Tk coding 'newbies' get started in making GUI's like this. Without the comments, the code might look too cryptic, and potential young Tcler's might be tempted to return to Twitter on their iPads.
Code for the Tk script 'make_gradient_disk_given2colors_onColorBkgnd.tk' :
#!/usr/bin/wish -f
##
## SCRIPT: make_gradient_disk_given2colors_onColorBkgnd.tk
##
##
## PURPOSE:  This Tk GUI script facilitates the creation of a disk
##           made up of a gradient of colored circles ---
##           on a canvas widget with a given (background) color.
##
##           This Tk script is based on a Tk script at the web page
##           called 'Gradient Spheres' at https://wiki.tcl-lang.org/16283 ---
##           by Keith Vetter in 2006 August.  To quote Vetter:
##
##           "For a game I'm writing, I needed sphere-shaped playing
##            pieces. I grabbed some images off the web but I had
##            trouble when I made the background transparent ---
##            the edges just looked horrible.
##
##            So I decided to create my own. It draws a series of
##            shrinking circles, each slightly offset from the previous
##            and with colors from a gradient.
##
##            The result looks (sort of) like a sphere with an offset
##            light source."
##
##            I too have had problems finding sphere-like images
##            which are usable after their solid-color background
##            is made transparent. Usually the color of pixels
##            around the outer edge of the disk are 'messed up'.
##
##            With this Tk script, I have more control over how
##            the boundary of the disk and the background is made.
##
## METHOD:   The GUI made by this Tk script contains a rectangular
##           canvas widget on which the colored circles (that make up
##           the disk) are drawn.
##
##           The GUI includes a 'scale' widget whose slider-bar can
##           be used to change the radius of the sphere-like disk.
##
##           The GUI also includes two buttons used to call a color selector
##           GUI to set the 2 colors to gradiate from and to, across the
##           disk/sphere.
##
##           A third button calls the same color selector GUI to set a
##           background color --- the color of the canvas.
##
##           There is a '-command' parameter tied to the radius-setting 'scale'
##           widget. That '-command' parameter is used to call a proc
##           to redraw the color-gradient disk.
##
##           The redraw includes clearing the canvas and redrawing the series
##           of circles that make up the gradient-colored disk, for each
##           detected change in radius.
##
##           (If the redraw takes more than half-a-second, then we can use
##           a button1-release binding on the scale widget to trigger the
##           redraw --- only when the user finishes dragging the sliderbar
##           of the scale.)
##
##           If erasing the colored circles from the canvas and redrawing
##           them completes within a very small fraction of a second, it will
##           be feasible to do the redraws 'dynamically' with the sliderbar.
##
## USING THE GENERATED IMAGE:
##           A screen/window capture utility (like 'gnome-screenshot'
##           on Linux) can be used to capture the GUI image in a GIF file, say.
##
##           If necessary, an image editor (like 'mtpaint' on Linux)
##           can be used to crop the window capture image.  The image
##           could also be down-sized --- say to make a 'bullet' image
##           file or an icon image file.
##
##           The editor could also be used to blur the image slightly to
##           'feather' the edges of the polygon.
##
##           The colored image file could be used with a utility (like the
##           ImageMagick 'convert' command) to change the outer, background
##           color to TRANSPARENT, making a partially transparent GIF
##           (or PNG) file. Then the semi-transparent image file could be used,
##           for 'bullets' in HTML pages or in Tk GUI's --- or for the
##           background of icons for use in GUIs.
##
##+########################################################################
## 'CANONICAL' STRUCTURE OF THIS TK CODE:
##
##  0) Set general window & widget parms (win-name, win-position,
##     win-color-scheme, fonts, widget-geometry-parms, win-size-control).
##
##  1) Define ALL frames (and sub-frames).  Pack them.
##
##  2) Define all widgets in the frames. Pack them.
##
##  3) Define keyboard or mouse action BINDINGS, if needed.
##
##  4) Define PROCS, if needed.
##
##  5) Additional GUI INITIALIZATION (with procs), if needed.
##
##
## Some detail about the code structure of this particular script:
##
##  1a) Define ALL frames:
##
##      Top-level :  '.fRbuttons' , '.fRimgspecs' , '.fRcan'
##
##      Sub-frames: none
##
##  1b) Pack ALL frames.
##
##  1c) Define a 'minilistbox' proc that is used to make a couple of
##      COMPACT LIST-SELECTION WIDGETS for use in step 2 below --- to serve
##      in place of the old-fashioned 'tk_optionMenu' widget, and yet
##      to avoid using a newer widget like 'spinbox' that is
##      not available to users of older 8.x wish interpreters
##      or the really-old 7.x interpreters.
##
##  2) Define all widgets in the frames (and pack them):
##
##     - In '.fRbuttons':   1 button widget ('Exit'),
##                            and
##                          3 buttons (for setting 2 disk-gradient colors and
##                                     one background color),
##                            and
##                          1 checkbutton to ask for a circle --- rather than
##                            an elliptical shape that has the aspect ratio of
##                            the canvas.
##
##     - In '.fRimgspecs': 1 'minilistbox' widget to specify the location
##                            of an apparent light reflection on the 'sphere'
##                            --- compass points such as
##                            nw, n, ne, e, se, s, sw, w, or center.
##                          1 radius 'scale' widget, to 'dynamically' change
##                            the radius of the disk/sphere.
##
##     - In '.fRcan':       1 'canvas' widget
##
##  3) Define bindings:
##
##       - button1-release on the 1 checkbutton (the 'circle' request)
##         should cause a redraw
##
##       - change of the light-location indicator --- i.e.
##         button1-release on that 'minilistbox' --- should cause a redraw
##
##    NOTE: The following 3 color changes should trigger a redraw.
##          They can probably be done in procs that are used to
##          set each of the 3 colors --- but, if the redraw is not
##          done at the end of each proc, the redraw could be done
##          via a button1-release binding on the 3 color-change buttons.
##
##       - change of either of the 2 gradient colors should cause a redraw
##         --- i.e. the commands for the 2 gradient-color-setting buttons
##         should end with a disk-redraw
##
##       - change of the background (canvas) color MAY need to cause a redraw
##         --- i.e. the command for the background-color-setting button
##         MAY need to end with a disk-redraw
##
##  4) Define procs:
##
##     - 'Gradient'        - to set the list of colors gradiating from
##                           color1 to color2 in N steps --- where N
##                           may be the number of pixels in the radius of
##                           the disk (or less than that)
##
##     - 'GradientSphere'  - to do the (re)draw
##
##     - 'set_gradient_color1'  - shows a color selector GUI and uses the
##                                user-selected color to redraw the disk on
##                                the canvas
##
##     - 'set_gradient_color2'  - shows a color selector GUI and uses the
##                                user-selected color to redraw the disk on
##                                the canvas
##
##     - 'set_color_background' - shows a color selector GUI and uses the
##                                user-selected color to reset the color of
##                                the canvas background
##
##  5) Additional GUI initialization:  Execute proc 'GradientSphere' once with
##                                     an initial, example set of parms
##                                     --- curRADIUS COLOR1hex COLOR2hex,
##                                     COLORbkGNDhex ---
##                                     to start with a gradient disk/sphere on
##                                     the canvas rather than a blank canvas.
##
##+########################################################################
## DEVELOPED WITH:
##   Tcl-Tk 8.5 on Ubuntu 9.10 (2009-october release, 'Karmic Koala').
##
##   $ wish
##   % puts "$tcl_version $tk_version"
##                                  showed   8.5 8.5   on Ubuntu 9.10
##    after Tcl-Tk 8.4 was replaced by 8.5 --- to get anti-aliased fonts.
##+#######################################################################
## MAINTENANCE HISTORY:
## Created by: Blaise Montandon 2012sep02
## Changed by: ...... ......... 2012
##+#######################################################################

##+#######################################################################
## Set general window parms (title,position,size,color-scheme,fonts,etc.).
##+#######################################################################

wm title    . "Color-Gradient 'Sphere' on a Canvas"
wm iconname . "Gradient"

wm geometry . +15+30

## We allow the window to be resizable and we pack the canvas with
## '-fill both -expand 1' so that the canvas can be enlarged by enlarging
## the window.

## If you want to make the window un-resizable,
## you can use the following statement.
# wm resizable . 0 0


##+######################################################
## Set the color scheme for the window and its widgets ---
## and set the initial color for the polygon interior
## and the canvas background (outside the polygon).
##+######################################################

tk_setPalette "#e0e0e0"

## Initialize the 2 gradient colors and the background color for the canvas.

# set COLOR1r 255
# set COLOR1g 255
# set COLOR1b 255
set COLOR1r 255
set COLOR1g 0
set COLOR1b 255
set COLOR1hex [format "#%02X%02X%02X" $COLOR1r $COLOR1g $COLOR1b]

# set COLOR2r 255
# set COLOR2g 255
# set COLOR2b 0
set COLOR2r 255
set COLOR2g 255
set COLOR2b 255
set COLOR2hex [format "#%02X%02X%02X" $COLOR2r $COLOR2g $COLOR2b]

# set COLORbkGNDr 60
# set COLORbkGNDg 60
# set COLORbkGNDb 60
set COLORbkGNDr 0
set COLORbkGNDg 0
set COLORbkGNDb 0
set COLORbkGNDhex \
    [format "#%02X%02X%02X" $COLORbkGNDr $COLORbkGNDg $COLORbkGNDb]

set listboxBKGD "#f0f0f0"


##+########################################################
## Use a VARIABLE-WIDTH FONT for label and button widgets.
##
## Use a FIXED-WIDTH FONT for listboxes (and
## entry fields, if any).
##+########################################################

font create fontTEMP_varwidth \
   -family {comic sans ms} \
   -size -14 \
   -weight bold \
   -slant roman

font create fontTEMP_SMALL_varwidth \
   -family {comic sans ms} \
   -size -10 \
   -weight bold \
   -slant roman


## Some other possible (similar) variable width fonts:
##  Arial
##  Bitstream Vera Sans
##  DejaVu Sans
##  Droid Sans
##  FreeSans
##  Liberation Sans
##  Nimbus Sans L
##  Trebuchet MS
##  Verdana

font create fontTEMP_fixedwidth  \
   -family {liberation mono} \
   -size -14 \
   -weight bold \
   -slant roman

font create fontTEMP_SMALL_fixedwidth  \
   -family {liberation mono} \
   -size -10 \
   -weight bold \
   -slant roman

## Some other possible fixed width fonts (esp. on Linux):
##  Andale Mono
##  Bitstream Vera Sans Mono
##  Courier 10 Pitch
##  DejaVu Sans Mono
##  Droid Sans Mono
##  FreeMono
##  Nimbus Mono L
##  TlwgMono


##+###########################################################
## SET GEOM VARS FOR THE VARIOUS WIDGET DEFINITIONS.
## (e.g. width and height of canvas, and padding for Buttons)
##+###########################################################

set initCanWidthPx 400
set initCanHeightPx 300
set minCanHeightPx 24

# set BDwidthPx_canvas 2
  set BDwidthPx_canvas 0


## BUTTON geom parameters:

set PADXpx_button 0
set PADYpx_button 0
set BDwidthPx_button 2


## LABEL geom parameters:

set BDwidthPx_label 2


## SCALE geom parameters:

set BDwidthPx_scale 2
set initScaleLengthPx 200


## LISTBOX geom parameters:

set listboxWIDTHchars 3


##+###################################################################
## Set a MINSIZE of the window.
##
## For width, allow for the minwidth of the '.fRbuttons' frame:
##            about 3 buttons (Exit,Color1,Color2,ColorBkgnd), and
##            1 checkboxes, and a label with current disk info.
##
## For height, allow for a canvas at least 24 pixels high, and
##             2 chars high for the scale widget height in the
##             '.fRimgspecs' frame, and
##             2 chars high for the widgets in the '.fRbuttons' frame.
##+###################################################################

set minWinWidthPx [font measure fontTEMP_varwidth \
   "Exit Color1 Color2 Background Circular (not elliptical)  Current  Colors"]

## Add some pixels to account for right-left-side window decoration
## (about 8 pixels), about 6 x 8 pixels/widget for borders/padding for
## 6 widgets --- 4 buttons and 1 checkbox and 1 label.

set minWinWidthPx [expr 56 + $minWinWidthPx]


## MIN HEIGHT ---
## for the 3 frames 'fRbuttons'  'fRimgspecs'  'fRcan'.
## Allow
##    1 char  high for 'fRbuttons'
##    2 chars high for 'fRimgspecs'
##    2 chars high for 'fRcan'

set CharHeightPx [font metrics fontTEMP_varwidth -linespace]

set minWinHeightPx [expr $minCanHeightPx + 5 * $CharHeightPx]

## Add about 28 pixels for top-bottom window decoration,
## about 3x8 pixels for each of the 3 stacked frames and their
## widgets (their borders/padding).

set minWinHeightPx [expr $minWinHeightPx + 52]


## FOR TESTING:
#   puts "minWinWidthPx = $minWinWidthPx"
#   puts "minWinHeightPx = $minWinHeightPx"

wm minsize . $minWinWidthPx $minWinHeightPx


##+################################################################
## DEFINE *ALL* THE FRAMES:
##
##   Top-level : 'fRbuttons'  '.fRimgspecs'  'fRcan'
##
##   Sub-frames: none
##+################################################################

# set BDwidth_frame 2
  set BDwidth_frame 0

# set RELIEF_frame raised
  set RELIEF_frame flat


frame .fRbuttons   -relief $RELIEF_frame  -borderwidth $BDwidth_frame

frame .fRimgspecs  -relief raised         -borderwidth 2

frame .fRcan       -relief $RELIEF_frame  -borderwidth $BDwidth_frame


##+##############################
## PACK the top-level FRAMES.
##+##############################

pack .fRbuttons \
     .fRimgspecs \
      -side top \
      -anchor nw \
      -fill x \
      -expand 0

pack .fRcan \
      -side top \
      -anchor nw \
      -fill both \
      -expand 1


##+#########################
## DEFINE PROC 'minilistbox'
## (for use in making a couple of widgets below)
##+##############################################################
## By using the global variables
##          - fontTEMP_SMALL_fixedwidth
##          - fontTEMP_SMALL_varwidth
##          - listboxBKGD
##          - listboxWIDTHchars
## for the decorative & geometric elements/parameters of the GUI,
## we keep the arguments of this widget-made-on-the-fly down
## to the 5 MAIN ELEMENTS/VARIABLES --- 3 INPUT AND 1 OUTPUT AND 1 CMD:
##
## - the parent widget/window,
##
## - an option/line at which to initially position the list in
##   the listbox (with the 'see' command),
##
## - an options list,
##
## - the name of the variable that is to hold the user-selected option,
##   i.e. a list-line (the result/output)
##   --- retrieved from the listbox with 'curselection' and 'get',
##
## - a command (proc --- and parameters, if any) to be executed at a
##   button1-release on this widget's frame.
##+##############################################################

proc minilistbox {w opt1 optslist listboxWIDTHchars seloptvar mlbProc} {

   global fontTEMP_SMALL_fixedwidth fontTEMP_SMALL_varwidth \
          listboxBKGD

   ##+#####################################
   ## DEFINE-and-PACK the widget SUB-FRAMES:
   ## '.frup-down' for 2 up and down buttons
   ## and '.fRopts' for the listbox.
   ## Pack them side by side.
   ##+#####################################

   frame $w.fRup-down -relief flat -bd 2
   frame $w.fRopts    -relief flat -bd 2

   pack $w.fRup-down \
        $w.fRopts \
      -side left \
      -anchor w \
      -fill y \
      -expand 0


   ##+####################################################
   ## In FRAME '.fRup-down',
   ## DEFINE-and-PACK a top-spacer label and 2 buttons.
   ##+####################################################

   ## We comment-out this label definition (and its pack statement)
   ## to reduce the height of this 'minilistbox' widget.
   ## See the label definition statement for frame .fRopts, below.
   # label $w.fRup-down.label \
   #    -text " " \
   #    -anchor w \
   #    -relief flat

   button $w.fRup-down.buttUP \
      -text "Up" \
      -font fontTEMP_SMALL_varwidth \
      -width 3 -height 1 \
      -pady 1 \
      -padx 0 \
      -command [list $w.fRopts.listbox yview scroll -1 unit]

   button $w.fRup-down.buttDOWN \
      -text "Dwn" \
      -width 3  -height 1 \
      -font fontTEMP_SMALL_varwidth \
      -pady 1 \
      -padx 0 \
      -command [list $w.fRopts.listbox yview scroll +1 unit]

   # pack $w.fRup-down.label \
   #   -side top \
   #   -anchor n \
   #   -fill none \
   #   -expand 0

   pack $w.fRup-down.buttUP \
        $w.fRup-down.buttDOWN \
      -side top \
      -anchor n \
      -fill none \
      -expand 0


   ##+####################################################
   ## In FRAME '.fRopts',
   ## DEFINE-and-PACK an info label and a listbox widget.
   ##+####################################################

   ## We comment-out this label definition (and its pack statement)
   ## to reduce the height of this 'minilistbox' widget.
   ## The user could supply a label, say to the left of this
   ## 'minilistbox' widget, using a label-def in their Tk script.
   # label $w.fRopts.label \
   #   -text "Up/dwn ; click a line:" \
   #   -font fontTEMP_SMALL_varwidth \
   #   -anchor w \
   #   -relief flat

   listbox $w.fRopts.listbox \
      -font fontTEMP_SMALL_fixedwidth \
      -height 3 \
      -width $listboxWIDTHchars \
      -bg "$listboxBKGD" \
      -state normal

   foreach optline $optslist {
      $w.fRopts.listbox insert end $optline
   }

   # pack $w.fRopts.label \
   #   -side top \
   #   -anchor n \
   #   -fill x \
   #   -expand 0

   pack $w.fRopts.listbox \
      -side top \
      -anchor n \
      -fill x \
      -expand 0


   ##+###################################################
   ## POSITION the list at the 'opt1' line, using 'see'.
   ##   And make the opt1 line the default selection. (?)
   ##+###################################################

   set INDEXofOPT1 [ lsearch -exact $optslist $opt1 ]

   if { "$INDEXofOPT1" != "-1" } {

      set seeINDEX [expr $INDEXofOPT1 - 1 ]
      if { "$seeINDEX" < "0" } {
         set seeINDEX "0"
      }

      $w.fRopts.listbox see $seeINDEX

      ## Comment this to de-activate it?
      $w.fRopts.listbox selection set $INDEXofOPT1

   }
   ## END OF if { "$INDEXofOPT1" != "-1" }


   ##+########################################################
   ## PROC for the following button1-release BINDING:  getline
   ##+########################################################

   proc getline {w outvar passedproc} {

      ## This 'upvar' associates the local var 'selectline' with
      ## the outer var that is to contain the listbox selection.
      ## It is like an EQUIVALENCE statement in FORTRAN.
      upvar #0 $outvar selectline

      set sel_index [ $w.fRopts.listbox curselection ]

      ## FOR TESTING:
      #  puts "sel_index: $sel_index"

      if { $sel_index != "" } {
         set selectline [ $w.fRopts.listbox get $sel_index ]
      } else {
         set selectline ""
      }

      eval set $outvar "$selectline"

      ## FOR TESTING:
      #   puts "selectline: $selectline"
      ##   puts "LIGHTloc: $LIGHTloc"
      ##   puts "theta0deg: $theta0deg"
      #   puts "outvar: [expr \$$outvar]"


      eval $passedproc
   }
   ## END OF proc getline


   ##+#####################################################
   ## SET BINDING on the listbox in this new-widget so that
   ##         <ButtonRelease-1> puts a selected line of the
   ##        listbox in a specified var and executes a
   ##        specified command/proc.
   ##+#####################################################

   bind  $w.fRopts.listbox <ButtonRelease-1> "getline $w $seloptvar \"$mlbProc\""

}
## END OF 'minlistbox' PROC


##+#########################################################
## OK. Now we are ready to define the widgets in the frames.
##+#########################################################


##+#####################################################################
## In the '.fRbuttons' FRAME  ---  DEFINE-and-PACK
##    - an exit-button,
## and
##    - 3 buttons ( to specify 3 colors)
## and
##   - a CHECKBUTTON (to request a CIRCLE, rather than an ellipse)
##+#####################################################################

button .fRbuttons.buttEXIT \
   -text "Exit" \
   -font fontTEMP_varwidth \
   -padx $PADXpx_button \
   -pady $PADYpx_button \
   -relief raised \
   -bd $BDwidthPx_button \
   -command {exit}

button .fRbuttons.buttCOLOR1 \
   -text "\
Gradient
Color1" \
   -font fontTEMP_varwidth \
   -padx $PADXpx_button \
   -pady $PADYpx_button \
   -relief raised \
   -bd $BDwidthPx_button \
   -command {set_gradient_color1}

button .fRbuttons.buttCOLOR2 \
   -text "\
Gradient
Color2" \
   -font fontTEMP_varwidth \
   -padx $PADXpx_button \
   -pady $PADYpx_button \
   -relief raised \
   -bd $BDwidthPx_button \
   -command {set_gradient_color2}

button .fRbuttons.buttCOLORbkGND \
   -text "\
Background
Color" \
   -font fontTEMP_varwidth \
   -padx $PADXpx_button \
   -pady $PADYpx_button \
   -relief raised \
   -bd $BDwidthPx_button \
   -command {set_background_color}


set CIRCULARellipse 1

checkbutton .fRbuttons.chkbuttCIRCLE \
   -text "\
Circle (not
ellipse)" \
   -font  fontTEMP_varwidth \
   -variable CIRCULARellipse \
   -selectcolor "#cccccc" \
   -relief raised

label .fRbuttons.labelPARMS \
   -text "" \
   -font fontTEMP_SMALL_varwidth \
   -justify left \
   -anchor w \
   -relief flat \
   -bd $BDwidthPx_button


##+###########################################
## Pack the widgets in the 'fRbuttons' frame.
##+###########################################

pack .fRbuttons.buttEXIT \
     .fRbuttons.buttCOLOR1 \
     .fRbuttons.buttCOLOR2 \
     .fRbuttons.buttCOLORbkGND \
     .fRbuttons.chkbuttCIRCLE \
     .fRbuttons.labelPARMS \
      -side left \
      -anchor w \
      -fill none \
      -expand 0


##+##################################################################
## In the '.fRimgspecs' FRAME ----  DEFINE-and-PACK
##   - a LABEL widget
##   - a 'minilistbox' widget for lighting-location on the sphere/disk
##   - a LABEL widget
##   - a SCALE widget, for radius of the rounded corners/points
##+###################################################################

label .fRimgspecs.labelLighting \
   -text "\
Light-Reflection Location
    on the Sphere/disk" \
   -font fontTEMP_SMALL_varwidth \
   -justify left \
   -anchor w \
   -relief flat \
   -bd $BDwidthPx_button


## DEFINE the 'minilistbox' widget for light-reflection location
## on the sphere/disk.

frame .fRimgspecs.fRlightloc -relief flat -bd 0
set LIGHTlocs { nw n ne e se s sw w center }
set LIGHTloc nw
minilistbox .fRimgspecs.fRlightloc $LIGHTloc $LIGHTlocs 6 LIGHTloc "ReDraw 0"


##+################################
## DEFINE the radius 'scale' widget
## including a 'label' widget.
##+################################

## Set the init value for the radius-scale  var.

set curRADIUS 100

## Set the MAX UNITS for the radius-scale,
## i.e. the upper limit of the range of values,

# set scaleMaxUnits 200
  set scaleMaxUnits [expr $initCanWidthPx / 2]
# set scaleMaxUnits [expr [winfo height .] / 2]
# set scaleMaxUnits [expr [winfo height .fRcan.can] / 2]

## Define a label widget to precede the radius-scale,
## followed by the scale:

label .fRimgspecs.labelSCALE1 \
   -text "\
\ \ \ Radius (in pixels) for
     the disk/sphere:" \
   -font fontTEMP_varwidth \
   -justify left \
   -anchor w \
   -relief flat \
   -bd $BDwidthPx_button

scale .fRimgspecs.scale1 \
   -orient horizontal \
   -digits 0 \
   -from 0 -to $scaleMaxUnits \
   -length $initScaleLengthPx \
   -variable curRADIUS \
   -command "ReDraw"

## PACK the widgets of FRAME .fRimgspecs ---
## label ; minilistbox-frame ; label ; minilistbox-frame ; label ; scale

pack .fRimgspecs.labelLighting \
     .fRimgspecs.fRlightloc \
     .fRimgspecs.labelSCALE1 \
      -side left \
      -anchor w \
      -fill none \
      -expand 0

pack .fRimgspecs.scale1 \
      -side left \
      -anchor w \
      -fill x \
      -expand 1


##+######################################################
## DEFINE-and-PACK the 'canvas' widget
## in the '.fRcan' FRAME
##+######################################################

canvas .fRcan.can \
   -width $initCanWidthPx \
   -height $initCanHeightPx \
   -relief raised \
   -borderwidth $BDwidthPx_canvas

pack .fRcan.can \
   -side top \
   -anchor nw \
   -fill both \
   -expand 1


##+########################################
## END OF the DEFINITION OF THE GUI WIDGETS
##+########################################


##+###############################
## BINDINGS SECTION:
##+###############################

bind . <Configure> "ReDraw 0"

bind .fRbuttons.chkbuttCIRCLE <ButtonRelease-1> "ReDraw 0"


##+######################################################################
## PROCS SECTION:
##
##  - ReDraw            - Called in the radius-scale '-command' and
##                        in several bindings.
##
##                        Sets the light x,y coords (in -1 to +1) from
##                        the LIGHTloc var (compass points). Then
##                        calls 'GradientSphere' and provides it about
##                        9 parameters.
##
##  - GradientSphere    - called by ReDraw
##
##  - Gradient          - called by GradientSphere
##
##  - set_gradient_color1   - called by color1 button '-command'
##  - set_gradient_color2   - called by color2 button '-command'
##  - set_background_color  - called by background color button '-command'
##
##+#######################################################################


##+#####################################################################
## proc ReDraw -
##
## PURPOSE:
##     Sets the light x,y coords (in -1 to +1) from the
##     LIGHTloc var (compass points).
##     Then calls 'GradientSphere' and provides it about 9 parameters.
##
## CALLED BY:  the radius-scale '-command' and in a couple of bindings
##             (a button1-release on a checkbutton and a window-reconfig
##              binding) and 3 set-color procs.
##
## NOTE: The 'x' argument is to avoid an error when the scale '-command'
##       passes a scale value as an argument to the command.
##       If we ever wanted to try doing the disk redraws 'dynamically'
##       as the scale sliderbar is dragged, we could use 'x' as the
##       current radius of the disk.
##+#####################################################################

proc ReDraw {x} {

   global curRADIUS LIGHTloc COLOR1hex COLOR2hex CIRCULARellipse

   if { $CIRCULARellipse != 1 } {
      set OFFset 0.25
   } else {
      set OFFset 0.5
   }

   # if { $LIGHTloc == "nw" } {
      set LIGHTx -$OFFset
      set LIGHTy -$OFFset
   # }

   if { $LIGHTloc == "n" } {
      set LIGHTx  0.0
      set LIGHTy -$OFFset
   }

   if { $LIGHTloc == "ne" } {
      set LIGHTx  $OFFset
      set LIGHTy -$OFFset
   }

   if { $LIGHTloc == "e" } {
      set LIGHTx  $OFFset
      set LIGHTy  0.0
   }

   if { $LIGHTloc == "se" } {
      set LIGHTx  $OFFset
      set LIGHTy  $OFFset
   }

   if { $LIGHTloc == "s" } {
      set LIGHTx  0.0
      set LIGHTy  $OFFset
   }

   if { $LIGHTloc == "sw" } {
      set LIGHTx -$OFFset
      set LIGHTy  $OFFset
   }

   if { $LIGHTloc == "w" } {
      set LIGHTx -$OFFset
      set LIGHTy  0.0
   }

   if { $LIGHTloc == "center" } {
      set LIGHTx  0.0
      set LIGHTy  0.0
   }

   .fRcan.can delete gradient

   GradientSphere .fRcan.can \
      [expr [winfo width .fRcan.can] / 2] \
      [expr [winfo height .fRcan.can] / 2] \
      $curRADIUS $LIGHTx $LIGHTy \
      $COLOR1hex $COLOR2hex $curRADIUS

   .fRbuttons.labelPARMS configure -text "\
Colors:
 1-Disk - $COLOR1hex ,  2-Lighting - $COLOR2hex"

}
## END OF proc 'ReDraw'


##+#####################################################################
## proc GradientSphere {c Ox Oy radius Lx Ly color1 color2 {csteps {}}}
##
## Description of the arguments:
##
## c:              canvas to use
## Ox,Oy, radius:  center and radius of sphere in pixels)
## Lx,Ly:          where light source hits and is a position in a -1,-1 to 1,1 box
##                 which is mapped onto the bounding box of the sphere
## color1, color2: outer and inner colors for the gradient
## csteps:         how many colors to use, defaults to radius
##
##+#####################################################################

proc GradientSphere {c Ox Oy radius Lx Ly color1 color2 {csteps {}}} {

   global CIRCULARellipse

   if {$csteps eq {}} {set csteps $radius}
   set clrs [Gradient $csteps $color1 $color2]

   if { $CIRCULARellipse != 1 } {
      set canWidthPx  [winfo width .fRcan.can]
      set canHeightPx [winfo height .fRcan.can]
      set canAspectYX [expr $canHeightPx / double($canWidthPx)]
   } else {
      set canAspectYX 1.0
   }

   ## FOR TESTING:
   #   puts "canAspectYX: $canAspectYX"

   for {set i 0} {$i < $radius} {incr i} {
        set x [expr {$Ox + $i * $Lx}]           ;# Center of shrinking circle
        set y [expr {$Oy + $i * $Ly}]
        set x0 [expr {$x - ($radius - $i)}]     ;# BBox of shrinking circle
        set y0 [expr {$y - (($radius - $i) * $canAspectYX)}]
        set x1 [expr {$x + ($radius - $i)}]
        set y1 [expr {$y + (($radius - $i) * $canAspectYX)}]
        set idx [expr {round($csteps * $i / double($radius))}]
        set clr [lindex $clrs $idx]

        $c create oval $x0 $y0 $x1 $y1 -tag gradient -fill $clr -outline $clr
   }


}
## END OF proc GradientSphere


##+########################################################################
## proc Gradient {n clr1 clr2}
##+########################################################################

proc Gradient {n clr1 clr2} {

   foreach {r1 g1 b1} [winfo rgb . $clr1] {r2 g2 b2} [winfo rgb . $clr2] break

   set n [expr {$n <= 1 ? 1 : double($n - 1)}]
   set gradient {}
   for {set i 0} {$i <= $n} {incr i} {
        set r [expr {int(($r2 - $r1) * $i / $n + $r1) * 255 / 65535}]
        set g [expr {int(($g2 - $g1) * $i / $n + $g1) * 255 / 65535}]
        set b [expr {int(($b2 - $b1) * $i / $n + $b1) * 255 / 65535}]
        lappend gradient [format "#%.2x%.2x%.2x" $r $g $b]
   }

   return $gradient
}
## END OF proc Gradient


##+#####################################################################
## proc 'set_gradient_color1'
##+#####################################################################
## PURPOSE:
##
##   This procedure is invoked to get an RGB triplet
##   via 3 RGB slider bars on the FE Color Selector GUI.
##
##   Uses that RGB value to set color1 of the 2 colors for a
##   sequence of circles changing from color1 to color2.
##
## Arguments: none
##
## CALLED BY:  .fRbuttons.buttCOLOR1  button
##+#####################################################################

proc set_gradient_color1 {} {

   global COLOR1r COLOR1g COLOR1b COLOR1hex curRADIUS curRADIUSevenVerts
   # global feDIR_tkguis

   ## FOR TESTING:
   #    puts "COLOR1r: $COLOR1r"
   #    puts "COLOR1g: $COLOR1g"
   #    puts "COLOR1b: $COLOR1b"

   set TEMPrgb [ exec \
       ./sho_colorvals_via_sliders3rgb.tk \
       $COLOR1r  $COLOR1g $COLOR1b]

   #   $feDIR_tkguis/sho_colorvals_via_sliders3rgb.tk \

   ## FOR TESTING:
   #    puts "TEMPrgb: $TEMPrgb"

   if { "$TEMPrgb" == "" } { return }

   scan $TEMPrgb "%s %s %s %s" r255 g255 b255 hexRGB

   set COLOR1hex "#$hexRGB"
   set COLOR1r $r255
   set COLOR1g $g255
   set COLOR1b $b255

   ## Call proc GradientSphere to redraw the geometry in the new interior color.

   ReDraw 0

}
## END OF proc 'set_gradient_color1'


##+#####################################################################
## proc 'set_gradient_color2'
##+#####################################################################
## PURPOSE:
##
##   This procedure is invoked to get an RGB triplet
##   via 3 RGB slider bars on the FE Color Selector GUI.
##
##   Uses that RGB value to set color2 of the 2 colors for a
##   sequence of circles changing from color1 to color2.
##
## Arguments: none
##
## CALLED BY:  .fRbuttons.buttCOLOR1  button
##+#####################################################################

proc set_gradient_color2 {} {

   global COLOR2r COLOR2g COLOR2b COLOR2hex curRADIUS curRADIUSevenVerts
   # global feDIR_tkguis

   ## FOR TESTING:
   #    puts "COLOR2r: $COLOR2r"
   #    puts "COLOR2g: $COLOR2g"
   #    puts "COLOR2b: $COLOR2b"

   set TEMPrgb [ exec \
       ./sho_colorvals_via_sliders3rgb.tk \
       $COLOR2r  $COLOR2g $COLOR2b]

   #   $feDIR_tkguis/sho_colorvals_via_sliders3rgb.tk \

   ## FOR TESTING:
   #    puts "TEMPrgb: $TEMPrgb"

   if { "$TEMPrgb" == "" } { return }

   scan $TEMPrgb "%s %s %s %s" r255 g255 b255 hexRGB

   set COLOR2hex "#$hexRGB"
   set COLOR2r $r255
   set COLOR2g $g255
   set COLOR2b $b255

   ## Call proc GradientSphere to redraw the geometry in the new interior color.

   ReDraw 0

}
## END OF proc 'set_gradient_color2'


##+#####################################################################
## proc 'set_background_color'
##+#####################################################################
## PURPOSE:
##
##   This procedure is invoked to get an RGB triplet
##   via 3 RGB slider bars on the FE Color Selector GUI.
##
##   Uses that RGB value to set the color of the canvas ---
##   on which all the tagged items (ovals and rectangles) lie.
##
## Arguments: none
##
## CALLED BY:  .fRbuttons.buttCOLORbkGND  button
##+#####################################################################

proc set_background_color {} {

   global COLORbkGNDr COLORbkGNDg COLORbkGNDb COLORbkGNDhex
   # global feDIR_tkguis

   ## FOR TESTING:
   #    puts "COLORbkGNDr: $COLORbkGNDr"
   #    puts "COLORbkGNDg: $COLORbkGNDb"
   #    puts "COLORbkGNDb: $COLORbkGNDb"

   set TEMPrgb [ exec \
       ./sho_colorvals_via_sliders3rgb.tk \
       $COLORbkGNDr  $COLORbkGNDg $COLORbkGNDb]

   #   $feDIR_tkguis/sho_colorvals_via_sliders3rgb.tk \

   ## FOR TESTING:
   #    puts "TEMPrgb: $TEMPrgb"

   if { "$TEMPrgb" == "" } { return }

   scan $TEMPrgb "%s %s %s %s" r255 g255 b255 hexRGB

   set COLORbkGNDhex "#$hexRGB"
   set COLORbkGNDr $r255
   set COLORbkGNDg $g255
   set COLORbkGNDb $b255

   ## Set the color of the canvas.

   .fRcan.can config -bg $COLORbkGNDhex

}
## END OF proc 'set_background_color'


##+#####################################################
## Additional GUI initialization, if needed (or wanted).
##+#####################################################

ReDraw 0

.fRcan.can config -bg $COLORbkGNDhex
Here is an image that shows how one can get a 'squashed' 'sphere' by un-checking the 'Circle (not ellipse)' checkbox.
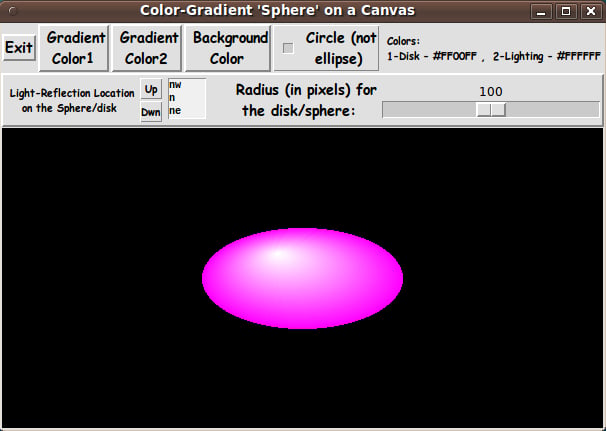
It appears that one could make some interesting 'bullet' and icon-background images with this utility.
To quote Vetter, from his Gradient Spheres page:
"For a game I'm writing, I needed sphere-shaped playing pieces. I grabbed some images off the web but I had trouble when I made the background transparent --- the edges just looked horrible.
So I decided to create my own. It draws a series of shrinking circles, each slightly offset from the previous and with colors from a gradient.
The result looks (sort of) like a sphere with an offset light source."
I too have had problems finding sphere-like images which are usable after their solid-color background is made transparent --- because the edge of the 'sphere' turns out to be a blend of an original (unwanted) background color and the spherical image color(s).
With the Tk script on this page, I have more control over how the boundary of the disk and the background is made --- in particular, control over their colors.
_____________________________________________________________________
Now I have ANOTHER tool with which to make some images (bullets or icon backgrounds or whatever) for use in decorating Tk GUI's --- and decorating web pages.
Thanks to KPV for his many contributions to this site. In particular, his 'GradientSphere' and 'Gradient' procs allowed me to spend most of my time on coding and testing the GUI features and relatively little time on the mathematical implementation.
____________________________________________________________________
For those who do not like the fonts used on the buttons and labels of this GUI, I should point out that one could add a 'Font' button (or two) on the GUI --- to change the variable-width font used on the buttons and labels. (A second Font button could be used to change the 'SMALL' font used on some of the labels and buttons.)
The 'Font' button(s) could call on the font-selector script presented on the page YAFSG - Yet Another Font Selector GUI --- just like an external color-selector script is being used for the 3 color-select buttons on this GUI.