GUI for Drawing 'Superformula' shapes, with choice of colors
uniquename - 2012sep06
I am interested in making nice images for 'toolchest' and 'drawer' backgrounds (and other GUI embellishments), as I have indicated at Experiments in making embellished GUI's and at A color-gradient-button-maker GUI.
In doing some searches on this wiki with keywords including 'canvas', I ran across the Superformula page of Gerard Sookahet. I assembled the code from that page and was struck by the variety of shapes it can make with simple slider bar changes --- shapes like many-pointed stars, strange stars, starfish, petals, and snowflakes.
It struck me that I might find some use for such images in the future --- for unusual 'bullet' images and icon backgrounds --- for use in Tk GUI's or in web pages.
Here is an image of Sookahet's GUI.
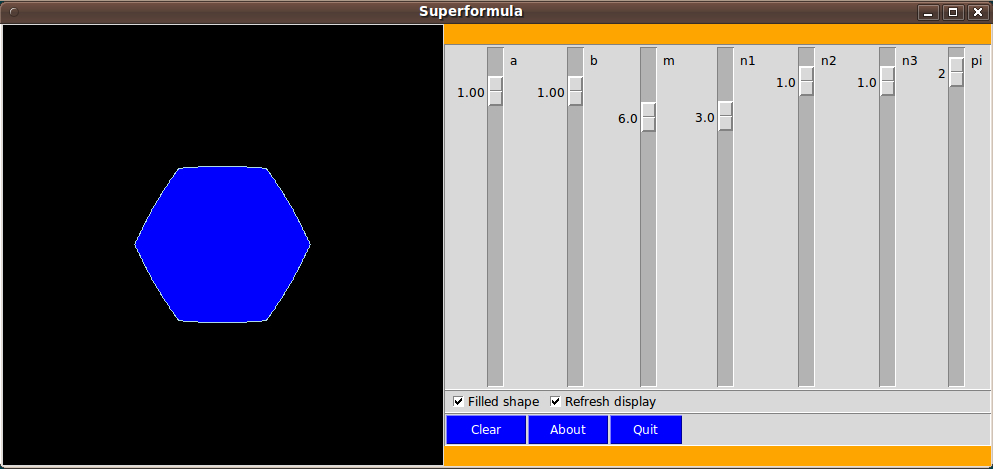
I found in using the GUI that some of the sliderbars, in the middle of his grouping, were more natural to try first, to start a basic shape.
Furthermore, small changes in some of the sliders would result in huge changes in the 'superformula' shape.
In other words, I found that it might be helpful to change the order of the sliders, and to give some guidance in using them.
Another feature that I would like to have is the ability to change the three colors on the canvas --- the 'fill' color and the 'outline' color of the shape --- and the background color (the canvas color).
Furthermore, Sookahet's script makes the 'superformula' shape by using a 400-sided polygon. I thought it would be nice to have a sliderbar that allows the user to change the value N for the number of equi-angular wedges to be used to make the polygon.
Having those goals in mind, I ended up with a GUI that looks like this.
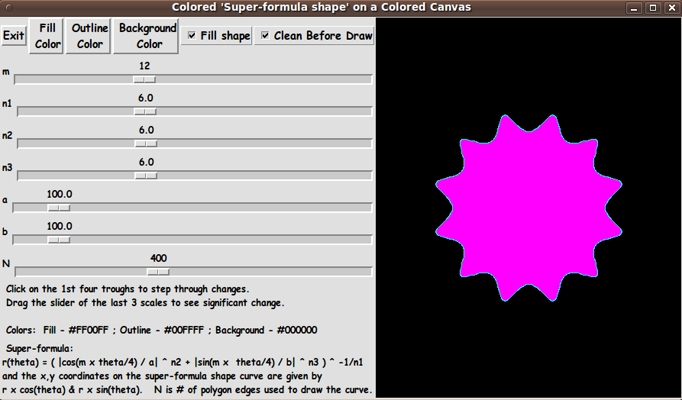
And here is a link [L1 ] to the full-sized image.
Note that I have supplied 3 buttons on the GUI with which to set the 'fill', 'outline', and 'background' colors in the canvas. Those 3 buttons call on a color-selector-GUI script to set those colors. You can make that color-selector script by cutting-and-pasting the code from the page A non-obfuscated color selector GUI on this site.
_____________________________________________________________________
Below is the code that produced this GUI.
In a comments section titled 'SOME NOTES ON THE FORMULA PARAMETERS', I have put some observations on the 6 superformula parameters --- what kind of changes to the superformula-shape you can expect for certain values and value combinations.
There are also comments above the sample code, in a section titled 'USING THE GENERATED IMAGE', that describe how one could make use of images produced by this GUI.
I follow my usual 'canonical' structure for Tk code, for this Tk script:
  0) Set general window & widget parms (win-name, win-position,
     win-color-scheme, fonts, widget-geometry-parms, win-size-control).

  1) Define ALL frames (and sub-frames).  Pack them.

  2) Define & pack all widgets in the frames.

  3) Define keyboard or mouse action BINDINGS, if needed.

  4) Define PROCS, if needed.

  5) Additional GUI initialization (typically with one or more of
     the procs), if needed.
This structure is discussed in more detail on the page A Canonical Structure for Tk Code --- and variations.
This structure makes it easy for me to find code sections --- while generating and testing a Tk script, and when looking for code snippets to include in Tk scripts (code re-use).
_________________________________________________________________
As in all my scripts that use the 'pack' geometry manager (which is all of my scripts, so far), I provide the four main pack parameters --- '-side', '-anchor', '-fill', and '-expand' --- on all the 'pack' commands for the frames and widgets.
I think I have found a good setting of the '-side', '-anchor', '-fill', and '-expand' parameters on the 'pack' commands for the various widgets. In particular ...
The 'canvas' widget expands/contracts appropriately when the window size is changed --- and button and label widgets stay fixed in size and relative-location as the window size is changed.
If anyone wants to change the way the GUI configures itself as the main window size is changed, they can experiment with the '-side', '-anchor', '-fill', and '-expand' parameters on the 'pack' commands for the various widgets --- to get the widget behavior that they want.
_____________________________________________________________________
That said, here's the code --- with plenty of comments to describe what most of the code-sections are doing.
The 'ReDraw' proc is based on GS's 'PlotSuperformula' proc.
I have added some comments in the 'ReDraw' proc that explain some of the steps in calculating the 'superformula'. The comments might help Tcl-Tk coding 'newbies' who might just give up if the code looked too cryptic.
Code for the Tk script 'draw_superformulaShape_colorFilled_onColorBkgnd.tk' :
#!/usr/bin/wish -f
##
## SCRIPT: draw_superformulaShape_colorFilled_onColorBkgnd.tk
##
##
## PURPOSE:  This Tk GUI script facilitates the creation of a color-filled
##           'super-formula' shape --- via polygons drawn on a canvas widget
##            --- where the canvas widget has a given (background) color.
##
##           This Tk script is based on a Tk script at the web page
##           called 'Superformula' at https://wiki.tcl-lang.org/12977 ---
##           by  Gerard Sookahet in 2004 November.  On that page, GS points
##           out that the equation for the 'super-formula' is:
##
##    r(theta) = ( |cos(m*theta/4)/a| ^ n2 + |sin(m*theta/4)/b| ^ n3 ) ^ -1/n1
##
## GS points out:
## "Superformula was proposed by Johan Gielis (a Belgian botanist) in 1997.
##  He has modified and generalized the superellipse formula discovered by
##  Gabriel Lamé in 1818 (a French mathematician). Superformula consists in
##  a simple 2D analytical expression allowing to draw a wide variety of
##  geometric and natural shapes (starfish, petals, snowflakes) by choosing
##  suitable values relevant to few parameters."
##
##+####################################
## SOME NOTES ON THE FORMULA PARAMETERS:
##
##  Note that 'm' generates protrusions/intrusions on the shape.
##  As theta goes from 0 to 2*pi in the formula above, and if m=2,
##  the angle m*theta/4 goes from 0 to pi --- one 'hump' of a sine
##  or cosine curve. In general, if m = 2*n, then there will be
##  (at least) n protrusions/intrusions.
##
##  We will make the 'm' scale the first on the left, since it
##  fundamentally changes the shape.
##
##  By some experimenting with the GUI, one finds
##  that if  'a' and  'b' are kept equal
##  and  if 'n2' and 'n3' are kept equal,
##  the shape will tend to be symmetric.
##  This makes sense by looking at the formula above.
##
##  We will make changing the 'a'  scale make the 'b'  scale change with it.
##  We will make changing the 'n2' scale make the 'n3' scale change with it.
##  Then the user can change the 'b' and 'n3' scales to make them
##  different from the 'a' and 'n2' scales, resp.
##
##  Note that the numerators of the 2 terms in absolute value marks (and
##  raised to the exponents n2 and n3) are sin and cos which have a max
##  value of 1. If n1 = n2 = n3 = 2 and a = b, for example, then the
##  formula looks like
##    r = ( |cos(...)/a| ^ 2 + |sin(...)/a| ^ 2 ) ^ -1/2
##  And the fundamental trigonometric identity
##          cos(...) ^ 2 + sin (...) ^ 2 = 1
##  allows us to simplify this to
##    r = (a ^ -2) ^ -1/2 = a
##  So for r(theta) to be on the order of 200 (pixels), the denominators
##  (a and b) will generally need to be on the order of 200 --- when
##  n1 = n2 = n3 = 2 and a = b.
##
##  Note that when n1 = 4, then the last equation above becomes
##    r = (a ^ -2) ^ -1/4 = a ^ 1/2 = sqrt( a )
##  So  (when a & b > 1) the bigger n1 becomes, the smaller the radius becomes.
##  And (when a & b < 1) the bigger n1 becomes, the larger the radius becomes
##  (but it is less than 1).
##  So n1 can be used to zoom in/out of the view of the image/shape.
##
##  If we look at the 'resolution' and range of the scales and
##  initial values in the Gerard Sookahet demo code, we see:
##       Resolution   From   To   Initial Value
##       ----------   ----  ----  -------------
##  m  -     0.2       0     34      6.0
##  n1 -     0.1       0.1   17      3.0
##  n2 -     0.1       0     17      1.0
##  n3 -     0.1       0     17      1.0
##  a  -    0.01      0.1    10      1.0
##  b  -    0.01      0.1    10      1.0
##
##   (We will change resolution of 'm' to 2.0 --- to avoid 'cusps' from
##    appearing on the right of the shape, at theta = 0, as the m-scale
##    sliderbar is moved.
##    The shape should then remain smooth --- no partial humps with
##    sharp-pointed 'drop-offs' --- as 'm' is changed.)
##
##+#######
## METHOD:   The GUI made by this Tk script contains a rectangular
##           canvas widget on which the color-filled superformula shape
##           will be drawn.
##
##           The GUI includes 6 'scale' widgets whose slider-bars can
##           be used to change the values of m, n1, n2, n3, a, and b.
##
##           The GUI also includes a button to call a color selector GUI
##           to set the 'fill' color of the super-formula shape.
##
##           Another button is used to call the same color selector GUI
##           to set the 'outline' color of the super-formula shape.
##
##           Another button calls the same color selector GUI to set a
##           background color --- the color of the canvas.
##
##           A checkbutton widget allows the user to specify whether
##           the polygon should be filled with a color (other than the
##           background color) --- i.e. whether only an outline should be
##           drawn.
##
##           A redraw includes clearing the canvas and redrawing the series
##           of lines that make up a polygon that approximates the
##           super-formula shape.
##
##           A checkbutton widget allows the user to specify whether
##           the canvas should be cleared before a redraw.
##
##           A redraw should be done (a) whenever any of the 6 scales change,
##           (b) whenever a color button is used to change a color,
##           (c) whenever the fill checkbutton is clicked, and (d) whenever
##           the window (and thus the canvas) is resized --- so that the
##           image/shape will be redrawn in the center of the canvas.
##
##       (Like G. Sookahet, we break up 360 degrees into N=400 angles to draw
##        the shape with a polygon of 400 edges. We have added a scale widget
##        to set N. The user can experiment to see how many 'wedges' are needed
##        to make a smooth shape --- AND the user can see when the redraws
##        become slowed down too much by large N. Amazingly, even a
##        thousand-edged polygon can be calculated within a fraction of a
##        second --- even when fractional exponentials are being calculated
##        via the Tcl 'pow' function.
##
##        In testing, I found that if the redraw is done 'dynamically' with
##        the '-command' option of the 'scale' widget, a redraw seems to be
##        done as the GUI is initially built --- a redraw for each scale
##        widget. To eliminate this extraneous processing, I have defined
##        a button1-release binding on each of the scale widgets to
##        trigger the redraw --- only when the user finishes dragging
##        the sliderbar of any scale.
##
##        However, it should be pointed out that as long as erasing the
##        canvas and calculating-redrawing the super-formula shape completes
##        within a small fraction of a second, it is feasible to do the redraws
##        'dynamically' with each sliderbar, via the '-command' option.)
##
## USING THE GENERATED IMAGE:
##           A screen/window capture utility (like 'gnome-screenshot'
##           on Linux) can be used to capture the GUI image in a GIF
##           or PNG file, say.
##
##           If necessary, an image editor (like 'mtpaint' on Linux)
##           can be used to crop the window capture image.  The image
##           could also be down-sized --- say to make a 'bullet' image
##           file or an icon image file.
##
##           The editor could also be used to blur the image slightly to
##           'feather' the edges of the polygon.
##
##           The colored image file could be used with a utility (like the
##           ImageMagick 'convert' command) to change the outer, background
##           color to TRANSPARENT, making a partially transparent GIF
##           (or PNG) file. Then the semi-transparent image file could be used,
##           for 'bullets' in HTML pages or in Tk GUI's --- or for the
##           background of icons or buttons for use in GUIs.
##
##           The image could also be taken into a scalable vector graphics
##           (SVG) editor (like Inkscape on Linux) and the SVG editor used
##           to add anti-aliased text to the image. OR, the shape can be
##           used as an underlying pattern to reproduce the shape as a
##           scalable shape, by using curve drawing tools of the editor.
##
##+########################################################################
## 'CANONICAL' STRUCTURE OF THIS TK CODE:
##
##  0) Set general window & widget parms (win-name, win-position,
##     win-color-scheme, fonts, widget-geometry-parms, win-size-control).
##
##  1) Define ALL frames (and sub-frames).  Pack them.
##
##  2) Define all widgets in the frames. Pack them.
##
##  3) Define keyboard or mouse action BINDINGS, if needed.
##
##  4) Define PROCS, if needed.
##
##  5) Additional GUI INITIALIZATION (with procs), if needed.
##
##
## Some detail about the code structure of this particular script:
##
##  1a) Define ALL frames:
##
##      Top-level :  '.fRleft' , '.fRright'
##
##      Sub-frames: '.fRleft.fRbuttons'
##                  '.fRleft.fRscaleM'
##                  '.fRleft.fRscaleN1'
##                  '.fRleft.fRscaleN2'
##                  '.fRleft.fRscaleN3'
##                  '.fRleft.fRscaleA'
##                  '.fRleft.fRscaleB'
##                  '.fRleft.fRscaleN'
##                  '.fRleft.fRinfo'
##
##                  The canvas widget will go in '.fRright'.
##
##  1b) Pack ALL frames.
##
##  2) Define all widgets in the frames (and pack them):
##
##     - In '.fRleft.fRbuttons':
##                          1 button widget ('Exit'),
##                            and
##                          3 buttons (for setting the super-formula shape's
##                                     fill & outline colors and the
##                                     background/canvas color),
##                            and
##                          1 label widget to display the current color
##                                  values (in hex).
##
##     - In '.fRleft.fRscaleX':
##                          1 'label' and 1 'scale' widget, in each scale-frame
##                             for superformula shape parameters ---
##                             m, n1, n2, n3, a, b --- and N.
##                               (We added a scale for N, the number of
##                                polygon edges to be drawn.)
##
##     - In '.fRleft.fRinfo':
##                          1 label widget to show 'how-to' some usage info and
##                            the current color values.
##                          1 label widget to show the superformula --- and
##                            maybe current super-formula parameter values.
##
##     - In '.fRright':     1 'canvas' widget
##
##  3) Define bindings:
##
##       - a button1-release on the fill/no-fill checkbutton causes a redraw
##
##       - a button1-release on each of the 7 scale widgets causes a redraw
##
##    NOTE1: We do not need a button1-release binding for the
##           'ClearBeforeRedraw' checkbutton.
##
##    NOTE3: The color changes should trigger a redraw, but we do not
##           need bindings to do those redraws.
##           The redraws can be done in procs that are used to
##           set each of the colors.
##
##  4) Define procs:
##
##     - 'ReDraw'          - to clear the canvas and redraw the
##                           polygon that approximates the super-formula shape
##                           --- for the current values of the 7 scale
##                           parameters and the fill & outline colors.
##
##     - 'set_shape_color1'   - shows a color selector GUI and uses the
##                                user-selected color to 'fill' the
##                                super-formula shape on the canvas
##
##     - 'set_shape_color2'   - shows a color selector GUI and uses the
##                                user-selected color to 'outline' the
##                                super-formula shape on the canvas
##
##     - 'set_color_background' - shows a color selector GUI and uses the
##                                user-selected color to reset the color of
##                                the canvas background
##
##  5) Additional GUI initialization:  Execute proc 'ReDraw' once with
##                                     an initial, example set of parms
##                                     --- 7 acale vars, COLOR1hex, COLOR2hex,
##                                     COLORbkGNDhex ---
##                                     to start with a super-formula shape on
##                                     the canvas rather than a blank canvas.
##
##     Also in this section, we define a binding for
##       - a <Configure> (resize) event on the canvas --- to cause a redraw.
##+########################################################################
## DEVELOPED WITH:
##   Tcl-Tk 8.5 on Ubuntu 9.10 (2009-october release, 'Karmic Koala').
##
##   $ wish
##   % puts "$tcl_version $tk_version"
##                                  showed   8.5 8.5   on Ubuntu 9.10
##    after Tcl-Tk 8.4 was replaced by 8.5 --- to get anti-aliased fonts.
##+#######################################################################
## MAINTENANCE HISTORY:
## Created by: Blaise Montandon 2012sep04
## Changed by: ...... ......... 2012
##+#######################################################################

##+#######################################################################
## Set general window parms (title,position,size,color-scheme,fonts,etc.).
##+#######################################################################

wm title    . "Colored 'Super-formula shape' on a Colored Canvas"
wm iconname . "Superformula"

wm geometry . +15+30

## We allow the window to be resizable and we pack the canvas with
## '-fill both -expand 1' so that the canvas can be enlarged by enlarging
## the window.

## If you want to make the window un-resizable,
## you can use the following statement.
# wm resizable . 0 0


##+######################################################
## Set the color scheme for the window and its widgets ---
## and set the initial color for the polygon interior
## and the canvas background (outside the polygon).
##+######################################################

tk_setPalette "#e0e0e0"

## Initialize the super-formula shape 'fill' color.

# set COLOR1r 255
# set COLOR1g 255
# set COLOR1b 255
set COLOR1r 255
set COLOR1g 0
set COLOR1b 255
set COLOR1hex [format "#%02X%02X%02X" $COLOR1r $COLOR1g $COLOR1b]

## Initialize the super-formula shape 'outline' color.

# set COLOR2r 255
# set COLOR2g 255
# set COLOR2b 0
set COLOR2r 0
set COLOR2g 255
set COLOR2b 255
set COLOR2hex [format "#%02X%02X%02X" $COLOR2r $COLOR2g $COLOR2b]


## Initialize the background color for the canvas.

# set COLORbkGNDr 60
# set COLORbkGNDg 60
# set COLORbkGNDb 60
set COLORbkGNDr 0
set COLORbkGNDg 0
set COLORbkGNDb 0
set COLORbkGNDhex \
    [format "#%02X%02X%02X" $COLORbkGNDr $COLORbkGNDg $COLORbkGNDb]

set listboxBKGD "#f0f0f0"


##+########################################################
## Use a VARIABLE-WIDTH FONT for label and button widgets.
##
## Use a FIXED-WIDTH FONT for listboxes (and
## entry fields, if any).
##+########################################################

font create fontTEMP_varwidth \
   -family {comic sans ms} \
   -size -14 \
   -weight bold \
   -slant roman

font create fontTEMP_SMALL_varwidth \
   -family {comic sans ms} \
   -size -12 \
   -weight bold \
   -slant roman

## Some other possible (similar) variable width fonts:
##  Arial
##  Bitstream Vera Sans
##  DejaVu Sans
##  Droid Sans
##  FreeSans
##  Liberation Sans
##  Nimbus Sans L
##  Trebuchet MS
##  Verdana


font create fontTEMP_fixedwidth  \
   -family {liberation mono} \
   -size -14 \
   -weight bold \
   -slant roman

font create fontTEMP_SMALL_fixedwidth  \
   -family {liberation mono} \
   -size -12 \
   -weight bold \
   -slant roman

## Some other possible fixed width fonts (esp. on Linux):
##  Andale Mono
##  Bitstream Vera Sans Mono
##  Courier 10 Pitch
##  DejaVu Sans Mono
##  Droid Sans Mono
##  FreeMono
##  Nimbus Mono L
##  TlwgMono


##+###########################################################
## SET GEOM VARS FOR THE VARIOUS WIDGET DEFINITIONS.
## (e.g. width and height of canvas, and padding for Buttons)
##+###########################################################

set initCanWidthPx 400
set initCanHeightPx 300
set minCanHeightPx 24

# set BDwidthPx_canvas 2
  set BDwidthPx_canvas 0


## BUTTON geom parameters:

set PADXpx_button 0
set PADYpx_button 0
set BDwidthPx_button 2


## LABEL geom parameters:

set BDwidthPx_label 2


## SCALE geom parameters:

set BDwidthPx_scale 2
set initScaleLengthPx 300
set scaleWidthPx 10


##+###################################################################
## Set a MINSIZE of the window.
##
## For width, allow for the minwidth of the '.fRbuttons' frame:
##            about 4 buttons (Exit,Color1,Color2,ColorBkgnd), and
##            2 checkbuttons.
##
## For height, allow
##             2 chars high for the '.fRbuttons' frame,
##             200 pixels high for the '.fRscales' frame, and
##             3 chars high for the label widget in the '.fRinfo' frame.
##+###################################################################

set minWinWidthPx [font measure fontTEMP_varwidth \
   "Exit  Fill  Outline  Background  Fill Shape  Clear Before Draw"]

## Add some pixels to account for right-left-side window decoration
## (about 8 pixels), about 6 x 4 pixels/widget for borders/padding for
## 6 widgets --- 4 buttons and 2 checkbuttons.

set minWinWidthPx [expr 32 + $minWinWidthPx]


## MIN HEIGHT ---
## for the 9 sub-frames '.fRleft.fRbuttons', 7 '.fRleft.fRscaleX',
## and '.fRleft.fRinfo'.
## Allow
##    2 char   high for 'fRbuttons'
##    2 char   high for each of the 7 scale frames
##    6 char   high for 'fRinfo'

set CharHeightPx [font metrics fontTEMP_varwidth -linespace]

set minWinHeightPx [expr 10 * $CharHeightPx]

## Add about 28 pixels for top-bottom window decoration,
## about 9x4 pixels for each of the 9 stacked frames and their
## widgets (their borders/padding).

set minWinHeightPx [expr $minWinHeightPx + 64]


## FOR TESTING:
#   puts "minWinWidthPx = $minWinWidthPx"
#   puts "minWinHeightPx = $minWinHeightPx"

wm minsize . $minWinWidthPx $minWinHeightPx


##+################################################################
## DEFINE *ALL* THE FRAMES:
##
##   Top-level : '.fRleft'  '.fRright'
##
##   Sub-frames: '.fRleft.fRbuttons'
##                '.fRleft.fRscaleM'
##                '.fRleft.fRscaleN1'
##                '.fRleft.fRscaleN2'
##                '.fRleft.fRscaleN3'
##                '.fRleft.fRscaleA'
##                '.fRleft.fRscaleB'
##                '.fRleft.fRscaleN'
##                '.fRleft.fRinfo'
##+################################################################

# set BDwidth_frame 2
# set RELIEF_frame raised

  set BDwidth_frame 0
  set RELIEF_frame flat

frame .fRleft    -relief $RELIEF_frame  -borderwidth $BDwidth_frame

frame .fRright   -relief $RELIEF_frame  -borderwidth $BDwidth_frame


frame .fRleft.fRbuttons  -relief $RELIEF_frame  -borderwidth $BDwidth_frame

frame .fRleft.fRscaleM   -relief $RELIEF_frame  -borderwidth $BDwidth_frame
frame .fRleft.fRscaleN1  -relief $RELIEF_frame  -borderwidth $BDwidth_frame
frame .fRleft.fRscaleN2  -relief $RELIEF_frame  -borderwidth $BDwidth_frame
frame .fRleft.fRscaleN3  -relief $RELIEF_frame  -borderwidth $BDwidth_frame
frame .fRleft.fRscaleA   -relief $RELIEF_frame  -borderwidth $BDwidth_frame
frame .fRleft.fRscaleB   -relief $RELIEF_frame  -borderwidth $BDwidth_frame
frame .fRleft.fRscaleN   -relief $RELIEF_frame  -borderwidth $BDwidth_frame

frame .fRleft.fRinfo     -relief $RELIEF_frame  -borderwidth $BDwidth_frame


##+##############################
## PACK the top-level FRAMES.
##+##############################

pack .fRleft \
      -side left \
      -anchor nw \
      -fill x \
      -expand 0

pack .fRright \
      -side left \
      -anchor nw \
      -fill both \
      -expand 1


##+##############################
## PACK the sub-FRAMES.
##+##############################

pack .fRleft.fRbuttons \
     .fRleft.fRscaleM \
     .fRleft.fRscaleN1 \
     .fRleft.fRscaleN2 \
     .fRleft.fRscaleN3 \
     .fRleft.fRscaleA \
     .fRleft.fRscaleB \
     .fRleft.fRscaleN \
     .fRleft.fRinfo \
      -side top \
      -anchor nw \
      -fill x \
      -expand 0


##+#########################################################
## OK. Now we are ready to define the widgets in the frames.
##+#########################################################


##+#####################################################################
## In the '.fRleft.fRbuttons' FRAME  ---  DEFINE-and-PACK
##    - an exit-button,
## and
##    - 2 buttons ( to specify colors)
## and
##   - a label widget, to show current color values (in hex)
##                     --- and if there is room, show the current
##                     values of the 6 scale parameters
##+#####################################################################

button .fRleft.fRbuttons.buttEXIT \
   -text "Exit" \
   -font fontTEMP_varwidth \
   -padx $PADXpx_button \
   -pady $PADYpx_button \
   -relief raised \
   -bd $BDwidthPx_button \
   -command {exit}

button .fRleft.fRbuttons.buttCOLOR1 \
   -text "\
Fill
 Color" \
   -font fontTEMP_varwidth \
   -padx $PADXpx_button \
   -pady $PADYpx_button \
   -relief raised \
   -bd $BDwidthPx_button \
   -command "set_shape_color1"

button .fRleft.fRbuttons.buttCOLOR2 \
   -text "\
Outline
 Color" \
   -font fontTEMP_varwidth \
   -padx $PADXpx_button \
   -pady $PADYpx_button \
   -relief raised \
   -bd $BDwidthPx_button \
   -command "set_shape_color2"


button .fRleft.fRbuttons.buttCOLORbkGND \
   -text "\
Background
  Color" \
   -font fontTEMP_varwidth \
   -padx $PADXpx_button \
   -pady $PADYpx_button \
   -relief raised \
   -bd $BDwidthPx_button \
   -command "set_background_color"

set fill0or1 1

checkbutton .fRleft.fRbuttons.chkbuttFILL \
   -text "Fill shape" \
   -font  fontTEMP_varwidth \
   -variable fill0or1 \
   -selectcolor "#cccccc" \
   -relief raised \
   -command "ReDraw 0"

set cleanBeforeDraw 1

checkbutton .fRleft.fRbuttons.chkbuttCLEAR \
   -text "Clean Before Draw" \
   -font  fontTEMP_varwidth \
   -variable cleanBeforeDraw \
   -selectcolor "#cccccc" \
   -relief raised \
   -command ""


##+###########################################
## Pack the widgets in the 'fRbuttons' frame.
##+###########################################

pack .fRleft.fRbuttons.buttEXIT \
     .fRleft.fRbuttons.buttCOLOR1 \
     .fRleft.fRbuttons.buttCOLOR2 \
     .fRleft.fRbuttons.buttCOLORbkGND \
     .fRleft.fRbuttons.chkbuttFILL \
     .fRleft.fRbuttons.chkbuttCLEAR \
      -side left \
      -anchor w \
      -fill none \
      -expand 0


##+##################################################################
## In the '.fRleft.fRscaleM' FRAME ----  DEFINE-and-PACK
## 1 LABEL and 1 SCALE widget.
##+###################################################################

label .fRleft.fRscaleM.label \
   -text "m" \
   -font fontTEMP_SMALL_varwidth \
   -justify left \
   -anchor w \
   -relief flat \
   -bd $BDwidthPx_label

set m 12

scale .fRleft.fRscaleM.scaleM \
   -from 0 -to 34 \
   -resolution 2 \
   -length $initScaleLengthPx \
   -font fontTEMP_SMALL_varwidth \
   -variable m \
   -showvalue true \
   -orient hor \
   -bd $BDwidthPx_scale \
   -width $scaleWidthPx

#    -command "ReDraw"

pack .fRleft.fRscaleM.label \
      -side left \
      -anchor w \
      -fill none \
      -expand 0

pack .fRleft.fRscaleM.scaleM \
      -side left \
      -anchor w \
      -fill x \
      -expand 1


##+##################################################################
## In the '.fRleft.fRscaleN1' FRAME ----  DEFINE-and-PACK
## 1 LABEL and 1 SCALE widget.
##+###################################################################

label .fRleft.fRscaleN1.label \
   -text "n1" \
   -font fontTEMP_SMALL_varwidth \
   -justify left \
   -anchor w \
   -relief flat \
   -bd $BDwidthPx_label

set n1 6.0

scale .fRleft.fRscaleN1.scaleN1 \
   -from 0.1 -to 17 \
   -resolution 0.1 \
   -length $initScaleLengthPx \
   -font fontTEMP_SMALL_varwidth \
   -variable n1 \
   -showvalue true \
   -orient hor \
   -bd $BDwidthPx_scale \
   -width $scaleWidthPx

#   -command "ReDraw"

pack .fRleft.fRscaleN1.label \
      -side left \
      -anchor w \
      -fill none \
      -expand 0

pack .fRleft.fRscaleN1.scaleN1 \
      -side left \
      -anchor w \
      -fill x \
      -expand 1


##+##################################################################
## In the '.fRleft.fRscaleN2' FRAME ----  DEFINE-and-PACK
## 1 LABEL and 1 SCALE widget.
##+###################################################################

label .fRleft.fRscaleN2.label \
   -text "n2" \
   -font fontTEMP_SMALL_varwidth \
   -justify left \
   -anchor w \
   -relief flat \
   -bd $BDwidthPx_label

set n2 6.0

scale .fRleft.fRscaleN2.scaleN2 \
   -from 0 -to 17 \
   -resolution 0.1 \
   -length $initScaleLengthPx \
   -font fontTEMP_SMALL_varwidth \
   -variable n2 \
   -showvalue true \
   -orient hor \
   -bd $BDwidthPx_scale \
   -width $scaleWidthPx

#   -command "set_scale_n3_to_n2_redraw"

pack .fRleft.fRscaleN2.label \
      -side left \
      -anchor w \
      -fill none \
      -expand 0

pack .fRleft.fRscaleN2.scaleN2 \
      -side left \
      -anchor w \
      -fill x \
      -expand 1


##+##################################################################
## In the '.fRleft.fRscaleN3' FRAME ----  DEFINE-and-PACK
## 1 LABEL and 1 SCALE widget.
##+###################################################################

label .fRleft.fRscaleN3.label \
   -text "n3" \
   -font fontTEMP_SMALL_varwidth \
   -justify left \
   -anchor w \
   -relief flat \
   -bd $BDwidthPx_label

set n3 6.0

scale .fRleft.fRscaleN3.scaleN3 \
   -from 0 -to 17 \
   -resolution 0.1 \
   -length $initScaleLengthPx \
   -font fontTEMP_SMALL_varwidth \
   -variable n3 \
   -showvalue true \
   -orient hor \
   -bd $BDwidthPx_scale \
   -width $scaleWidthPx

#   -command "ReDraw"

pack .fRleft.fRscaleN3.label \
      -side left \
      -anchor w \
      -fill none \
      -expand 0

pack .fRleft.fRscaleN3.scaleN3 \
      -side left \
      -anchor w \
      -fill x \
      -expand 1


##+##################################################################
## In the '.fRleft.fRscaleA' FRAME ----  DEFINE-and-PACK
## 1 LABEL and 1 SCALE widget.
##+###################################################################

label .fRleft.fRscaleA.label \
   -text "a" \
   -font fontTEMP_SMALL_varwidth \
   -justify left \
   -anchor w \
   -relief flat \
   -bd $BDwidthPx_label

set a 100.0

scale .fRleft.fRscaleA.scaleA \
   -from 0.1 -to 1000 \
   -resolution 0.1 \
   -length $initScaleLengthPx \
   -font fontTEMP_SMALL_varwidth \
   -variable a \
   -showvalue true \
   -orient hor \
   -bd $BDwidthPx_scale \
   -width $scaleWidthPx

#   -command "set_scale_b_to_a_redraw"

pack .fRleft.fRscaleA.label \
      -side left \
      -anchor w \
      -fill none \
      -expand 0

pack .fRleft.fRscaleA.scaleA \
      -side left \
      -anchor w \
      -fill x \
      -expand 1


##+##################################################################
## In the '.fRleft.fRscaleB' FRAME ----  DEFINE-and-PACK
## 1 LABEL and 1 SCALE widget.
##+###################################################################

label .fRleft.fRscaleB.label \
   -text "b" \
   -font fontTEMP_SMALL_varwidth \
   -justify left \
   -anchor w \
   -relief flat \
   -bd $BDwidthPx_label

set b 100.0

scale .fRleft.fRscaleB.scaleB \
   -from 0.1 -to 1000 \
   -resolution 0.1 \
   -length $initScaleLengthPx \
   -font fontTEMP_SMALL_varwidth \
   -variable b \
   -showvalue true \
   -orient hor \
   -bd $BDwidthPx_scale \
   -width $scaleWidthPx

#   -command "ReDraw"

pack .fRleft.fRscaleB.label \
      -side left \
      -anchor w \
      -fill none \
      -expand 0

pack .fRleft.fRscaleB.scaleB \
      -side left \
      -anchor w \
      -fill x \
      -expand 1


##+##################################################################
## In the '.fRleft.fRscaleN' FRAME ----  DEFINE-and-PACK
## 1 LABEL and 1 SCALE widget.
##+###################################################################

label .fRleft.fRscaleN.label \
   -text "N" \
   -font fontTEMP_SMALL_varwidth \
   -justify left \
   -anchor w \
   -relief flat \
   -bd $BDwidthPx_label

set N 400

scale .fRleft.fRscaleN.scaleN \
   -from 10 -to 1000 \
   -resolution 1 \
   -length $initScaleLengthPx \
   -font fontTEMP_SMALL_varwidth \
   -variable N \
   -showvalue true \
   -orient hor \
   -bd $BDwidthPx_scale \
   -width $scaleWidthPx

#   -command "ReDraw"

pack .fRleft.fRscaleN.label \
      -side left \
      -anchor w \
      -fill none \
      -expand 0

pack .fRleft.fRscaleN.scaleN \
      -side left \
      -anchor w \
      -fill x \
      -expand 1


##+######################################################
## DEFINE-and-PACK a 'label' widget
## in the '.fRleft.fRinfo' FRAME
##+######################################################

label .fRleft.fRinfo.labelCOLORS \
   -text "" \
   -font fontTEMP_SMALL_varwidth \
   -justify left \
   -anchor w \
   -relief flat \
   -bd $BDwidthPx_button

## The text for labelCOLORS is set in the ReDraw proc.

label .fRleft.fRinfo.labelPARMS \
   -text "\
Super-formula:
r(theta) = ( |cos(m x theta/4) / a| ^ n2 + |sin(m x  theta/4) / b| ^ n3 ) ^ -1/n1
and the x,y coordinates on the super-formula shape curve are given by
r x cos(theta) & r x sin(theta).   N is # of polygon edges used to draw the curve." \
   -font fontTEMP_SMALL_varwidth \
   -justify left \
   -anchor w \
   -relief flat \
   -bd $BDwidthPx_button


pack .fRleft.fRinfo.labelCOLORS \
     .fRleft.fRinfo.labelPARMS \
   -side top \
   -anchor nw \
   -fill x \
   -expand 0


##+######################################################
## DEFINE-and-PACK the 'canvas' widget
## in the '.fRright' FRAME
##+######################################################

canvas .fRright.can \
   -width $initCanWidthPx \
   -height $initCanHeightPx \
   -relief raised \
   -borderwidth $BDwidthPx_canvas

pack .fRright.can \
   -side top \
   -anchor nw \
   -fill both \
   -expand 1


##+########################################
## END OF the DEFINITION OF THE GUI WIDGETS
##+########################################


##+###############################
## BINDINGS SECTION:
##+###############################

## The following <Configure> bind causes an extra ReDraw
## when the GUI is first configured via an 'update' below
## in the GUI initialization section.
##    (And 'update' causes about 40 redraws if
##     we use '.' instead of '.fRright.can'.)
## We move this statement to the bottom of this script.

# bind .fRright.can <Configure> "ReDraw 0"

bind .fRleft.fRbuttons.chkbuttFILL <ButtonRelease-1> "ReDraw 0"

bind .fRleft.fRscaleM.scaleM    <ButtonRelease-1> "ReDraw 0"
bind .fRleft.fRscaleN1.scaleN1  <ButtonRelease-1> "ReDraw 0"
bind .fRleft.fRscaleN2.scaleN2  <ButtonRelease-1> "set_scale_n3_to_n2_redraw 0"
bind .fRleft.fRscaleN3.scaleN3  <ButtonRelease-1> "ReDraw 0"
bind .fRleft.fRscaleA.scaleA    <ButtonRelease-1> "set_scale_b_to_a_redraw 0"
bind .fRleft.fRscaleB.scaleB    <ButtonRelease-1> "ReDraw 0"
bind .fRleft.fRscaleN.scaleN    <ButtonRelease-1> "ReDraw 0"


##+######################################################################
## PROCS SECTION:
##
##  - ReDraw            - Called by the '-command' option on the
##                        7 scale widgets originally (now by the bindings
##                        on button1-release, above), by a checkbutton binding,
##                        and by the Color procs.
##
##                        Draws the super-formula shape on the canvas for
##                        the current scale parameter values and for the
##                        current color var values.
##
##  - set_scale_n3_to_n2_redraw  - called by  '-command' for scale-n3
##
##  - set_scale_b_to_a_redraw    - called by  '-command' for scale-b
##
##  - set_shape_color1   - called by color1 (fill) button '-command'
##
##  - set_shape_color2   - called by color2 (outline) button '-command'
##
##  - set_background_color  - called by background color button '-command'
##
##+#######################################################################


##+#####################################################################
## proc ReDraw -
##
## PURPOSE:
##     Draws the super-formula shape on the canvas.
##
## CALLED BY:  bindings (in the BINDINGS section) --- and by set-color procs.
##
## NOTE: The 'x' argument is to avoid an error when the scale '-command'
##       passes a scale value as an argument to the command. This is in
##       case we try using the '-command' option of the scale widgets to
##       do the redraws 'dynamically' as a sliderbar is moved.
##+#####################################################################
## For reference in the math statements below, the 'superformula' is:
## r(theta) =
##    ( |cos(m*theta/4)/a| ^ n2 + |sin(m*theta/4)/b| ^ n3 ) ^ -1/n1
##+#####################################################################

proc ReDraw {x} {

   global m n1 n2 n3 a b N \
          cleanBeforeDraw fill0or1 \
          COLOR1hex COLOR2hex COLORbkGNDhex

   set twopi [expr 2 * 3.14159265358]

   ## Get the center of the canvas.
   set x0Px [expr [winfo width  .fRright.can] / 2]
   set y0Px [expr [winfo height .fRright.can] / 2]

   ## Number of edges/interior-angles for drawing
   ## the polygon that approximates the superformula shape.
   ## GS hard-coded the value.
   ##   (We provide a widget on the GUI for the user
   ##    to change this value --- say, in a range of 10
   ##    to 1000.)
   # set N 400

   ## Provide a size-factor to allow for easily adjusting
   ## the size of the image within the canvas.
   ## GS provided a value of 0.4. We hope to prove that
   ## this factor is not needed, and we set it to 1.0.
   set sizeFactor 1.0

   ## Initialize the points list for the polygon.

   set listPts {}

   ## Calculate the x,y coords --- r*cos(theta) and r*sin(theta)
   ## --- of the points on the superformula curve, where r is given by
   ## the superformula in terms of theta, where theta is in radians.
   ## How we do this:
   ## In a loop from 0 to N, calculate each theta, between 0 and 2*pi radians,
   ## and calculate r.  Then add each x,y pair to the points list.

   for {set i 0} {$i<=$N} {incr i} {

      set theta [expr {$i*$twopi/$N}]

      ## For this theta, calculate r.

      set t  [expr {$m*$theta/4.0}]

      ## FOR TESTING:
      # if { $i == 0 || $i == 50 || $i == 100 } {
      #    puts "theta: $theta  ;  m: $m  ;  t: $t"
      # }

      set term1 [expr {abs(cos($t)/$a)}]
      set term1 [expr {pow($term1,$n2)}]
      set term2 [expr {abs(sin($t)/$b)}]
      set term2 [expr {pow($term2,$n3)}]

      set r [expr {pow($term1+$term2,1.0/$n1)}]

      ## Note that, above, when n1=n2=n3=2 that we are
      ## computing the square root of the sum of the
      ## squares of the cos(...)/a and sin(...)/b terms.

      ## This statement essentially applies the
      ## minus sign of the exponent -1/n1.
      set r [expr {1.0/$r}]

      ## FOR TESTING:
      # if { $i == 0 || $i == 50 || $i == 100 } {
      #    puts "m: $m ; n1: $n1 ; n2: $n2 ; n3: $n3 ; a: $a ; b: $b ; N = $N"
      #    puts "r: $r ; term1: $term1 ; term2: $term2"
      # }

      ## Append the new point (in pixels, on the canvas,
      ## relative to the center of the canvas)
      ## to the list of points.

      if {[expr {abs($r)}] <= 0.1} {
         lappend listPts 0 0
      } else {
         lappend listPts \
            [expr $x0Px + round($sizeFactor*$r*cos($theta))] \
            [expr $y0Px + round($sizeFactor*$r*sin($theta))]
      }
      ## END OF if {[expr {abs($r)}] <= 0.1}
   }
   ## END OF LOOP for {set i 0} {$i<=$N} {incr i}

   if $cleanBeforeDraw {.fRright.can delete all}

   set edgeWidthPx 1

   if $fill0or1 {
      .fRright.can create polygon $listPts \
         -outline $COLOR2hex -width $edgeWidthPx -fill $COLOR1hex
   } else {
      .fRright.can create polygon $listPts \
         -outline $COLOR2hex -width $edgeWidthPx
   }
   ## END OF if $fill0or1

   ## This was GS's method of drawing the polygon.
   # set polyID [eval .fRright.can create polygon $listPts]
   # if $fill0or1 {
   #    .fRright.can itemconfigure $polyID \
   #      -outline $COLOR2hex -width $edgeWidthPx -fill $COLOR1hex
   # } else {
   #   .fRright.can itemconfigure $polyID \
   #      -outline $COLOR2hex -width $edgeWidthPx -fill $COLORbkGNDhex
   # }
   ## END OF if $fill0or1

   ## Make sure the text on the COLORS and PARMS label widgets
   ## is up to date.

   .fRleft.fRinfo.labelCOLORS configure -text "\
Click on the top four scale troughs to step through changes.
 Drag the slider of the bottom 3 scales to see significant change.

 Colors:  Fill - $COLOR1hex ; Outline - $COLOR2hex ; Background - $COLORbkGNDhex"

#    .fRleft.fRinfo.labelPARMS configure -text "\
# Current super-formula shape Parameters:
#  m = $m ; n1 = $n1 ; n2 = $n2 ; n3 = $n3 ; a = $a ; b = $b
#  in equation
# r(theta) = ( |cos(m*theta/4)/a| ^ n2 + |sin(m*theta/4)/b| ^ n3 ) ^ -1/n1 "

}
## END OF proc 'ReDraw'


##+##########################################
## proc set_scale_n3_to_n2_redraw
##+##########################################

proc set_scale_n3_to_n2_redraw {x} {
   global n2 n3
   set n3 $n2
   ReDraw 0
}
## END OF proc 'set_scale_n3_to_n2_redraw'


##+##########################################
## proc set_scale_b_to_a_redraw
##+##########################################

proc set_scale_b_to_a_redraw {x} {
   global a b
   set b $a
   ReDraw 0
}
## END OF proc 'set_scale_b_to_a_redraw'


##+#####################################################################
## proc 'set_shape_color1'
##+#####################################################################
## PURPOSE:
##
##   This procedure is invoked to get an RGB triplet
##   via 3 RGB slider bars on the FE Color Selector GUI.
##
##   Uses that RGB value to set a 'fill' color.
##
## Arguments: none
##
## CALLED BY:  .fRleft.fRbuttons.buttCOLOR1  button
##+#####################################################################

proc set_shape_color1 {} {

   global COLOR1r COLOR1g COLOR1b COLOR1hex
   # global feDIR_tkguis

   ## FOR TESTING:
   #    puts "COLOR1r: $COLOR1r"
   #    puts "COLOR1g: $COLOR1g"
   #    puts "COLOR1b: $COLOR1b"

   set TEMPrgb [ exec \
       ./sho_colorvals_via_sliders3rgb.tk \
       $COLOR1r $COLOR1g $COLOR1b]

   #   $feDIR_tkguis/sho_colorvals_via_sliders3rgb.tk \

   ## FOR TESTING:
   #    puts "TEMPrgb: $TEMPrgb"

   if { "$TEMPrgb" == "" } { return }

   scan $TEMPrgb "%s %s %s %s" r255 g255 b255 hexRGB

   set COLOR1hex "#$hexRGB"
   set COLOR1r $r255
   set COLOR1g $g255
   set COLOR1b $b255

   ## Redraw the geometry in the new interior color.

   ReDraw 0

}
## END OF proc 'set_shape_color1'


##+#####################################################################
## proc 'set_shape_color2'
##+#####################################################################
## PURPOSE:
##
##   This procedure is invoked to get an RGB triplet
##   via 3 RGB slider bars on the FE Color Selector GUI.
##
##   Uses that RGB value to set an 'outline' color.
##
## Arguments: none
##
## CALLED BY:  .fRleft.fRbuttons.buttCOLOR2  button
##+#####################################################################

proc set_shape_color2 {} {

   global COLOR2r COLOR2g COLOR2b COLOR2hex
   # global feDIR_tkguis

   ## FOR TESTING:
   #    puts "COLOR2r: $COLOR2r"
   #    puts "COLOR2g: $COLOR2g"
   #    puts "COLOR2b: $COLOR2b"

   set TEMPrgb [ exec \
       ./sho_colorvals_via_sliders3rgb.tk \
       $COLOR2r $COLOR2g $COLOR2b]

   #   $feDIR_tkguis/sho_colorvals_via_sliders3rgb.tk \

   ## FOR TESTING:
   #    puts "TEMPrgb: $TEMPrgb"

   if { "$TEMPrgb" == "" } { return }

   scan $TEMPrgb "%s %s %s %s" r255 g255 b255 hexRGB

   set COLOR2hex "#$hexRGB"
   set COLOR2r $r255
   set COLOR2g $g255
   set COLOR2b $b255

   ## Redraw the geometry in the new outline color.

   ReDraw 0

}
## END OF proc 'set_shape_color2'


##+#####################################################################
## proc 'set_background_color'
##+#####################################################################
## PURPOSE:
##
##   This procedure is invoked to get an RGB triplet
##   via 3 RGB slider bars on the FE Color Selector GUI.
##
##   Uses that RGB value to set the color of the canvas ---
##   on which all the tagged items (lines) lie.
##
## Arguments: none
##
## CALLED BY:  .fRleft.fRbuttons.buttCOLORbkGND  button
##+#####################################################################

proc set_background_color {} {

   global COLORbkGNDr COLORbkGNDg COLORbkGNDb COLORbkGNDhex
   # global feDIR_tkguis

   ## FOR TESTING:
   #    puts "COLORbkGNDr: $COLORbkGNDr"
   #    puts "COLORbkGNDg: $COLORbkGNDb"
   #    puts "COLORbkGNDb: $COLORbkGNDb"

   set TEMPrgb [ exec \
       ./sho_colorvals_via_sliders3rgb.tk \
       $COLORbkGNDr $COLORbkGNDg $COLORbkGNDb]

   #   $feDIR_tkguis/sho_colorvals_via_sliders3rgb.tk \

   ## FOR TESTING:
   #    puts "TEMPrgb: $TEMPrgb"

   if { "$TEMPrgb" == "" } { return }

   scan $TEMPrgb "%s %s %s %s" r255 g255 b255 hexRGB

   set COLORbkGNDhex "#$hexRGB"
   set COLORbkGNDr $r255
   set COLORbkGNDg $g255
   set COLORbkGNDb $b255

   ## Set the color of the canvas.

   .fRright.can config -bg $COLORbkGNDhex

}
## END OF proc 'set_background_color'


##+#####################################################
## Additional GUI initialization, if needed (or wanted).
##+#####################################################

## Need 'update' here to set the size of the canvas,
## because 'ReDraw' uses 'winfo' to get the width and
## height of the canvas.
# update
# ReDraw 0

## We need this statement because ReDraw does not (re)set
## the background/canvas color.
.fRright.can config -bg $COLORbkGNDhex

## Rather than use the 'update' & 'ReDraw' statements to initialize
## the GUI, we can kill 2 birds with one stone via the 'bind' below.
## If the window (and canvas) is resized, this bind causes the
## shape to be redrawn in the middle of the new canvas area.
## This bind is also triggered (twice?) when this script falls into
## the Tk event handling loop and the canvas is first configured.

bind .fRright.can <Configure> "ReDraw 0"
Here is an image that shows some interesting effects you can achieve by un-checking the 'Clean Before Draw' checkbox.
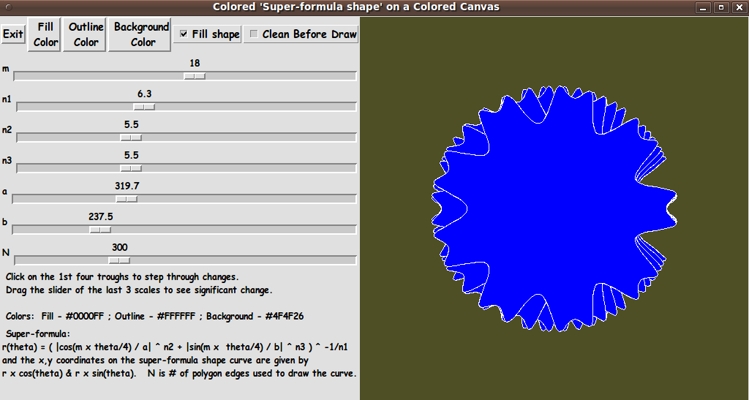
(I changed the default fill and background colors.)
Other interesting effects can be achieved by un-checking the 'Fill' checkbox as well as the 'Clean Before Draw' checkbox.
It appears that one could make some interesting logo images with this utility.
Note that one could make the outline color the same as the fill or the background color --- or an average of the two colors, for a 'feathering' effect.
(We could make the width of the outline a parameter that can be set with a scale or mini-listbox on the GUI. Currently the width is set at 1 pixel. We could allow 1, 2, or 3 pixels. Four might be too thick. But what the heck, we could allow 10 or more. Some interesting effects might result.)
_____________________________________________________________________
Now I have ANOTHER tool with which to make some images (bullets or icon backgrounds or whatever) for use in decorating Tk GUI's --- and decorating web pages.
Thanks to GS for his many contributions to this site. In particular, his 'PlotSuperformula' proc allowed me to spend most of my time on coding and testing the GUI features and relatively little time on the formula implementation.