GUI for Drawing Rectangular 'Buttons' with nice shaded edges
uniquename - 2012oct15
I am interested in making nice images for 'toolchest' and 'drawer' backgrounds (and other GUI embellishments), as I have indicated at Experiments in making embellished GUI's and at A color-gradient-button-maker GUI.
On the page GUI for Drawing 'Super-ellipses', with nice shaded edges, I presented code for a GUI that uses 'create image' on a canvas, along with 'put' commands, to implement the drawing of a 'super-ellipse' with nice 'edge shading' --- shading from a user-specified color for the super-ellipse to a user-specified color for a surrounding background.
The shading technique was based on using a 'color-metric' scalar parameter given by the equation for the super-ellipse:
v = |x/a|^n + |y/b|^n
I began thinking about this shading technique in conjunction with the color gradient rectangles ('buttons') that were made by using canvas 'create line'. See, for example, code at A color-gradient-button-maker GUI with 6 'miniscale' widgets.
I realized that I should be able to make rectangular buttons with nice shading at the edges by using a 'create image' technique, instead of 'create line'.
I just needed a 'color-metric' for the rectangle, similar to the one above for the super-ellipse. I realized that I could use the 'max' function to make a suitable metric, as follows.
Let us say that x,y coordinates in the rectangle are measured from the center of the rectangle. I.e. the origin is the center of the rectangle. Let 'xhalf' denote the x-distance from the center of the rectangle to the left and right edges, and let 'yhalf' denote the y-distance from the center of the rectangle to the top and bottom edges.
Then we can define a suitable metric by means of the expression:
v = max(abs(x/xhalf), abs(y/yhalf))
Note that for a point x,y in the interior of the rectangle, both abs(x/xhalf) and abs(y/yhalf) are less than one --- and the metric is 0.0 at the origin (x,y)=(0,0).
Furthermore, on the edges of the rectangle, either abs(x/xhalf) or abs(y/yhalf) is equal to 1.0 --- so the metric is 1.0 on the edges of the rectangle.
And for xy points outside the rectangle, v is greater than 1.0.
Thus I had a plan. To round out the plan, I decided that:
I would essentially merge the scripts from GUI for Drawing 'Super-ellipses', with nice shaded edges and A color-gradient-button-maker GUI with 6 'miniscale' widgets --- and I would change the 'color-metric' being used.
And in the process of merging these two scripts, I decided I would preserve the capability of the 2nd script that allows the user to specify 2 colors to use for a color gradient across the button --- in either the x or the y directions.
So I would keep the 3 color buttons of the 2nd script --- for color1, color2, and background-color. And I would keep the 2 radiobuttons of the 2nd script for specifying the x or y direction.
Furthermore, I would add a checkbutton widget so that I could turn the 'edge-shading' on or off.
After a lot of work in trying to minimize the number of 'put' commands issued and in trying lists-versus-strings, I ended up with the following GUI --- and the code presented below.
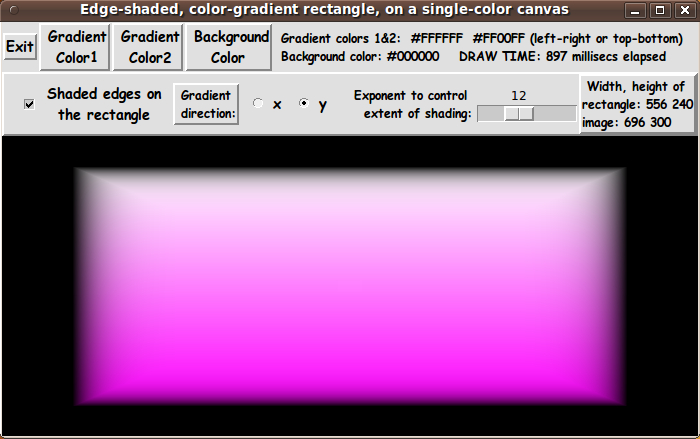
Note that I added a scale widget to the GUI to allow the user to control an exponent that is used to control the 'extent' of the shading at the edges of the rectangle.
I also added a display of 'elapsed time' for each redraw --- by using the Tcl 'clock milliseconds' command.
Having learned my lesson (from development of the script at GUI for Drawing 'Super-ellipses', with nice shaded edges) about using braces with 'expr' statements for much better execution times (as Welch et. al. point out by page 7 in the 4th edition of 'Practical Programming in Tcl and Tk'), I consistently used braces with ALL 'expr' commands.
---
Note that I have supplied 3 buttons on the GUI with which to set the 2 'gradient' colors and the 'background' color. Those 3 buttons call on a color-selector-GUI script to set those colors. You can make that color-selector script by cutting-and-pasting the code from the page A non-obfuscated color selector GUI on this site.
_____________________________________________________________________
Below is the code that produced this GUI.
There are comments at the top of the code, in a section titled 'USING THE GENERATED IMAGE', that describe how one could make use of images produced by this GUI.
I follow my usual 'canonical' structure for Tk code, for this Tk script:
  0) Set general window & widget parms (win-name, win-position,
     win-color-scheme, fonts, widget-geometry-parms, win-size-control).

  1a) Define ALL frames and sub-frames.
  1b) Pack   ALL frames and sub-frames.

  2) Define & pack all widgets in the frames.

  3) Define keyboard and mouse/touchpad/touch-sensitive-screen action
     BINDINGS, if needed.

  4) Define PROCS, if needed.

  5) Additional GUI initialization (typically with one or more of
     the procs), if needed.
This structure is discussed in more detail on the page A Canonical Structure for Tk Code --- and variations.
This structure makes it easy for me to find code sections --- while generating and testing a Tk script, and when looking for code snippets to include in Tk scripts (code re-use).
_________________________________________________________________
As in all my scripts that use the 'pack' geometry manager (which is all of my 100-plus Tk scripts, so far), I provide the four main pack parameters --- '-side', '-anchor', '-fill', and '-expand' --- on all the 'pack' commands for the frames and widgets.
I think I have found a good setting of the '-side', '-anchor', '-fill', and '-expand' parameters on the 'pack' commands for the various widgets of this GUI. In particular ...
The 'canvas' widget expands/contracts appropriately when the window size is changed --- and button and label widgets stay fixed in size and relative-location as the window size is changed.
If anyone wants to change the way the GUI configures itself as the main window size is changed, they can experiment with the '-side', '-anchor', '-fill', and '-expand' parameters on the 'pack' commands for the various widgets --- to get the widget behavior that they want. For example, you may want the scale widget to x-expand, rather than stay fixed in length, whenever the window is expanded in the x-direction.
Also, you could change the fonts used for the various GUI widgets. For example, you could change '-weight' from 'bold' to 'normal' --- or '-slant' from 'roman' to 'italic'. Or change font families.
Furthermore, there are variables used to set geometry parameters of widgets --- parameters such as border-widths and padding. And you could change the '-relief' values for frames and widgets. Feel free to experiment with those 'appearance' parameters as well.
_____________________________________________________________________
That said, here's the code --- with plenty of comments to describe what most of the code-sections are doing.
The most complex code is in the 'ReDraw_ydir' and 'ReDraw_xdir' routines. I have indicated in comments at the top of the code and in comments in those procs that I attempted to minimize the number of 'put' commands to draw an image by using 'horizontal-scanlines' (of hex-colors) in proc 'ReDraw_ydir' and 'vertical-scanlines' in proc 'ReDraw_xdir'.
Unfortunately, I was unable to get the 'vertical-scanline' technique to work in the 'ReDraw_xdir' proc. So I ended up using a 'put' command for each pixel within the rectangle.
The draw-time for the x-direction then turned out to be about twice the time as for the y-direction (where I was able to 'put' an entire horizontal scanline at a time). For the default initial size of the GUI, x-gradient draw-times were about 1.7 secs --- versus about 0.85 sec for the y-gradient draw-times.
(The draw-times were more than twice those times when I increased the GUI window size to fill the monitor screen.)
I leave it as an exercise for others to determine if there is a way to successfully use 'put' to apply 'vertical-scanlines' to an image. (I left some code from my attempts, commented, in the 'ReDraw_xdir' proc, to help any takers of the challenge.)
In any case, the copious comments in the code might help Tcl-Tk coding 'newbies' get started in making GUI's like this. Without the comments --- especially in the 'ReDraw_ydir' and 'ReDraw_xdir' procs, the code might look even more cryptic than it already is.
Without the comments, potential young Tcler's might be tempted to return to their iPhones and iPads and iPods --- to watch America's/Japan's/Germany's/Uzbekistan's Funniest Home Videos.
Code for the Tk script 'make_color-gradient-button_xORyGradient_withShadedEdges.tk' :
#!/usr/bin/wish -f
##
## SCRIPT: make_color-gradient-button_xORyGradient_withShadedEdges.tk
##
##
## PURPOSE: This Tk GUI script facilitates the creation of an edge-shaded,
## 2-color-gradient rectangle --- via a Tk image 'structure' put on
## a canvas widget.
##
## The image is put on the canvas via a canvas 'image create' command
## --- and via 'put <hexcolor(s)-list> -to $x $y' commands on the image.
##
## The image covers the entire canvas widget. The rectangle lies
## within the canvas with a margin around it. In the margin, outside
## the rectangle on the canvas, a user-selected 'background' color
## is applied.
##
## The rectangle is drawn with color-shading toward the
## edges of the rectangle. The user is given the option of
## turning the color shading off, via a checkbutton.
##
## This Tk script is based on a Tk script that draws an edge-shaded
## 'super-ellipse'. Code is at the web page https://wiki.tcl-lang.org/37004 ---
## "GUI for Drawing 'Super-ellipses', with nice shaded edges".
## The script on that page uses a technique to shade the color
## toward the edge of the super-ellipse. The shading gives the
## 'super-ellipse' a 3D appearance.
##
## Rather than simply use a single color for the (unshaded) rectangle,
## we allow the user to choose TWO colors (and an x or y direction)
## and the rectangle is colored from one color to the other,
## in the x or y direction. This color-gradient style was used
## in the script at https://wiki.tcl-lang.org/36922 ---
## "A color-gradient-button-maker GUI with 6 'miniscale' widgets".
##
## But in that script a 'create line' technique was used instead
## of the 'create image' technique we use here. We use the
## 'create image' technique in this script in order to facilitate
## creation of the shading (3D effect) at the edges of the rectangle.
## But we also allow the user to choose 2 colors to gradiate across
## the image in the x or y direction.
##
## So this script is essentially a 'mash-up' of the scripts
## on pages 37004 and 36922 at wiki.tcl.tk.
##
##+#####################
## THE SHADING TECHNIQUE (for the 3D effect):
## The edge-shading effect for the super-ellipse benefited from the equation
## for a super-ellipse --- more precisely, the equation for its edge:
## |x/a|^n + |y/b|^n = 1
##
## The interior of the super-ellipse is given by the inequality
## |x/a|^n + |y/b|^n <= 1
##
## The edge shading (3D effect) was obtained by using a 'metric' on the
## points x,y in the super-ellipse --- a value 'v', between 0 and 1, given by:
## v = |x/a|^n + |y/b|^n
## for each point inside the super-ellipse.
##
## The equation for v dictates that the value of v is 1 on the border and
## declines to 0 towards the center.
##
## (1.0 - $v) is applied to the user-selected 'unshaded' RGB colors for
## the super-ellipse --- and $v applied to the user-selected RGB
## background colors. A weighted-average of these pairs of RGB values
## gives us the color at any x,y point in the superellipse. (Note that the
## values of x and y gave us the 'v' value to apply to get the 'shaded'
## color at x,y.)
##
## (To keep the shading from being too spread out at the edge of
## the super-ellipse, we used a POWER of v rather than v. Note that
## a power of v, like v to the 12th, is still a floating point number
## between 0 and 1.)
##
## So to do the shading of our 2-color-gradient rectangle, it would be great
## if we had a 'metric' on the rectangle that was 0.0 in the middle of the
## rectangle and 1.0 on the edges of the rectangle.
##
## Let us say that x,y coordinates in the rectangle are measured from
## the center of the rectangle. I.e. the origin is the center of the rectangle.
## Let 'xhalf' denote the x-distance from the center of the rectangle to the
## left and right edges, and let 'yhalf' denote the y-distance from the center
## of the rectangle to the top and bottom edges.
##
## Then we can define a suitable metric by means of the expression:
## max(abs(x/xhalf), abs(y/yhalf))
##
## Note that for a point x,y in the interior of the rectangle, both
## abs(x/xhalf) and abs(y/yhalf) are less than one --- and the metric is
## 0.0 at the origin (x,y)=(0,0).
##
## Furthermore, on the edges of the rectangle, either abs(x/xhalf) or abs(y/yhalf)
## is equal to 1.0.
##
## And for xy points outside the rectangle, v is greater than 1.0.
##
## So for our rectangle, we can let
## v = max(abs(x/xhalf), abs(y/yhalf))
## and here is how we use v:
##
## At a point x,y, we determine the color at the point (before our
## shading is applied), by using a color interpolated between user-selected
## color1 and color2, where color1 is applied to the left (or top) edge of the
## rectangle and color2 is applied to the right (or bottom) edge of the rectangle.
## Let us call this color the 'gradient color at xy'.
##
## Then we calculate the 'shaded color' at x,y by calulating a weighted average
## based on applying the factor (1.0 - $v) to the 'gradient color at xy'
## --- and applying $v to the user-selected 'background' color. Thus we will
## get the edge-shading (the 3D effect) for the rectangle.
##
##+##############
## THE GUI DESIGN --- and details and 'realities' of applying the shading technique:
##
## The GUI made by this Tk script contains a rectangular CANVAS WIDGET on which
## the color-filled rectangle (and the background color) will be drawn.
##
## To do the drawing on the canvas, we use the 'image create' command to
## put an image on the entire canvas.
##
## The color weighting is achieved by applying 'v' and '1.0 - v' to the RGB
## components of the background color and the 'gradient color', where
## 'v' is given by
## v = max(abs(x/xhalf), abs(y/yhalf))
## Actually we use a power of v to get 'crisper' edge shading. There
## is a SCALE WIDGET on the GUI with which to set the power (exponent).
##
## FOR A COLOR-GRADIENT IN THE Y-DIRECTION:
##
## We put the top and bottom of the background onto the canvas by using
## 'put <background-hexcolor> -to 0 $y'
## commands on the image. This technique counts on the 'put'
## command to 'tile' the background color completely across the image.
##
## We fill the interior of the rectangle (and the background color
## to the left and right of the rectangle) by using
## 'put <hexcolor(s)-list> -to $x $y'
## commands on the image where each hexcolor in the 'scanline list' that
## is inside the rectangle is a weighted mixture of user-selected colors
## --- the background color and a 'gradiated color' determined from
## 2 user-selected colors (to achieve a color gradient across the
## rectangle).
##
## We can use the color-symmetry of the rectangle (about a vertical
## axis through the middle of the rectangle) to allow us to do the
## calculations of colors for the pixels in just half of a horizontal
## scanline --- we use the left half. By the color symmetry, we build
## the right-half of the horizontal scanline as we build the left-half.
## We use one 'put' command to draw each horizontal scan line.
##
## FOR A COLOR-GRADIENT IN THE X-DIRECTION:
##
## I could not find a way of building VERTICAL-scanlines and being
## able to apply them to the image structure with a single 'put'
## command for each vertical-scanline. So I ended up using a 'put'
## command for each pixel within the rectangle.
##
## The draw-time for the x-direction then turned out to be about
## twice the time as for the y-direction (where I was able to 'put'
## an entire horizontal scanline at a time). For the default,
## initial size of the GUI, x-gradient draw-times were about 1.7 secs
## --- versus about 0.85 sec for the y-gradient draw-times.
## (The draw-times were more than twice those times when I increased
## the GUI window size to fill the monitor screen.)
##
## SINGLE-RECTANGLE-COLOR:
##
## Note that if the 2 colors selected for the color-gradient are the
## same, then the user is simply requesting an edge shaded rectangle
## where the shading goes from that single color to the background
## color at the edge of the rectangle.
##
## HOW THE MARGIN AROUND THE RECTANGLE IS SET:
##
## We set the value of a and b (the rectangle half-width and half-height)
## to be about 80% of half the current width and height of the canvas
## --- and change the size of the rectangle by changing the size
## of the canvas (by resizing the window) --- with a redraw
## being done whenever the window is resized. (We take this
## approach, for now, to help simplify the GUI.)
##
## The GUI could include 2 'scale' widgets whose slider-bars can
## be used to change the values of a and b --- to a max of
## half the current width and height of the canvas widget, say.
##
## BUTTONS USED TO SET COLORS:
##
## The GUI includes 2 buttons to call a color selector GUI
## to set the 2 gradient colors of the rectangle.
##
## Another button calls the same color selector GUI to set a
## 'background' color --- effectively, the color of the canvas.
##
## TURNING OFF SHADING:
##
## There is a checkbox on the GUI to choose whether to use the
## 'v/1-v' shading --- or to simply use the 2 gradient colors to
## draw a color gradient across the rectangle --- without doing
## any 'edge-shading'.
##
## AUTO-REDRAWS:
##
## There are bindings to some of the widgets on the GUI that call the
## redraw proc whenever a new setting is chosen. For example,
## if the x/y radiobuttons on the GUI (for specifying the direction
## of the color gradient) are changed, a redraw occurs automatically.
## And if the checkbutton on the GUI (for turning edge-shading on/off)
## is changed, a redraw is initiated automatically.
##
## The redraw includes clearing the canvas (deleting the image),
## recreating the image structure according to the current canvas size,
## and redrawing (re-filling) the image with 'put <hexcolor(s)> -to' commands.
##
## (In the case that we use scale widgets to set a & b ---
## rectangle dimensions:
## If the redraw takes more than half-a-second, then we can use
## a button1-release binding on the scale widgets for a and b
## to trigger the redraw --- only when the user finishes dragging
## the sliderbar of either scale.
##
## If erasing the canvas and redrawing the rectangle
## completes within a very small fraction of a second, it would
## be feasible to do the redraws 'dynamically' with the sliderbar
## --- but it does not appear that we will be able to do that
## given current computer speeds.)
##
##+#########################
## USING THE GENERATED IMAGE:
## A screen/window capture utility (like 'gnome-screenshot'
## on Linux) can be used to capture the GUI image in a GIF
## or PNG file, say.
##
## If necessary, an image editor (like 'mtpaint' on Linux)
## can be used to crop the window capture image. The image
## could also be down-sized --- say to make a 'bullet' image
## file or an icon-background image file.
##
## The editor could also be used to blur the image slightly to
## 'feather' the edges of the rectangle --- for example,
## if the 'v/1-v' shading is not used.
##
## The colored image file could be used with a utility (like the
## ImageMagick 'convert' command) to change the outer, background
## color to TRANSPARENT, making a partially transparent GIF
## (or PNG) file. Then the semi-transparent image file could be used,
## for 'bullets' in HTML pages or in Tk GUI's --- or for the
## background of icons for use in Tk GUIs and web pages.
##
## The image could also be taken into a scalable vector graphics
## (SVG) editor (like Inkscape on Linux) and the SVG editor used
## to add anti-aliased text to the image.
##
##+########################################################################
## 'CANONICAL' STRUCTURE OF THIS TK CODE:
##
## 0) Set general window & widget parms (win-name, win-position,
## win-color-scheme, fonts, widget-geometry-parms, win-size-control).
##
## 1a) Define ALL frames and sub-frames.
## 1b) Pack ALL frames and sub-frames.
##
## 2) Define all widgets in the frames --- typically going through the
## frames top-to-bottom and/or left-to-right --- and defining the
## widgets within each frame top-to-bottom and/or left-to-right.
## Pack the widgets after each frame has its widgets defined.
##
## 3) Define keyboard or mouse/touchpad/touch-sensitive-screen action
## BINDINGS, if needed.
##
## 4) Define PROCS, if needed.
##
## 5) Additional GUI INITIALIZATION (with procs), if needed.
##
##
## Some detail about the code structure of this particular script:
##
## 1a) Define ALL frames:
##
## Top-level : '.fRbuttons' , '.fRimgspecs' , '.fRcan'
##
## Sub-frames: none
##
## 1b) Pack ALL frames.
##
## 2) Define all widgets in the frames (and pack them):
##
## - In '.fRbuttons': 1 button widget ('Exit'),
## and
## 3 buttons (for setting 2 gradient colors
## and the background/canvas color),
## and
## 1 label widget to display current color values
##
## - In '.fRimgspecs': 1 checkbox widget, to specify shading (or not)
## and
## 2 radio-buttons to specify x/y gradient direction
## and
## 1 label widget to display current rectangle
## parameter values such as a and b
## (rectangle width and height, in pixels).
##
## - In '.fRcan': 1 'canvas' widget
##
## 3) Define bindings:
##
## - button1-release on a shading checkbutton widget
## - button1-release on the 2 x/y-gradient-direction radiobutton widgets
##
## Note: A <Configure> event on the canvas (in particular, a canvas-resize)
## should cause a redraw.
##
## 4) Define procs:
##
## - 'ReDraw' - to call proc 'ReDraw_ydir' or 'ReDraw_xdir'
## depending on the setting of the x/y-direction
## radiobuttons
##
## - 'ReDraw_ydir' - to clear the image structure and redraw the
## background color and the rectangle --- for
## the current values of a, b (i.e. canvas size) and
## the 3 colors --- and for the checkbutton (shading
## on or off) --- applying a color gradient in
## the y-direction.
##
## - 'ReDraw_xdir' - to clear the image structure and redraw the
## background color and the rectangle --- for
## the current values of a, b (i.e. canvas size) and
## the 3 colors --- and for the checkbutton (shading
## on or off) --- applying a color gradient in
## the x-direction.
##
## - 'set_gradient_color1' - shows a color selector GUI and uses the
## user-selected gradient-color-1 to do a redraw
## of the rectangle on the canvas.
##
## - 'set_gradient_color2' - shows a color selector GUI and uses the
## user-selected gradient-color-2 to do a redraw
## of the rectangle on the canvas.
##
## - 'set_color_background' - shows a color selector GUI for the user to
## specify a color as the color to use for
## the canvas/image background --- and for
## the shading at the edge of the rectangle.
## Does a redraw.
##
## - 'ReDraw_if_canvas_resized' - to do a redraw when a <Configure>
## event is detected on the canvas ---
## but only if the canvas has been resized.
##
## 5) Additional GUI initialization: Execute proc 'ReDraw' once with
## an initial, example set of parms
## --- a, b, COLOR1hex, COLOR2hex,
## COLORbkGNDhex ---
## to start with a rectangle on
## the canvas rather than a blank canvas.
##
##+########################################################################
## DEVELOPED WITH:
## Tcl-Tk 8.5 on Ubuntu 9.10 (2009-october release, 'Karmic Koala').
##
## $ wish
## % puts "$tcl_version $tk_version"
## showed 8.5 8.5 on Ubuntu 9.10
## after Tcl-Tk 8.4 was replaced by 8.5 --- to get anti-aliased fonts.
##+#######################################################################
## MAINTENANCE HISTORY:
## Created by: Blaise Montandon 2012oct08
## Changed by: Blaise Montandon 2012oct11 Add elapsed time display.
## Changed by: Blaise Montandon 2012oct15 Finalize the string/list techniques
## used in proc ReDraw_ydir.
##+#######################################################################
##+#######################################################################
## Set general window parms (title,position,size,color-scheme,fonts,etc.).
##+#######################################################################
wm title . "Edge-shaded, color-gradient rectangle, on a single-color canvas"
wm iconname . "ShadedRect"
wm geometry . +15+30
##+######################################################
## Set the color scheme for the window and its widgets ---
## and set the initial color for the rectangle interior
## and the canvas background (outside the rectangle).
##+######################################################
tk_setPalette "#e0e0e0"
## Initialize the 2 gradient colors for the rectangle
## and the background color for the canvas.
# set COLOR1r 255
# set COLOR1g 255
# set COLOR1b 0
set COLOR1r 255
set COLOR1g 255
set COLOR1b 255
set COLOR1hex [format "#%02X%02X%02X" $COLOR1r $COLOR1g $COLOR1b]
# set COLOR2r 255
# set COLOR2g 128
# set COLOR2b 0
set COLOR2r 255
set COLOR2g 0
set COLOR2b 255
set COLOR2hex [format "#%02X%02X%02X" $COLOR2r $COLOR2g $COLOR2b]
# set COLORbkGNDr 60
# set COLORbkGNDg 60
# set COLORbkGNDb 60
set COLORbkGNDr 0
set COLORbkGNDg 0
set COLORbkGNDb 0
set COLORbkGNDhex \
[format "#%02X%02X%02X" $COLORbkGNDr $COLORbkGNDg $COLORbkGNDb]
# set listboxBKGD "#f0f0f0"
# set entryBKGD "#f0f0f0"
set radbuttBKGD "#f0f0f0"
##+##########################################################
## We use a VARIABLE-WIDTH FONT for label and button widgets.
##
## We use a FIXED-WIDTH FONT for entry fields, listboxes, and
## text or message widgets, if any.
##+##########################################################
font create fontTEMP_varwidth \
-family {comic sans ms} \
-size -14 \
-weight bold \
-slant roman
font create fontTEMP_SMALL_varwidth \
-family {comic sans ms} \
-size -12 \
-weight bold \
-slant roman
## Some other possible (similar) variable width fonts:
## Arial
## Bitstream Vera Sans
## DejaVu Sans
## Droid Sans
## FreeSans
## Liberation Sans
## Nimbus Sans L
## Trebuchet MS
## Verdana
font create fontTEMP_fixedwidth \
-family {liberation mono} \
-size -14 \
-weight bold \
-slant roman
font create fontTEMP_SMALL_fixedwidth \
-family {liberation mono} \
-size -12 \
-weight bold \
-slant roman
## Some other possible fixed width fonts (esp. on Linux):
## Andale Mono
## Bitstream Vera Sans Mono
## Courier 10 Pitch
## DejaVu Sans Mono
## Droid Sans Mono
## FreeMono
## Nimbus Mono L
## TlwgMono
##+###########################################################
## SET GEOM VARS FOR THE VARIOUS WIDGET DEFINITIONS.
## (e.g. width and height of canvas, and padding for Buttons)
##+###########################################################
set initCanWidthPx 400
set initCanHeightPx 300
set minCanHeightPx 24
# set BDwidthPx_canvas 2
set BDwidthPx_canvas 0
## BUTTON geom parameters:
set PADXpx_button 0
set PADYpx_button 0
set BDwidthPx_button 2
## LABEL geom parameters:
set PADXpx_label 0
set PADYpx_label 0
set BDwidthPx_label 2
##+###################################################################
## Set a MINSIZE of the window (roughly).
##
## For width, allow for the minwidth of the '.fRbuttons' frame:
## about 3 buttons of the four ---
## Exit,Color1,Color2,ColorBkgnd.
##
## For height, allow for
## 2 chars high for the widgets in the '.fRbuttons' frame,
## 1 char high for the checkbutton & 2-radiobuttons in the
## '.fRimgspecs' frame, and
## a canvas at least 24 pixels high
##+###################################################################
set minWinWidthPx [font measure fontTEMP_varwidth \
"Exit Gradient Gradient"]
## If we wanted to assure that all buttons and the label in '.fRbuttons'
## show, we could use the following.
##
# "Exit Gradient Gradient Background Gradient colors 1&2: #FF00FF #FFFFFF"]
##
## But this restricts the size of our rectangle, since we are auto-sizing
## it depending on the size of the canvas. We want to be able to
## shrink the rectangle quite a bit in the x-direction.
## Add some pixels to account for right-left-side window decoration
## (about 8 pixels), about 3 x 4 pixels/widget for borders/padding for
## 3 widgets --- 3 buttons.
set minWinWidthPx [expr {20 + $minWinWidthPx}]
## MIN HEIGHT --- for the 3 frames
## 'fRbuttons' 'fRimgspecs' 'fRcan' --- allow:
## 2 'regular-sized' chars high for 'fRbuttons'
## 1 'regular-sized' char high for 'fRimgspecs'
## 24 pixels high for 'fRcan'
set CharHeightPx [font metrics fontTEMP_varwidth -linespace]
set minWinHeightPx [expr {24 + (3 * $CharHeightPx)}]
## Add about 28 pixels for top-bottom window decoration,
## about 3x8 pixels for each of the 3 stacked frames and their
## widgets (their borders/padding).
set minWinHeightPx [expr {$minWinHeightPx + 52}]
## FOR TESTING:
# puts "minWinWidthPx = $minWinWidthPx"
# puts "minWinHeightPx = $minWinHeightPx"
wm minsize . $minWinWidthPx $minWinHeightPx
## We allow the window to be resizable and we pack the canvas with
## '-fill both -expand 1' so that the canvas can be enlarged by enlarging
## the window.
## If you want to make the window un-resizable,
## you can use the following statement.
# wm resizable . 0 0
##+################################################################
## DEFINE *ALL* THE FRAMES:
##
## Top-level : 'fRbuttons' '.fRimgspecs' 'fRcan'
##
## Sub-frames: none
##+################################################################
# set BDwidth_frame 2
# set RELIEF_frame raised
set BDwidth_frame 0
set RELIEF_frame flat
frame .fRbuttons -relief $RELIEF_frame -borderwidth $BDwidth_frame
frame .fRimgspecs -relief raised -borderwidth 2
frame .fRcan -relief $RELIEF_frame -borderwidth $BDwidth_frame
##+##############################
## PACK the top-level FRAMES.
##+##############################
pack .fRbuttons \
.fRimgspecs \
-side top \
-anchor nw \
-fill x \
-expand 0
pack .fRcan \
-side top \
-anchor nw \
-fill both \
-expand 1
##+#########################################################
## OK. Now we are ready to define the widgets in the frames.
##+#########################################################
##+#####################################################################
## In the '.fRbuttons' FRAME --- DEFINE-and-PACK
## - an exit-button,
## and
## - 3 buttons ( to specify colors)
## and
## - a label widget, to show image parameters
##+#####################################################################
button .fRbuttons.buttEXIT \
-text "Exit" \
-font fontTEMP_varwidth \
-padx $PADXpx_button \
-pady $PADYpx_button \
-relief raised \
-bd $BDwidthPx_button \
-command {exit}
button .fRbuttons.buttCOLOR1 \
-text "\
Gradient
Color1" \
-font fontTEMP_varwidth \
-padx $PADXpx_button \
-pady $PADYpx_button \
-relief raised \
-bd $BDwidthPx_button \
-command "set_gradient_color1"
button .fRbuttons.buttCOLOR2 \
-text "\
Gradient
Color2" \
-font fontTEMP_varwidth \
-padx $PADXpx_button \
-pady $PADYpx_button \
-relief raised \
-bd $BDwidthPx_button \
-command "set_gradient_color2"
button .fRbuttons.buttCOLORbkGND \
-text "\
Background
Color" \
-font fontTEMP_varwidth \
-padx $PADXpx_button \
-pady $PADYpx_button \
-relief raised \
-bd $BDwidthPx_button \
-command "set_background_color"
label .fRbuttons.labelCOLORS \
-text "" \
-font fontTEMP_SMALL_varwidth \
-justify left \
-anchor w \
-relief flat \
-bd $BDwidthPx_label
##+###########################################
## Pack the widgets in the 'fRbuttons' frame.
##+###########################################
pack .fRbuttons.buttEXIT \
.fRbuttons.buttCOLOR1 \
.fRbuttons.buttCOLOR2 \
.fRbuttons.buttCOLORbkGND \
.fRbuttons.labelCOLORS \
-side left \
-anchor w \
-fill none \
-expand 0
##+##################################################################
## In the '.fRimgspecs' FRAME ---- DEFINE-and-PACK
## - a CHECKBUTTON widget --- to turn on/off the 'edge-shading'
## - 2 RADIOBUTTON widgets to set x/y color-gradient direction
## - a LABEL widget to show current rectangle parms and info
## - (perhaps someday) 2 LABEL & SCALE widgets, for the a & b parms
##+###################################################################
set shade0or1 1
checkbutton .fRimgspecs.chkbuttSHADE \
-text "\
Shaded edges on
the rectangle" \
-font fontTEMP_varwidth \
-variable shade0or1 \
-selectcolor "#cccccc" \
-relief flat \
-padx 10
label .fRimgspecs.labelDIRECTION \
-text "\
Gradient
direction:" \
-font fontTEMP_SMALL_varwidth \
-justify left \
-anchor w \
-relief raised \
-bd $BDwidthPx_label
set curDIRECTION "y"
radiobutton .fRimgspecs.radbuttX \
-text "x" \
-font fontTEMP_varwidth \
-anchor w \
-variable curDIRECTION \
-value "x" \
-selectcolor "$radbuttBKGD" \
-relief flat \
-bd $BDwidthPx_button
radiobutton .fRimgspecs.radbuttY \
-text "y" \
-font fontTEMP_varwidth \
-anchor w \
-variable curDIRECTION \
-value "y" \
-selectcolor "$radbuttBKGD" \
-relief flat \
-bd $BDwidthPx_button
## Set the init value for the exponent/power var
## to control the 'extent' of the shading.
set shadeEXP 12
## Define a label widget to precede the scale.
label .fRimgspecs.labelSCALEexp \
-text "\
\ \ \ Exponent to control
extent of shading:" \
-font fontTEMP_SMALL_varwidth \
-justify left \
-anchor w \
-relief flat \
-bd $BDwidthPx_label
scale .fRimgspecs.scaleEXP \
-orient horizontal \
-digits 0 \
-from 1 -to 30 \
-length 100 \
-variable shadeEXP
## We use a button1-release binding instead of this cmd.
# -command "ReDraw 0"
## Activate scale widget definition like the following,
## if we decide to provide a & b via two scale widgets.
if { 1 == 0} {
##+################################
## DEFINE the 'a'-scale widget
## including a 'label' widget.
##+################################
## Set the init value for the a-scale var.
set curAvalue 100
## Set the MAX UNITS for the a-scale,
## i.e. the upper limit of the range of values,
# set scaleMaxUnits [expr {[winfo height .] / 2}]
set scaleMaxUnits [expr {[winfo height .fRcan.can] / 2}]
## Define a label widget to precede the a-scale,
## followed by the scale:
label .fRimgspecs.labelSCALE1 \
-text "\
\ \ \ 'a' (in pixels):" \
-font fontTEMP_varwidth \
-justify left \
-anchor w \
-relief flat \
-bd $BDwidthPx_button
scale .fRimgspecs.scale1 \
-orient horizontal \
-digits 0 \
-from 0 -to $scaleMaxUnits \
-length $initScaleLengthPx \
-variable curAvalue \
-command "ReDraw"
}
## END OF if { 1 == 0 }
label .fRimgspecs.labelPARMS \
-text "" \
-font fontTEMP_SMALL_varwidth \
-justify left \
-anchor w \
-relief raised \
-bd $BDwidthPx_label
## PACK the widgets of FRAME .fRimgspecs ---
## checkbutton, 2 radiobuttons, label
pack .fRimgspecs.chkbuttSHADE \
-side left \
-anchor w \
-fill none \
-expand 0
pack .fRimgspecs.labelDIRECTION \
.fRimgspecs.radbuttX \
.fRimgspecs.radbuttY \
.fRimgspecs.labelSCALEexp \
.fRimgspecs.scaleEXP \
-side left \
-anchor w \
-fill none \
-expand 0
pack .fRimgspecs.labelPARMS \
-side right \
-anchor e \
-fill none \
-expand 0
## Activate scale widget packings like the following,
## if we decide to provide a & b via two scale widgets.
# pack .fRimgspecs.labelSCALE1 \
# -side left \
# -anchor w \
# -fill none \
# -expand 0
# pack .fRimgspecs.scale1 \
# -side left \
# -anchor w \
# -fill x \
# -expand 1
# pack .fRimgspecs.labelSCALE2 \
# -side left \
# -anchor w \
# -fill none \
# -expand 0
# pack .fRimgspecs.scale2 \
# -side left \
# -anchor w \
# -fill x \
# -expand 1
##+######################################################
## In the '.fRcan' FRAME -
## DEFINE-and-PACK the 'canvas' widget.
##
## We highlightthickness & borderwidth of the canvas to
## zero, as suggested on page 558, Chapter 37, 'The Canvas
## Widget', in the 4th edition of the book 'Practical
## Programming in Tcl and Tk'.
##+######################################################
canvas .fRcan.can \
-width $initCanWidthPx \
-height $initCanHeightPx \
-relief flat \
-highlightthickness 0 \
-borderwidth 0
pack .fRcan.can \
-side top \
-anchor nw \
-fill both \
-expand 1
##+########################################
## END OF the DEFINITION OF THE GUI WIDGETS
##+########################################
##+###############################
## BINDINGS SECTION:
##+###############################
bind .fRimgspecs.chkbuttSHADE <ButtonRelease-1> "ReDraw 0"
bind .fRimgspecs.radbuttX <ButtonRelease-1> "ReDraw 0"
bind .fRimgspecs.radbuttY <ButtonRelease-1> "ReDraw 0"
bind .fRimgspecs.scaleEXP <ButtonRelease-1> "ReDraw 0"
## The following bind may cause an extra ReDraw when the
## GUI is first configured via an 'update' below
## in the GUI initialization section.
##
## We move this statement to the bottom of this script
## --- and we put the call to 'ReDraw' in a proc that
## checks if the canvas size has indeed changed.
# bind .fRcan.can <Configure> "ReDraw_if_canvas_resized"
##+######################################################################
## PROCS SECTION:
##
## - ReDraw - Calls ReDraw_xdir or ReDraw_ydir, depending
## on the value of $curDIRECTION (x or y).
##
## Called by the <Configure> binding mentioned above,
## by button1-release on the 2 radiobutton widgets,
## by button1-release on the shading checkbox widget,
## and by the set-color procs below.
##
## - ReDraw_ydir - Draws the rectangle on the canvas a HORIZONTAL
## SCANLINE, at a time, for the currently set
## gradient and background color var values --- and
## current values for a & b, determined from the
## current canvas dimensions.
## (Note: For the y-gradient-direction, the same
## 'unshaded gradient color' is used for all the pixels
## horizontally, within the rectangle. This reduces
## a lot of color computations.)
##
## Called by the ReDraw proc.
##
## - ReDraw_xdir - Ideally, we would draw the rectangle on the canvas
## a VERTICAL SCANLINE at a time, for the currently set
## gradient and background color var values --- and
## current values for a & b, determined from the
## current canvas dimensions.
## (Note: For the x-gradient-direction, the same
## 'unshaded gradient color' is used for all the pixels
## vertically, within the rectangle.)
##
## BUT I could not find a way to format the list of
## 'vertical-scanline' colors so that the 'put' command
## would apply the colors a scanline-at-a-time.
## So I 'put' the colors 'individually'.
##
## Called by the ReDraw proc.
##
## - set_gradient_color1 - called by color1 button '-command'
##
## - set_gradient_color2 - called by color2 button '-command'
##
## - set_background_color - called by background color button '-command'
##
## - ReDraw_if_canvas_resized - called by 'bind' to canvas <Configure>
##
##+#######################################################################
##+#####################################################################
## proc ReDraw
##
## PURPOSE:
## Calls Calls ReDraw_xdir or ReDraw_ydir, depending
## on the value of $curDIRECTION (x or y).
##
## CALLED BY: a <Configure> binding on the canvas widget,
## a button1-release binding on the shading checkbutton,
## a button1-release binding on the 2 radiobutton widgets,
## --- and by set-color procs.
##
## NOTE: The 'x' argument is to avoid an error when the scale '-command'
## passes a scale value as an argument to the command. This is in
## case we ever want to implement a scale widget for a parm
## and use '-command ReDraw'. Thus for each small movement of the
## scale widget's sliderbar, we could do a redraw --- if the redraw
## proceeds fast enough.
##+#####################################################################
proc ReDraw {x} {
global curDIRECTION
if {$curDIRECTION == "x"} {
ReDraw_xdir 0
} else {
ReDraw_ydir 0
}
}
## END OF proc ReDraw
##+#####################################################################
## proc ReDraw_ydir
##
## PURPOSE:
## Draws the rectangle on the canvas, with shaded or unshaded
## edges, and with a background color surrounding the rectangle
## --- and with a y-gradient of 2 colors --- i.e. the rectangle
## is colored from color1 at the top to color2 at the bottom
## of the rectangle.
##
## This proc does the draw a horizontal scan-line at a time,
## with calls like:
## imgID put $hexcolorsLIST -to 0 $y
## where 0 $y is the leftmost position of a horizontal line of
## hexcolors for the pixels.
##
## When y is above or below the rectangle, the scanline is just
## the background color for all pixels in the scanline.
##
## CALLED BY: the ReDraw proc, if $curDIRECTION is y.
##+#####################################################################
proc ReDraw_ydir {x} {
global curDIRECTION shade0or1 shadeEXP \
COLOR1r COLOR1g COLOR1b COLOR1hex \
COLOR2r COLOR2g COLOR2b COLOR2hex \
COLORbkGNDr COLORbkGNDg COLORbkGNDb COLORbkGNDhex
## Set the current time, for determining elapsed
## time for building the 'photo' image.
set t0 [clock milliseconds]
## Delete the current image structure.
## We especially need to do this when the canvas has been re-sized,
## so that we can redraw the image according to the new canvas size. (?)
catch {image delete imgID}
## Get the current canvas size.
set curCanWidthPx [winfo width .fRcan.can]
set curCanHeightPx [winfo height .fRcan.can]
## Initialize the width & height of the image that we are going to create
## --- to the size of the canvas ---
## and let us make each dimension of the image an even integer (pixels).
set imgWidthPx $curCanWidthPx
set imgHeightPx $curCanHeightPx
if {$imgWidthPx % 2 == 1} { incr imgWidthPx -1 }
if {$imgHeightPx % 2 == 1} { incr imgHeightPx -1 }
## Make the new image structure.
image create photo imgID -width $imgWidthPx -height $imgHeightPx
## Put the image on the canvas.
## (Note to myself: Should this statement be at top or bottom of this proc?)
.fRcan.can create image 0 0 -anchor nw -image imgID
## Get the half width and height of the image --- with which
## we will set a & b --- the half width and height of the rectangle.
set xmidPx [expr {$imgWidthPx / 2}]
set ymidPx [expr {$imgHeightPx / 2}]
## Set the a & b parms (half width & height of the rectangle)
## to about 80% of the image half-width & half-height, resp.
set factor 0.8
set aPx [expr {round($factor * double($xmidPx))}]
set bPx [expr {round($factor * double($ymidPx))}]
set aPx_float [expr {double($aPx)}]
set bPx_float [expr {double($bPx)}]
## We set the x-location of the left & right sides of
## the rectangle (relative to the top left of the canvas),
## for use in building scan-lines below.
set x_rectLeftPx [expr {($xmidPx - $aPx) + 1}]
set x_rectRightPx [expr {$xmidPx + $aPx}]
## We set the y-location of the top & bottom sides of
## the rectangle (relative to the top-left of the canvas),
## for use in building scan-lines below.
set y_rectTopPx [expr {($ymidPx - $bPx) + 1}]
set y_rectBottomPx [expr {$ymidPx + $bPx}]
## FOR TESTING:
# puts "ReDraw_ydir > xmidPx: $xmidPx ; ymidPx: $ymidPx"
# puts "ReDraw_ydir > aPx : $aPx ; bPx : $bPx"
## Set the RGB color ranges for the current choice of
## gradient color1 & color2.
set rRange [expr {$COLOR2r - double($COLOR1r)}]
set gRange [expr {$COLOR2g - double($COLOR1g)}]
set bRange [expr {$COLOR2b - double($COLOR1b)}]
## Note that this proc should only be called when
## $curDIRECTION == "y". So we want to 'spread' the
## RGB color range over the HEIGHT of the RECTANGLE'S area.
##
## The following RGB ratios will be used to set the gradient color
## at a y-level.
## (The units are base-256-color-units per y-distance-in-pixels.)
set rectHeightPx [expr {2.0 * $bPx_float}]
set rRatio [expr {$rRange / $rectHeightPx}]
set gRatio [expr {$gRange / $rectHeightPx}]
set bRatio [expr {$bRange / $rectHeightPx}]
## We now draw the image --- by horizontal scan-lines.
##
## For each y (going from the top of the image area to the bottom),
## we set the colors in the horizontal scan-lines.
## We can use the horizontal symmetry (symmetry about the vertical axis
## thru the center of the image) of this y-gradient-direction image
## to set the colors of pixels in the right-half of the image
## to be the mirror image of the left-half.
##
## When y is above the top of the rectangle or below the bottom of
## the rectangle, all the pixels are the background color.
## We can use this to avoid a loop thru the x-values
## for these scan-lines.
##
## In more detail:
## We iterate from the top of the image y=0 to the bottom of the image
## y=img-height, and then iterate over x going from the left of the
## image x=0 to the middle of the image x=half-the-image-width.
## We build the right half of the horizontal scanline as we build the
## left half of the scanline.
##
## Note that if the shading-switch is off, the part
## of the scanlines in the rectangle is a constant color --- interpolated
## from the 2 user-supplied gradient colors. Otherwise, we need to
## apply the v & 1-v values (for each x,y on the half-scanline) to
## the current y-gradient-color and the background color to get the
## color of the pixel x,y --- where v is our 'color-metric'.
##
## For each horizontal scan-line at y, we build the colors for the
## left and right scanline-halves in two strings ---
## $hexcolorsSTR_left and $hexcolorsSTR_right.
## (I tried using lists and 'lappend' and'lprepend', but strings
## turned out to be faster --- in my attempts.)
##
## We concatenate $hexcolorsSTR_left and $hexcolorsSTR_right into a
## list --- and 'put' the list of colors on the image, with its
## 'left-location' at 0 $y.
for {set yPx 0} {$yPx < $imgHeightPx} {incr yPx} {
## If we are above or below the rectangle, write a scanline
## of the background color and skip to the next y.
set ymetric [expr { abs( ($ymidPx - $yPx) / $bPx_float ) }]
if { $ymetric > 1.0} {
## Draw the scanline at height $yPx. (We are depending on
## the 'put' command to 'tile' the color across the image.)
imgID put [list $COLORbkGNDhex] -to 0 $yPx $imgWidthPx [expr {$yPx + 1}]
## FOR TESTING:
# puts "ReDraw_ydir > ymetric: $ymetric"
## Skip to the next y.
continue
}
## Set the rectangle-gradient-color (unshaded) for the current Y value.
## This is to be used inside the rectangle. We adjust y accordingly.
## (We are going to need this whether the shading switch is on or off.)
set yFromTopPx [expr {($yPx - $y_rectTopPx) + 1}]
set curGradCOLORr [expr {int( $COLOR1r + ($rRatio * $yFromTopPx ) )}]
set curGradCOLORg [expr {int( $COLOR1g + ($gRatio * $yFromTopPx ) )}]
set curGradCOLORb [expr {int( $COLOR1b + ($bRatio * $yFromTopPx ) )}]
if {$curGradCOLORr > 255} {set curGradCOLORr 255}
if {$curGradCOLORg > 255} {set curGradCOLORg 255}
if {$curGradCOLORb > 255} {set curGradCOLORb 255}
set curGradCOLORhex [format "#%02x%02x%02x" $curGradCOLORr $curGradCOLORg $curGradCOLORb]
## FOR TESTING:
# puts "ReDraw_ydir > curGradCOLORg: $curGradCOLORg"
# puts "ReDraw_ydir > curGradCOLORhex: $curGradCOLORhex"
## Reset the 2 string-vars for the 2 halves of the next
## horizontal scanline.
set hexcolorsSTR_left ""
set hexcolorsSTR_right ""
## We iterate over the left-half of the horizontal scan-line.
for {set xPx 0} {$xPx < $xmidPx} {incr xPx} {
if {$xPx < $x_rectLeftPx} {
## If we are to the left of the rectangle, add the
## background color to the left and right scanline strings
## and skip to the next x.
set hexcolorsSTR_left "$hexcolorsSTR_left $COLORbkGNDhex"
set hexcolorsSTR_right "$COLORbkGNDhex $hexcolorsSTR_right"
continue
}
if {$shade0or1 == 0} {
## If the shade switch is off, for this $xPx within the
## rectangle, we can add the current gradient color
## to the left and right scanline strings and skip
## to the next x.
set hexcolorsSTR_left "$hexcolorsSTR_left $curGradCOLORhex"
set hexcolorsSTR_right "$curGradCOLORhex $hexcolorsSTR_right"
## FOR TESTING:
# puts "ReDraw_ydir > xPx: $xPx yPx: $yPx \
# curGradCOLORhex: $curGradCOLORhex"
continue
}
## At this point we have $shade0or1 == 1 --- shade switch turned on,
## so we need to evaluate v and calculate the new
## shaded-gradient-color for this $xPx.
## Evaluate the expression v = max(abs(x/a), abs(y/b)) ,
## where x and y are measured relative to the middle of the
## rectangle (and the image).
set v [ expr {max( abs( ($xPx - $xmidPx) / $aPx_float ) , \
$ymetric )} ]
## According to the value of v, set the pixel color that we will add
## to the 2 string-vars holding hexcolors.
##
## The shading at the edges falls off too slowly if we use
## v or even v to the 4th. The power 12 gives good shading.
set vpow [expr {pow($v,$shadeEXP)}]
set oneMinusVpow [expr {1.0 - $vpow}]
set R [expr {int(($vpow * $COLORbkGNDr) + ($oneMinusVpow * $curGradCOLORr))}]
set G [expr {int(($vpow * $COLORbkGNDg) + ($oneMinusVpow * $curGradCOLORg))}]
set B [expr {int(($vpow * $COLORbkGNDb) + ($oneMinusVpow * $curGradCOLORb))}]
if {$R > 255} {set R 255}
if {$G > 255} {set G 255}
if {$B > 255} {set B 255}
if {$R < 0} {set R 0}
if {$G < 0} {set G 0}
if {$B < 0} {set B 0}
set hexcolor [format "#%02X%02X%02X" $R $G $B]
## Add this 'shaded' hexcolor to the left and right scanline
## strings.
set hexcolorsSTR_left "$hexcolorsSTR_left $hexcolor"
set hexcolorsSTR_right "$hexcolor $hexcolorsSTR_right"
## FOR TESTING:
# if {$xPx == $xmidPx} {
# puts "ReDraw_ydir > xPx: $xPx yPx: $yPx v: $v hexcolor: $hexcolor"
# }
}
## END OF xPx loop
## Make a list from the left and right color strings.
set scanlineSTR "$hexcolorsSTR_left $hexcolorsSTR_right"
set scanlineLIST [list $scanlineSTR]
## Draw the scanline at height $yPx.
imgID put $scanlineLIST -to 0 $yPx
## FOR TESTING: (show the progress after drawing each horizontal
## scanline for a yPx value)
# update
}
## END OF yPx loop
## FOR TESTING:
# imgID put [list {#888888 #888888 #888888 #888888 #888888} ] -to 0 [expr {$ymidPx - 5}]
## FOR TESTING:
# puts "ReDraw_ydir > hexcolorsSTR_right: $hexcolorsSTR_right"
# puts "ReDraw_ydir > hexcolorsSTR_left: $hexcolorsSTR_left"
## Make sure the text on the COLORS and PARMS label widgets
## is up to date.
.fRbuttons.labelCOLORS configure -text "\
Gradient colors 1&2: $COLOR1hex $COLOR2hex (left-right or top-bottom)
Background color: $COLORbkGNDhex DRAW TIME: [expr {[clock milliseconds] - $t0}] millisecs elapsed"
.fRimgspecs.labelPARMS configure -text "\
Width, height of
rectangle: [expr {2 * $aPx}] [expr {2 * $bPx}]
image: $imgWidthPx $imgHeightPx"
## Change the title of the window to show execution time.
## (This shows how we could put a msg in the window title bar,
## instead of in a label in the GUI.)
# wm title . \
# "Redraw DONE. [expr {[clock milliseconds] - $t0}] millisecs elapsed."
}
## END OF proc 'ReDraw_ydir'
##+#####################################################################
## proc ReDraw_xdir
##
## PURPOSE:
## Draws the rectangle on the canvas, with shaded or unshaded
## edges, and with a background color surrounding the rectangle
## --- and with an x-gradient of 2 colors --- i.e. the rectangle
## is colored from color1 at the left to color2 at the right of
## the rectangle.
##
## Ideally, I wanted to do the draw a vertical scan-line
## at a time, with calls like:
## imgID put $hexcolorsLIST -to $x 0 [expr {$x + 1}] $imgHeightPx
## where $x,0 is the topmost position of a vertical line of
## hexcolors for the pixels.
##
## I could not find a way of building VERTICAL-scanlines and being
## able to apply them to the image structure with a single 'put'
## command for each vertical-scanline. So I ended up using a 'put'
## command for each pixel within the rectangle.
##
## The draw-time for the x-direction then turned out to be about
## twice the time as for the y-direction (where I was able to 'put'
## an entire horizontal scanline at a time). For the default
## initial size of the GUI, x-gradient draw-times were about 1.7 secs
## --- versus about 0.85 sec for the y-gradient draw-times.
## (The draw-times were more than twice those times when I increased
## the GUI window size to fill the monitor screen.)
##
## When x is to the left or right of the rectangle, the vertical
## scanline is just the background color for all pixels in the scanline.
## I was able to draw each of those scanlines with one 'put'.
##
## CALLED BY: the ReDraw proc, if $curDIRECTION is x.
##+#####################################################################
proc ReDraw_xdir {x} {
global curDIRECTION shade0or1 shadeEXP \
COLOR1r COLOR1g COLOR1b COLOR1hex \
COLOR2r COLOR2g COLOR2b COLOR2hex \
COLORbkGNDr COLORbkGNDg COLORbkGNDb COLORbkGNDhex
## Set the current time, for determining execution
## time for building the photo image, below.
set t0 [clock milliseconds]
## Delete the current image structure.
## We especially need to do this when the canvas has been re-sized,
## so that we can redraw the image according to the new canvas size.
catch {image delete imgID}
## Get the current canvas size.
set curCanWidthPx [winfo width .fRcan.can]
set curCanHeightPx [winfo height .fRcan.can]
## Initialize the width & height of the image that we are going to create
## --- to the size of the canvas ---
## and let us make each dimension of the image an even integer (pixels).
set imgWidthPx $curCanWidthPx
set imgHeightPx $curCanHeightPx
if {$imgWidthPx % 2 == 1} { incr imgWidthPx -1 }
if {$imgHeightPx % 2 == 1} { incr imgHeightPx -1 }
## Make the new image structure.
image create photo imgID -width $imgWidthPx -height $imgHeightPx
## Put the image on the canvas.
## (Note to myself: Should this statement be at top or bottom of this proc?)
.fRcan.can create image 0 0 -anchor nw -image imgID
## Get the half width and height of the image --- with which
## we will set a & b --- the half width and height of the rectangle.
set xmidPx [expr {$imgWidthPx / 2}]
set ymidPx [expr {$imgHeightPx / 2}]
## Set the a & b parms (half width & height of the rectangle)
## to about 80% of the image half-width & half-height, resp.
set factor 0.8
set aPx [expr {round($factor * double($xmidPx))}]
set bPx [expr {round($factor * double($ymidPx))}]
set aPx_float [expr {double($aPx)}]
set bPx_float [expr {double($bPx)}]
## We set the y-location of the top & bottom sides of
## the rectangle (relative to the top left of the canvas),
## for use in building scan-lines below.
set y_rectTopPx [expr {($ymidPx - $bPx) + 1}]
set y_rectBottomPx [expr {$ymidPx + $bPx}]
## We set the x-location of the left & right sides of
## the rectangle (relative to the top-left of the canvas),
## for use in building scan-lines and coloring background below.
set x_rectLeftPx [expr {($xmidPx - $aPx) + 1}]
set x_rectRightPx [expr {$xmidPx + $aPx}]
## FOR TESTING:
# puts "ReDraw_xdir > Setting width, height, distance vars:"
# puts "ReDraw_xdir > xmidPx: $xmidPx ; ymidPx: $ymidPx"
# puts "ReDraw_xdir > aPx : $aPx ; bPx : $bPx"
# puts "ReDraw_xdir > rectTopPx : $rectTopPx"
## Set the RGB color ranges for the current choice of
## gradient color1 & color2.
set rRange [expr {$COLOR2r - double($COLOR1r)}]
set gRange [expr {$COLOR2g - double($COLOR1g)}]
set bRange [expr {$COLOR2b - double($COLOR1b)}]
## Note that this proc should only be called when
## $curDIRECTION == "x". So we want to 'spread' the
## RGB color range over the WIDTH of the RECTANGLE'S area.
##
## The following RGB ratios will be used to set the gradient color
## at an x-scanline (vertical).
## (The units are base-256-color-units per x-distance-in-pixels.)
set rectWidthPx [expr {2.0 * $aPx_float}]
set rRatio [expr {$rRange / $rectWidthPx}]
set gRatio [expr {$gRange / $rectWidthPx}]
set bRatio [expr {$bRange / $rectWidthPx}]
## We now draw the image. Originally I wanted to do the draw
## by vertical scan-lines --- as follows:
##
## For each x (going from the left of the image area to the right),
## we set the colors in the vertical scan-lines.
## We can use the vertical symmetry (symmetry about the horizontal axis
## thru the center of the image) of this x-gradient-direction image
## to set the colors of pixels in the bottom-half of the image
## to be the mirror image of the top-half.
##
## When x is to the left of the rectangle or to the right of
## the rectangle, all the pixels in the vertical 'scanline'
## are the background color.
## We can use this to avoid a loop thru the y-values
## for these scan-lines.
##
## In more detail:
## We iterate from the left of the image x=0 to the right of the image
## x=img-width, and then iterate over y going from the top of the
## image y=0 to the middle of the image y=half-the-image-height.
## We build the bottom-half of the vertical 'scanline' as we build the
## top-half of the scanline.
##
## Note that if the shading-switch is off, the part of a scanline
## that is within the rectangle is a constant color --- interpolated
## from the 2 user-supplied gradient colors. Otherwise, we need to
## apply the v & 1-v values (for each x,y on the vertical half-scanline) to
## the current x-gradient-color and the background color to get the
## color of the pixel x,y.
##
## For each vertical 'scan-line' at x, we build the colors for the
## top and bottom scanline-halves in two strings ---
## $hexcolorsSTR_top and $hexcolorsSTR_bottom.
##
## We concatenate $hexcolorsSTR_top and $hexcolorsSTR_bottom into a
## list --- and 'put' the list of colors on the image, with its
## 'top-location' at $x 0.
##
## Unfortunately, I was unable to get the 'put' command to apply
## a string of colors representing a 'vertical-scanline' properly
## into the image structure. So I had to 'put' the hex-colors
## a pixel at a time.
for {set xPx 0} {$xPx < $imgWidthPx} {incr xPx} {
## If we are to the left or right of the rectangle, write a scanline
## of the background color and skip to the next x.
set xmetric [expr { abs( ($xmidPx - $xPx) / $aPx_float ) }]
if { $xmetric > 1.0} {
## Draw the vertical scanline at $xPx. (We are depending on
## the 'put' command to 'tile' the color within the specified area.)
imgID put [list $COLORbkGNDhex] -to $xPx 0 [expr {$xPx + 1}] $imgHeightPx
## The above must be used. The following will not draw the vertical
## scanlines to the left and right of the rectangle.
# imgID put [list $COLORbkGNDhex] -to $xPx 0 $xPx $imgHeightPx
## FOR TESTING:
# puts "ReDraw_xdir > Plotting vert-lines at the left or right of the rectangle:"
# puts "ReDraw_xdir > xmetric: $xmetric xPx: $xPx"
# update
# after 10
## Skip to the next x.
continue
}
## Set the rectangle-gradient-color (unshaded) for the current X value.
## This is to be used INSIDE the rectangle. We adjust x accordingly.
## (We are going to need this whether the shading switch is on or off.)
set xFromLeftPx [expr {($xPx - $x_rectLeftPx) + 1}]
set curGradCOLORr [expr {int( $COLOR1r + ($rRatio * $xFromLeftPx ) )}]
set curGradCOLORg [expr {int( $COLOR1g + ($gRatio * $xFromLeftPx ) )}]
set curGradCOLORb [expr {int( $COLOR1b + ($bRatio * $xFromLeftPx ) )}]
if {$curGradCOLORr > 255} {set curGradCOLORr 255}
if {$curGradCOLORg > 255} {set curGradCOLORg 255}
if {$curGradCOLORb > 255} {set curGradCOLORb 255}
set curGradCOLORhex [format "#%02x%02x%02x" $curGradCOLORr $curGradCOLORg $curGradCOLORb]
## FOR TESTING:
# puts "ReDraw_xdir > Setting the unshaded gradient color at xPx for the vert line:"
# puts "ReDraw_xdir > curGradCOLORg: $curGradCOLORg xPx: $xPx"
# puts "ReDraw_xdir > curGradCOLORhex: $curGradCOLORhex xPx: $xPx"
## Reset the 2 string-vars for the 2 halves of the next
## vertical scanline. COMMENTED - Could not get 'put' to work with
## 'vertical-scanlines'.
# set hexcolorsSTR_top ""
# set hexcolorsSTR_bottom ""
## We iterate over the top-half of the vertical scan-line.
for {set yPx 0} {$yPx <= $ymidPx} {incr yPx} {
## If we are to above the rectangle, add the
## background color to the top and bottom scanline strings
## and skip to the next y.
if {$yPx < $y_rectTopPx} {
# set hexcolorsSTR_top "$hexcolorsSTR_top \{$COLORbkGNDhex\}"
# set hexcolorsSTR_bottom "\{$COLORbkGNDhex\} $hexcolorsSTR_bottom"
## Since the strings/lists don't seem to work, poke the color at current xy.
## Following doesn't draw:
## imgID put $COLORbkGNDhex -to $xPx $yPx [expr {$xPx + 1}] $yPx
imgID put $COLORbkGNDhex -to $xPx $yPx
imgID put $COLORbkGNDhex -to $xPx [expr {$imgHeightPx - $yPx}]
## FOR TESTING:
# puts "ReDraw_xdir > Above the rect. Adding bkgnd color to vert-strings at:"
# puts "ReDraw_xdir > yPx: $yPx rectTopPx: $rectTopPx xPx: $xPx"
continue
}
if {$shade0or1 == 0} {
## If the shade switch is off, for this $yPx within the
## rectangle, we can add the current gradient color
## to the top and bottom scanline strings and skip
## to the next y. COMMENTED - could not get 'put' to work
## with the 'vertical-scanlines'.
# set hexcolorsSTR_top "$hexcolorsSTR_top \{$curGradCOLORhex\}"
# set hexcolorsSTR_bottom "\{$curGradCOLORhex\} $hexcolorsSTR_bottom"
## Since the strings/lists don't seem to work, poke the color at current xy.
imgID put $curGradCOLORhex -to $xPx $yPx
imgID put $curGradCOLORhex -to $xPx [expr {$imgHeightPx - $yPx}]
## FOR TESTING:
# puts "ReDraw_ydir > Shade switch is OFF."
# puts "ReDraw_ydir > Adding current grad-color to the vert-strings."
# puts "ReDraw_ydir > xPx: $xPx yPx: $yPx \
# curGradCOLORhex: $curGradCOLORhex"
continue
}
## At this point we have $shade0or1 == 1 --- i.e. shade switch turned on,
## so we need to evaluate v and calculate the new
## shaded-gradient-color for this $yPx.
## Evaluate the expression v = max(abs(x/a), abs(y/b)) ,
## where x and y are measured relative to the middle of the
## rectangle (and the image).
set v [ expr {max( $xmetric , abs( ($yPx - $ymidPx) / $bPx_float ) )} ]
## According to the value of v, set the pixel color that we will add
## to the 2 string-vars holding hexcolors.
##
## The shading at the edges falls off too slowly if we use
## v or even v to the 4th. So we try the power 12.
set vpow [expr {pow($v,$shadeEXP)}]
set oneMinusVpow [expr {1.0 - $vpow}]
set R [expr {int(($vpow * $COLORbkGNDr) + ($oneMinusVpow * $curGradCOLORr))}]
set G [expr {int(($vpow * $COLORbkGNDg) + ($oneMinusVpow * $curGradCOLORg))}]
set B [expr {int(($vpow * $COLORbkGNDb) + ($oneMinusVpow * $curGradCOLORb))}]
if {$R > 255} {set R 255}
if {$G > 255} {set G 255}
if {$B > 255} {set B 255}
if {$R < 0} {set R 0}
if {$G < 0} {set G 0}
if {$B < 0} {set B 0}
set hexcolor [format "#%02X%02X%02X" $R $G $B]
## Add this 'shaded' hexcolor to the top and bottom 'vertical scanline'
## strings. COMMENTED - could not get 'put' to work with the
## 'vertical-scanlines'.
# set hexcolorsSTR_top "$hexcolorsSTR_top \{$hexcolor\}"
# set hexcolorsSTR_bottom "\{$hexcolor\} $hexcolorsSTR_bottom"
## Since the strings & lists don't seem to work, poke the color at current xy
## and its vertical reflection.
imgID put $hexcolor -to $xPx $yPx
imgID put $hexcolor -to $xPx [expr {$imgHeightPx - $yPx}]
## FOR TESTING:
# if {$yPx == [expr {$ymidPx - 1}] && $xpx == $xmidPx} {
# puts "ReDraw_xdir > We should be inside the rectangle now."
# puts "ReDraw_xdir > Adding a shaded-gradient-color to the vert-strings:"
# puts "ReDraw_xdir > xPx: $xPx yPx: $yPx v: $v hexcolor: $hexcolor"
# puts "ReDraw_xdir > xPx: $xPx yPx: $yPx hexcolorsSTR_top: $hexcolorsSTR_top"
# after 5000
# exit
# }
}
## END OF yPx loop
## Make a list from the top and bottom color strings. COMMENTED -
## could not get 'put' to work with the 'vertical-scanlines'.
# set scanlineSTR "$hexcolorsSTR_top $hexcolorsSTR_bottom"
# set scanlineLIST [list $scanlineSTR]
## FOR TESTING:
# if {$xPx == $xmidPx} {
# puts "ReDraw_xdir > Writing a vert-scanline after dropping out of y-loop at:"
# puts "ReDraw_xdir > xPx: $xPx scanlineSTR: $scanlineSTR"
# }
## Draw the scanline at height $xPx. COMMENTED - could not
## get 'put' to work with the 'vertical-scanlines' --- even when I
## specified a 1-pixel-wide rectangle in which to draw.
## Instead, the pixel colors were set with 'individual' put's above.
# imgID put [list "$scanlineSTR"] -to $xPx 0 [expr {$xPx + 1}] $imgHeightPx
## FOR TESTING: (show the progress after drawing each 'vertical
## scanline' for an xPx value)
# update
}
## END OF xPx loop
## FOR TESTING: (Trying to get 'vertical-scanlines' to work.)
# set tempSTR "{#444444} {#666666} {#888888} {#AAAAAA} {#CCCCCC}"
# imgID put [list $tempSTR ] \
# -to [expr {$xmidPx - 5}] 0 [expr {$xmidPx - 4}] $imgHeightPx
# imgID put [list {#888888} {#888888} {#888888} {#888888} {#888888} ] \
# -to [expr {$xmidPx - 5}] 0 [expr {$xmidPx - 4}] $imgHeightPx
## FOR TESTING: (show the halves of the LAST vertical scanline)
# puts "ReDraw_xdir > hexcolorsSTR_bottom: $hexcolorsSTR_bottom"
# puts "ReDraw_xdir > hexcolorsSTR_top: $hexcolorsSTR_top"
## Make sure the text on the COLORS and PARMS label widgets
## is up to date.
.fRbuttons.labelCOLORS configure -text "\
Gradient colors 1&2: $COLOR1hex $COLOR2hex (left-right or top-bottom)
Background color: $COLORbkGNDhex DRAW TIME: [expr {[clock milliseconds] - $t0}] millisecs elapsed"
.fRimgspecs.labelPARMS configure -text "\
Width, height of
rectangle: [expr {2 * $aPx}] [expr {2 * $bPx}]
image: $imgWidthPx $imgHeightPx"
## Change the title of the window to show execution time.
## (This shows how we could put a msg in the window title bar,
## instead of in a label in the GUI.)
# wm title . \
# "Redraw DONE. [expr {[clock milliseconds] - $t0}] millisecs elapsed."
}
## END OF proc 'ReDraw_xdir'
##+#####################################################################
## proc 'set_gradient_color1'
##+#####################################################################
## PURPOSE:
##
## This procedure is invoked to get an RGB triplet
## via 3 RGB slider bars on the FE Color Selector GUI.
##
## Uses that RGB value to set gradient color #1 for the rectangle.
##
## Arguments: none
##
## CALLED BY: .fRbuttons.buttCOLOR1 button
##+#####################################################################
proc set_gradient_color1 {} {
global COLOR1r COLOR1g COLOR1b COLOR1hex
# global feDIR_tkguis
## FOR TESTING:
# puts "COLOR1r: $COLOR1r"
# puts "COLOR1g: $COLOR1g"
# puts "COLOR1b: $COLOR1b"
set TEMPrgb [ exec \
./sho_colorvals_via_sliders3rgb.tk \
$COLOR1r $COLOR1g $COLOR1b]
# $feDIR_tkguis/sho_colorvals_via_sliders3rgb.tk \
## FOR TESTING:
# puts "TEMPrgb: $TEMPrgb"
if { "$TEMPrgb" == "" } { return }
scan $TEMPrgb "%s %s %s %s" r255 g255 b255 hexRGB
set COLOR1hex "#$hexRGB"
set COLOR1r $r255
set COLOR1g $g255
set COLOR1b $b255
## Redraw the rectangle (and background) with the new
## rectangle gradient color #1.
ReDraw 0
}
## END OF proc 'set_gradient_color1'
##+#####################################################################
## proc 'set_gradient_color2'
##+#####################################################################
## PURPOSE:
##
## This procedure is invoked to get an RGB triplet
## via 3 RGB slider bars on the FE Color Selector GUI.
##
## Uses that RGB value to set color2 of the 2 colors for a
## color gradient from color1 to color2.
##
## Arguments: none
##
## CALLED BY: .fRbuttons.buttCOLOR1 button
##+#####################################################################
proc set_gradient_color2 {} {
global COLOR2r COLOR2g COLOR2b COLOR2hex
# global feDIR_tkguis
## FOR TESTING:
# puts "COLOR2r: $COLOR2r"
# puts "COLOR2g: $COLOR2g"
# puts "COLOR2b: $COLOR2b"
set TEMPrgb [ exec \
./sho_colorvals_via_sliders3rgb.tk \
$COLOR2r $COLOR2g $COLOR2b]
# $feDIR_tkguis/sho_colorvals_via_sliders3rgb.tk \
## FOR TESTING:
# puts "TEMPrgb: $TEMPrgb"
if { "$TEMPrgb" == "" } { return }
scan $TEMPrgb "%s %s %s %s" r255 g255 b255 hexRGB
set COLOR2hex "#$hexRGB"
set COLOR2r $r255
set COLOR2g $g255
set COLOR2b $b255
## Redraw the rectangle (and background) with the new
## rectangle gradient color #2.
ReDraw 0
}
## END OF proc 'set_gradient_color2'
##+#####################################################################
## proc 'set_background_color'
##+#####################################################################
## PURPOSE:
##
## This procedure is invoked to get an RGB triplet
## via 3 RGB slider bars on the FE Color Selector GUI.
##
## Uses that RGB value to set the background color ---
## on which the rectangle lies.
##
## Arguments: none
##
## CALLED BY: .fRbuttons.buttCOLORbkGND button
##+#####################################################################
proc set_background_color {} {
global COLORbkGNDr COLORbkGNDg COLORbkGNDb COLORbkGNDhex
# global feDIR_tkguis
## FOR TESTING:
# puts "COLORbkGNDr: $COLORbkGNDr"
# puts "COLORbkGNDg: $COLORbkGNDb"
# puts "COLORbkGNDb: $COLORbkGNDb"
set TEMPrgb [ exec \
./sho_colorvals_via_sliders3rgb.tk \
$COLORbkGNDr $COLORbkGNDg $COLORbkGNDb]
# $feDIR_tkguis/sho_colorvals_via_sliders3rgb.tk \
## FOR TESTING:
# puts "TEMPrgb: $TEMPrgb"
if { "$TEMPrgb" == "" } { return }
scan $TEMPrgb "%s %s %s %s" r255 g255 b255 hexRGB
set COLORbkGNDhex "#$hexRGB"
set COLORbkGNDr $r255
set COLORbkGNDg $g255
set COLORbkGNDb $b255
## Redraw the background (and the rectangle) with the
## new background color.
ReDraw 0
}
## END OF proc 'set_background_color'
##+#############################################################
## proc ReDraw_if_canvas_resized
##
## CALLED BY: bind .fRcan.can <Configure>
## at bottom of this script.
##+#############################################################
proc ReDraw_if_canvas_resized {} {
global PREVcanWidthPx PREVcanHeightPx
set CURcanWidthPx [winfo width .fRcan.can]
set CURcanHeightPx [winfo height .fRcan.can]
if { $CURcanWidthPx != $PREVcanWidthPx ||
$CURcanHeightPx != $PREVcanHeightPx} {
ReDraw 0
set PREVcanWidthPx $CURcanWidthPx
set PREVcanHeightPx $CURcanHeightPx
}
}
## END OF ReDraw_if_canvas_resized
##+#####################################################
## Additional GUI initialization, if needed (or wanted).
##+#####################################################
## Initialize the canvas with 'ReDraw'.
## Need 'update' here to set the size of the canvas,
## because 'ReDraw' uses 'winfo' to get the width and
## height of the canvas.
## See the 'bind <Configure>' command below.
update
ReDraw 0
## When this script drops into the Tk event-handling loop,
## this bind command causes redraws whenever the canvas is resized.
set PREVcanWidthPx [winfo width .fRcan.can]
set PREVcanHeightPx [winfo height .fRcan.can]
bind .fRcan.can <Configure> "ReDraw_if_canvas_resized"
It appears that one could make some quite high-quality 'button', 'bullet', icon-background, and logo-background images with this utility.
And I have the option of enhancing the Tk script on this page, to provide a few more capabilities to this 'button' generator.
For example, I could add a couple of scale widgets to the GUI, to allow for setting the width and height of the rectangle (in pixels) more directly --- instead of setting the dimensions by resizing the window.
By the way, by putting a scale widget on the GUI for adjusting a 'pow' exponent to change the 'extensity' of the shading at the edge of the rectangle, it was easy to find that low powers (like 1 or 4 or even 6) gave really washed-out edges to the rectangle. It surprised me that it took a rather high value (like 12) to get a good-looking edge.
That means that v^12 and (1 - v^12) gave better edges when blending the rectangle color at xy and the background color --- better than using the weighted average of the 2 colors using v and (1-v).