Primes Sieve - on a resizable canvas
uniquename - 2013jul05
I recieved an education in mathematics and am retired now after a career involving computer science applications (and Tcl-Tk programming). In retirement, I am finally finding the time to read many books on mathematics --- and I find that there are many well-written books nowadays that combine an appreciation for the history of mathematics with discussions of 'fun' or interesting topics in math --- books by authors like Petr Beckmann, William Dunham, Ian Stewart, Eli Maor, Paul Nahin, Julian Havil, Saul Stahl, Clifford Pickover, Alfred Posamentier (and Ingmar Lehmann), Anany and Maria Levitin, Ivan Moscovich, Tony Crilly, and, of course, that seeker of magic in mathematics, Martin Gardner.
I am planning on spending the next several years writing Tcl-Tk scripts that bring to life many of these classical and modern math topics by presenting geometry, numbers, etc. in an interactive and/or animated way on the Tk canvas.
For my first contribution of this kind, on this wiki, I happen to have chosen to provide a display of prime numbers (via the 'sieve of Eratosthanes') on the Tk canvas.
I have seen some Tcl-Tk 'primes' demo scripts that show a few hundred integers and then show the prime numbers among them by use of an 'Eratosthenes sieve' technique.
But the demo scripts that I have seen show only a few hundred integers and show them as text.
I decided that I would like to see the distribution of about a million to 10 million primes --- that is, how the density of that many primes looks in an 'overview'. In order to see that many integers and primes at one time, I decided to show each prime and non-prime on a rectangular Tk canvas as a single pixel for each integer.
I wanted to use 2 different colors --- one for the primes and one for the non-primes --- with the user having the option to choose the two colors. I decided to show the integers (pixels) in the usual fashion --- in rows, with the integers increasing from left to right.
And I wanted to make the canvas resizable so that the user can experiment with seeing how the pattern of primes changes as one uses a different number of pixels per row.
To make it easy and quick to change the canvas width, I decided to make the canvas resizable by simply grabbing an edge or corner of the GUI window and dragging, with the mouse/pointer cursor.
With those goals in mind, this utility ended up with features that can be summarized as follows.
---
MAIN FEATURES of the script/utility :
This Tk GUI script shows the primes and non-primes in the first M times N positive integers as colored pixels in a rectangular Tk Canvas --- where
** each postive integer is represented as a single pixel in the canvas
** each prime is indicated by one color and each non-prime is indicated by another color
** the user can choose the two colors (from among 256x256x256 = 16,777,216 colors)
** the integers (the 'on-or-off pixels') are plotted 'row-wise' in a canvas in the Tk GUI, where the size of the canvas is determined by the current size and shape of the GUI window
** the integer-pixels are plotted in M rows of N columns of pixels where M is the height of the canvas widget in pixels and N is the width of the canvas widget in pixels.
** the total number of integers that are sieve-processed (when the GUI script starts up) is Mscrn times Nscrn, where Mscrn and Nscrn denote the resolution of the user's monitor (the number of rows and columns of pixels being shown on the entire screen).
---
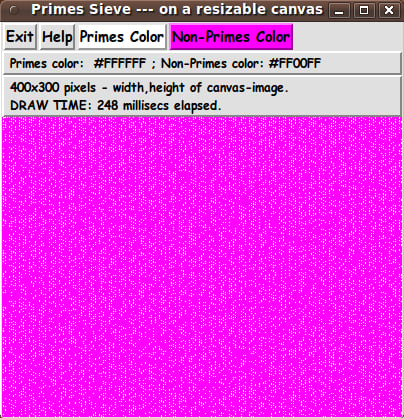
In implementing these features, I ended up with the GUI seen in the following image.
---
HELP TEXT
The 'Help' button on the GUI shows text which includes the observations listed below the Tcl-Tk code provided below.
The code
Below I provide the Tk script code for this 'primes sieve on a canvas image'.
I follow my usual 'canonical' structure for Tk code for this Tk script:
  0) Set general window & widget parms (win-name, win-position,
     win-color-scheme, fonts, widget-geometry-parms, win-size-control,
     text-array-for-labels-etc).

  1a) Define ALL frames (and sub-frames, if any).
  1b) Pack   ALL frames and sub-frames.

  2) Define & pack all widgets in the frames, frame by frame.
     Within each frame, define ALL the widgets. Then pack the widgets.

  3) Define keyboard and mouse/touchpad/touch-sensitive-screen action
     BINDINGS, if needed.

  4) Define PROCS, if needed.

  5) Additional GUI initialization (typically with one or more of
     the procs), if needed.
This structure is discussed in more detail on the page A Canonical Structure for Tk Code --- and variations.
This structure makes it easy for me to find code sections --- while generating and testing a Tk script, and when looking for code snippets to include in other scripts (code re-use).
I call your attention to step-zero. One new thing that I have started doing recently is using a text-array for text in labels, buttons, and other widgets in the GUI. This can make it easier for people to internationalize my scripts. I will be using a text-array like this in most of my scripts in the future.
Experimenting with the GUI
As in all my scripts that use the 'pack' geometry manager (which is all of my 100-plus scripts, so far), I provide the four main pack parameters --- '-side', '-anchor', '-fill', '-expand' --- on all of the 'pack' commands for the frames and widgets.
That helps me when I am initially testing the behavior of a GUI (the various widgets within it) as I resize the main window.
I think that I have used a nice choice of the 'pack' parameters. The labels and buttons stay fixed in size and relative-location as the window is re-sized --- while the 'canvas' expands/contracts as the window is re-sized.
You can experiment with the '-side', '-anchor', '-fill', and '-expand' parameters on the 'pack' commands for the various frames and widgets --- to get the widget behavior that you want.
___
In addition, you might want to change the fonts used for the various GUI widgets. For example, you could change '-weight' from 'bold' to 'normal' --- or '-slant' from 'roman' to 'italic'. Or change font families.
In fact, you may NEED to change the font families, because the families I used may not be available on your computer --- and the default font that the 'wish' interpreter chooses may not be very pleasing.
I use variables to set geometry parameters of widgets --- parameters such as border-widths and padding. And I have included the '-relief' parameter on the definitions of frames and widgets. Feel free to experiment with those 'appearance' parameters as well.
___
Note that the color buttons call on a color-selector-GUI script to set the colors. You can make that color-selector script by cutting-and-pasting the code from the page A non-obfuscated color selector GUI on this site.
Some features in the code
That said, here's the code --- with plenty of comments to describe what most of the code-sections are doing.
You can look at the top of the PROCS section of the code to see a list of the procs used in this script, along with brief descriptions of how they are called and what they do.
___
Here is a brief description of the two main procs of the script.
   - 'load_primes_sieve_array' - loads an array with zeros and ones
                                 indicating whether the integer index of
                                 the array is a non-prime or a prime.

   - 'redraw_primes'     - clears the image structure (if any) and
                           creates a new image structure according to the
                           current width and height of the canvas widget ---
                           and then draws the on/off (colored) pixels in the
                           rectangular image structure on the canvas.
The 'load' proc is executed once, when the GUI starts up.
The 'redraw' proc is executed when the GUI starts up and each time the canvas widget is resized.
It is my hope that the copious comments in the code will help Tcl-Tk coding 'newbies' get started in making GUI's like this.
Without the comments, potential young Tcler's might be tempted to return to their iPhones and iPads and iPods --- to watch videos of people being hit by large vehicles such as buses and ice cream trucks.
Code for Tk script 'primesSieve_inResizableCanvas_createImg.tk' :
#!/usr/bin/wish -f
##
## SCRIPT: primesSieve_inResizableCanvas_createImg.tk
##
## PURPOSE: This Tk GUI script shows the primes and non-primes in the
## first M times N positive integers as colored pixels in a
## Tk Canvas --- where
## - each postive integer is represented as a pixel in the canvas
## - each prime is indicated by one color and each non-prime
## is indicated by another color
## - the user can choose the two colors
## - the integers (the 'on-or-off pixels') are plotted 'row-wise'
## in a canvas in the Tk GUI, where the size of the canvas is
## determined by the current size and shape of the GUI window
## - the integer-pixels are plotted in M rows of N columns of
## pixels where M is the height of the canvas widget in pixels
## and N is the width of the canvas widget in pixels.
##
## METHOD: In this particular implementation, the 'image of the primes' is
## put on the canvas via a canvas 'image create' command
## --- and via 'put <hexcolor(s)-list> -to 0 $y' commands on
## the image, where each color list is N elements long.
##
## Thus the image is built row-wise --- that is, a list of N colors
## is built and placed in the image with the 'put' command, until
## the image is built up by M such rows.
##
## Each time the user changes the size of the Tk GUI window
## and the canvas dimensions change, the image is re-built, using
## the new values of M and N.
##
## The MxN primes (to be shown in the MxN canvas) are determined
## by a sieve of Eratosthenes procedure.
##
## To avoid having to determine the primes each time the canvas
## size is changed, the primes are determined in one procedure
## based on the screen size of the user's monitor. In other words,
## a procedure is suppled that queries the current screen-size and
## then applies the sieve of Eratosthenes method to determine the
## primes in the first (Mscrn x Nscrn) positive integers, where
## Mscrn is the number of rows of pixels of the monitor sreen and
## Nscrn is the number of columns of pixels of the monitor.
##
## The yes/no 'prime' information is saved in an array of ones
## and zeros, and the array is used to re-populate the canvas image
## with pixels of one color or the other (of the 2 colors chosen by
## the user) --- on initial GUI display --- and each time the canvas
## size changes (whenever the user resizes the GUI window).
##
## (If it takes quite a number of seconds to build the 'primes array',
## the user could be supplied hints on the GUI --- say,
## 'Building sieve array...' and 'Array done.' messages on the GUI
## --- so that the user is aware of why there is a pause at
## the beginning of the presentation of the GUI.)
##
##+##############
## THE GUI DESIGN:
##
## The GUI made by this Tk script contains a rectangular CANVAS WIDGET
## on which the color-filled rectangle will be drawn, using 2 colors.
##
## To do the drawing on the canvas, we use the 'image create' command to
## put an image on the entire canvas.
##
## After the (Mscrn x Nscrn) array of ones and zeros is built,
## we fill the interior of the image-rectangle by using
## 'put <hexcolor(s)-list> -to 0 $y'
## commands on the image where each hexcolor in the 'scanline list' that
## is inside the rectangle is determined by the 2 colors that a user
## chooses, and by the ones and zeros of the 'primes array'.
##
######################################
## RE-DRAWING THE IMAGE IN THE CANVAS:
##
## The user can change the size of the canvas by resizing the window
## --- and a redraw of the 'primes image' is performed whenever the
## canvas is resized.
##
## **NOTE**
## We take this approach, so that the user can quickly experiment
## with how the pattern of primes changes when the primes are 'plotted'
## with a different length of the rows of integers.
##
## The redraw includes clearing the canvas (deleting the image),
## recreating the image structure according to the current canvas size,
## and redrawing (re-filling) the image with 'put <hexcolor(s)> -to'
## commands.
##
## (If erasing the canvas and redrawing the rectangular image
## completes within a very small fraction of a second, it would
## be feasible to do the redraws 'dynamically' whenever the
## canvas size changes. Otherwise, a button could be supplied
## on the GUI so that the user can control when the redraw
## is performed, after a window/canvas re-size.)
##
###################################
## BUTTONS USED TO SET THE 2 COLORS:
##
## The GUI includes 2 buttons to call on a color selector GUI (an 'external'
## Tk script) to set the 2 colors --- for the primes and non-primes.
##
##+#########################
## USING THE GENERATED IMAGE:
## A screen/window capture utility (like 'gnome-screenshot'
## on Linux) can be used to capture the GUI image in a GIF
## or PNG file, say.
##
## If necessary, an image editor (like 'mtpaint' on Linux)
## can be used to crop the window capture image.
##
## The colored image file could be used with a utility (like the
## ImageMagick 'convert' command) to change one of the 2 colors
## to TRANSPARENT, making a partially transparent GIF
## (or PNG) file. Then the semi-transparent image file could be used
## --- for example, to overlay other backgrounds in HTML pages.
## This would be more effective' if the primes were indicated
## by squares of pixels rather than single pixels.
##
##+########################################################################
## 'CANONICAL' STRUCTURE OF THIS TK CODE:
##
## 0) Set general window & widget parms (win-name, win-position,
## win-color-scheme, fonts, widget-geometry-parms, win-size-control).
##
## 1a) Define ALL frames and sub-frames.
## 1b) Pack ALL frames and sub-frames.
##
## 2) Define all widgets in the frames --- typically going through the
## frames top-to-bottom and/or left-to-right --- and defining the
## widgets within each frame top-to-bottom and/or left-to-right.
## Pack the widgets after each frame has its widgets defined.
##
## 3) Define keyboard or mouse/touchpad/touch-sensitive-screen action
## BINDINGS, if needed.
##
## 4) Define PROCS, if needed.
##
## 5) Additional GUI INITIALIZATION (with procs), if needed.
##
##
## Some detail about the code structure of this particular script:
##
## 1a) Define ALL frames:
##
## Top-level : '.fRbuttons' , '.fRcolors', '.fRstatus', '.fRcan'
##
## Sub-frames: none
##
## 1b) Pack ALL frames.
##
## 2) Define all widgets in the frames (and pack them):
##
## - In '.fRbuttons': 1 button widget ('Exit'),
## and
## 2 buttons (for setting 2 colors),
## and
## - In '.fRcolors': 1 label widget to display 2 current color values
##
## - In '.fRstatus': 1 label widget in which to display 'status' msgs
##
## - In '.fRcan': 1 'canvas' widget
##
## 3) Define bindings:
##
## A button1-release event on the window (in particular, a canvas-resize)
## should cause a redraw of the 'primes image'.
##
## 4) Define procs:
##
## - 'load_primes_sieve_array' - to load an array with ones and zeros
## indicating whether the integer index of the
## array is a prime or a non-prime.
##
## - 'redraw_primes' - to clear the image structure (if any) and
## create a new image structure according to the
## current width and height of the canvas widget ---
## and then draw the on/off (colored) pixels in the
## rectangluar image structure on the canvas.
##
## - 'set_color1' - shows a color selector GUI and uses the
## user-selected color-1 to do a redraw
## of the 'primes image' on the canvas.
##
## - 'set_color2' - shows a color selector GUI and uses the
## user-selected color-2 to do a redraw
## of the 'primes image' on the canvas.
##
## - 'redraw_if_canvas_resized' - calls on the 'redraw_primes' proc above
## to do a redraw when a button1-release
## event is detected on the GUI window ---
## but only if the canvas has been resized.
##
## 5) Additional GUI initialization: Execute the 'load_primes_sieve_array'
## proc. Then execute the 'redraw_primes'
## proc once with an initial set
## of parms --- COLOR1hex, COLOR2hex
## --- to start with a 'primes image' on
## the canvas rather than a blank canvas.
##
##+########################################################################
## DEVELOPED WITH:
## Tcl-Tk 8.5 on Ubuntu 9.10 (2009-october release, 'Karmic Koala').
##
## $ wish
## % puts "$tcl_version $tk_version"
## showed 8.5 8.5 on Ubuntu 9.10
## after Tcl-Tk 8.4 was replaced by 8.5 --- to get anti-aliased fonts.
##+#######################################################################
## MAINTENANCE HISTORY:
## Created by: Blaise Montandon 2013jul04
## Changed by: Blaise Montandon 2013
##+#######################################################################
##+#######################################################################
## Set general window parms (title,position --- followed by
## color-scheme,fonts,window-minsize,etc.).
##+#######################################################################
wm title . "Primes Sieve --- on a resizable canvas"
wm iconname . "PrimesImage"
wm geometry . +15+30
##+######################################################
## Set the color scheme for the window and its widgets ---
## and set the initial 2 colors for the pixels of the
## 'primes image' in the rectangular interior of the
## canvas widget.
##+######################################################
tk_setPalette "#e0e0e0"
## Initialize the 2 colors for the pixels in the 'primes image'.
# set COLOR1r 255
# set COLOR1g 255
# set COLOR1b 0
set COLOR1r 255
set COLOR1g 255
set COLOR1b 255
set COLOR1hex [format "#%02X%02X%02X" $COLOR1r $COLOR1g $COLOR1b]
# set COLOR2r 255
# set COLOR2g 128
# set COLOR2b 0
set COLOR2r 255
set COLOR2g 0
set COLOR2b 255
set COLOR2hex [format "#%02X%02X%02X" $COLOR2r $COLOR2g $COLOR2b]
# set listboxBKGD "#f0f0f0"
# set entryBKGD "#f0f0f0"
set radbuttBKGD "#f0f0f0"
##+##########################################################
## We use a VARIABLE-WIDTH FONT for label and button widgets.
##
## We use a FIXED-WIDTH FONT for entry fields, listboxes, and
## text or message widgets, if any.
##+##########################################################
font create fontTEMP_varwidth \
-family {comic sans ms} \
-size -14 \
-weight bold \
-slant roman
font create fontTEMP_SMALL_varwidth \
-family {comic sans ms} \
-size -12 \
-weight bold \
-slant roman
## Some other possible (similar) variable width fonts:
## Arial
## Bitstream Vera Sans
## DejaVu Sans
## Droid Sans
## FreeSans
## Liberation Sans
## Nimbus Sans L
## Trebuchet MS
## Verdana
font create fontTEMP_fixedwidth \
-family {liberation mono} \
-size -14 \
-weight bold \
-slant roman
font create fontTEMP_SMALL_fixedwidth \
-family {liberation mono} \
-size -12 \
-weight bold \
-slant roman
## Some other possible fixed width fonts (esp. on Linux):
## Andale Mono
## Bitstream Vera Sans Mono
## Courier 10 Pitch
## DejaVu Sans Mono
## Droid Sans Mono
## FreeMono
## Nimbus Mono L
## TlwgMono
##+###########################################################
## SET GEOM VARS FOR THE VARIOUS WIDGET DEFINITIONS.
## (e.g. width and height of canvas, and padding for Buttons)
##+###########################################################
set initCanWidthPx 400
set initCanHeightPx 300
## NOTE: We could make these numbers smaller if
## we want a smaller initial canvas.
# set BDwidthPx_canvas 2
set BDwidthPx_canvas 0
## BUTTON geom parameters:
set PADXpx_button 0
set PADYpx_button 0
set BDwidthPx_button 2
## LABEL geom parameters:
set PADXpx_label 0
set PADYpx_label 0
set BDwidthPx_label 2
##+###################################################################
## Set a MINSIZE of the window (roughly).
##
## For width, allow for the minwidth of the '.fRbuttons' frame:
## about 3 buttons --- Exit,Color1,Color2.
##
## For height, allow for
## 1 char high for the widgets in the '.fRbuttons' frame,
## 1 char high for the label widget in the '.fRcolors' frame,
## 1 char high for the label widget in the '.fRstatus' frame,
## a canvas at least 24 pixels high
##+###################################################################
set minWinWidthPx [font measure fontTEMP_varwidth \
"Exit Help Prime Color Non-Prime Color"]
## Add some pixels to account for right-left-side window decoration
## (about 8 pixels), about 3 x 4 pixels/widget for borders/padding for
## 3 widgets --- 3 buttons. 8 + 12 = 20 pixels.
set minWinWidthPx [expr {20 + $minWinWidthPx}]
## NOTE: We want to be able to shrink the canvas rectangle quite a bit
## in the x-direction --- so we do not want to make the min-width very wide.
## So one could use a smaller min-width than this, if one wants to
## make the canvas very narrow.
## MIN HEIGHT --- for the 4 frames --- allow:
## 1 char high for 'fRbuttons'
## 1 char high for 'fRcolors'
## 1 char high for 'fRstatus'
## 24 pixels high for 'fRcan'
set CharHeightPx [font metrics fontTEMP_varwidth -linespace]
set minWinHeightPx [expr {24 + (3 * $CharHeightPx)}]
## Add about 28 pixels for top-bottom window decoration,
## about 2x2 pixels for each of the 4 stacked frames and their
## widgets (their borders/padding). 28 + 16 = 44.
set minWinHeightPx [expr {$minWinHeightPx + 44}]
## FOR TESTING:
# puts "minWinWidthPx = $minWinWidthPx"
# puts "minWinHeightPx = $minWinHeightPx"
wm minsize . $minWinWidthPx $minWinHeightPx
## We allow the window to be resizable and we pack the canvas with
## '-fill both -expand 1' so that the canvas can be enlarged by enlarging
## the window.
## If you want to make the window un-resizable,
## you can use the following statement.
# wm resizable . 0 0
##+####################################################################
## Set a TEXT-ARRAY to hold text for buttons & labels on the GUI.
## NOTE: This can aid INTERNATIONALIZATION. This array can
## be set according to a nation/region parameter.
##+####################################################################
## if { "$VARlocale" == "en"}
## For the 'fRbuttons' frame:
set aRtext(buttonEXIT) "Exit"
set aRtext(buttonHELP) "Help"
set aRtext(buttonCOLOR1) "Primes Color"
set aRtext(buttonCOLOR2) "Non-Primes Color"
## END OF if { "$VARlocale" == "en"}
##+################################################################
## DEFINE *ALL* THE FRAMES:
##
## Top-level : 'fRbuttons' 'fRcan'
##
## Sub-frames: none
##+################################################################
# set BDwidth_frame 2
# set RELIEF_frame raised
set BDwidth_frame 0
set RELIEF_frame flat
frame .fRbuttons -relief $RELIEF_frame -borderwidth $BDwidth_frame
frame .fRcolors -relief $RELIEF_frame -borderwidth $BDwidth_frame
frame .fRstatus -relief $RELIEF_frame -borderwidth $BDwidth_frame
frame .fRcan -relief $RELIEF_frame -borderwidth $BDwidth_frame
##+##############################
## PACK the top-level FRAMES.
##+##############################
pack .fRbuttons \
-side top \
-anchor nw \
-fill x \
-expand 0
pack .fRcolors \
.fRstatus \
-side top \
-anchor nw \
-fill x \
-expand 0
pack .fRcan \
-side top \
-anchor nw \
-fill both \
-expand 1
##+#########################################################
## OK. Now we are ready to define the widgets in the frames.
##+#########################################################
##+#####################################################################
## In the '.fRbuttons' FRAME --- DEFINE-and-PACK
## - an exit-button,
## and
## - 2 buttons ( to specify colors).
##+#####################################################################
button .fRbuttons.buttEXIT \
-text "$aRtext(buttonEXIT)" \
-font fontTEMP_varwidth \
-padx $PADXpx_button \
-pady $PADYpx_button \
-relief raised \
-bd $BDwidthPx_button \
-command {exit}
button .fRbuttons.buttHELP \
-text "$aRtext(buttonHELP)" \
-font fontTEMP_varwidth \
-padx $PADXpx_button \
-pady $PADYpx_button \
-relief raised \
-bd $BDwidthPx_button \
-command {popup_msgVarWithScroll .fRhelp "$HELPtext"}
button .fRbuttons.buttCOLOR1 \
-text "$aRtext(buttonCOLOR1)" \
-font fontTEMP_varwidth \
-padx $PADXpx_button \
-pady $PADYpx_button \
-relief raised \
-bd $BDwidthPx_button \
-command "set_color1"
button .fRbuttons.buttCOLOR2 \
-text "$aRtext(buttonCOLOR2)" \
-font fontTEMP_varwidth \
-padx $PADXpx_button \
-pady $PADYpx_button \
-relief raised \
-bd $BDwidthPx_button \
-command "set_color2"
##+###########################################
## Pack the widgets in the 'fRbuttons' frame.
##+###########################################
pack .fRbuttons.buttEXIT \
.fRbuttons.buttHELP \
.fRbuttons.buttCOLOR1 \
.fRbuttons.buttCOLOR2 \
-side left \
-anchor w \
-fill none \
-expand 0
##+#####################################################################
## In the '.fRcolors' FRAME --- DEFINE-and-PACK
## a LABEL widget, to show color values.
##+#####################################################################
label .fRcolors.labelCOLORS \
-text "" \
-font fontTEMP_SMALL_varwidth \
-justify left \
-anchor w \
-relief raised \
-bd $BDwidthPx_label
##+###########################################
## Pack the widget in the 'fRcolors' frame.
##+###########################################
pack .fRcolors.labelCOLORS \
-side left \
-anchor w \
-fill x \
-expand 1
##+#####################################################################
## In the '.fRstatus' FRAME --- DEFINE-and-PACK
## a LABEL widget, to show status messages.
##+#####################################################################
label .fRstatus.labelSTATUS \
-text "" \
-font fontTEMP_SMALL_varwidth \
-justify left \
-anchor w \
-relief raised \
-bd $BDwidthPx_label
##+###########################################
## Pack the widget in the 'fRstatus' frame.
##+###########################################
pack .fRstatus.labelSTATUS \
-side left \
-anchor w \
-fill x \
-expand 1
##+######################################################
## In the '.fRcan' FRAME -
## DEFINE-and-PACK the 'canvas' widget.
##
## We highlightthickness & borderwidth of the canvas to
## zero, as suggested on page 558, Chapter 37, 'The Canvas
## Widget', in the 4th edition of the book 'Practical
## Programming in Tcl and Tk'.
##+######################################################
canvas .fRcan.can \
-width $initCanWidthPx \
-height $initCanHeightPx \
-relief flat \
-highlightthickness 0 \
-borderwidth 0
pack .fRcan.can \
-side top \
-anchor nw \
-fill both \
-expand 1
##+########################################
## END OF the DEFINITION OF THE GUI WIDGETS
##+########################################
##+###############################
## BINDINGS SECTION:
##+###############################
## The following bind may cause an extra ReDraw when the
## GUI is first configured via an 'update' below
## in the GUI initialization section.
##
## We move this statement to the bottom of this script
## --- and we put the call to 'redraw_primes' in a proc that
## checks if the canvas size has indeed changed.
# bind .fRcan.can <Configure> "redraw_if_canvas_resized"
## I tried some other bind statements, like
##
# bind . <ButtonRelease-1> "redraw_if_canvas_resized"
## AND
# bind .fRcan.can <Gravity> "redraw_if_canvas_resized"
## if the canvas moves because of a change in size of its parent window.
##
## But they did not work.
##+######################################################################
## PROCS SECTION:
##
## - 'load_primes_sieve_array' - to load an array with zeros and ones
## indicating whether the integer index of the
## array is a non-prime or a prime.
##
## - 'redraw_primes' - to clear the image structure (if any) and
## create a new image structure according to the
## current width and height of the canvas widget ---
## and then draw the on/off (colored) pixels in the
## rectangluar image structure on the canvas.
##
## - 'set_color1' - shows a color selector GUI and uses the
## user-selected color-1 to do a redraw
## of the 'primes image' on the canvas.
##
## - 'set_color2' - shows a color selector GUI and uses the
## user-selected color-2 to do a redraw
## of the 'primes image' on the canvas.
##
## - 'redraw_if_canvas_resized' - calls on the 'redraw_primes' proc above
## to do a redraw of the 'primes image' ---
## but only if the canvas has been resized.
##
## - 'popup_msgVarWithScroll' - to show Help text (and other msgs)
##
##+#######################################################################
#########################################################################
## proc load_primes_sieve_array
##
## PURPOSE: To load an array 'parray' with zeros and ones
## indicating whether the integer index of the
## array is a non-prime or a prime.
##
## METHOD: Gets the screen-size of the monitor (rows and columns of
## pixels --- Mscrn, Nscrn) and uses Mscrn times Nscrn
## as the size of the array.
##
## Uses the Erathosthenes sieve method to set the values
## of the array to zeros or ones, where the index of the
## array is integers. One for a prime index; zero for a non-prime.
##
## CALLED BY: The 'Additional GUI Initialization' section at the
## bottom of this script.
##
########################################################################
proc load_primes_sieve_array {} {
global parray
## Set the current time, for determining elapsed
## time for building the array.
set t0 [clock milliseconds]
set Mscrn [winfo screenwidth .]
set Nscrn [winfo screenheight .]
set MN [expr {$Mscrn * $Nscrn}]
## Initialize the parray to all ones, where one
## is the indicator of a prime.
for {set i 0} {$i < $MN} {incr i} {
set parray($i) 1
}
## END OF parray initialization
## Set the limit on the size of the primes we will
## use in performing the sieve operation.
set LIM [expr { int( sqrt($MN) ) }]
## FOR TESTING:
# puts "proc 'load_primes_sieve_array' > Finding primes based on:"
# puts " Mscrn: $Mscrn Nscrn: $Nscrn MN: $MN LIM: $LIM"
## Set the initial prime to use in the sieve operation.
## This variable will also hold the index to the last prime
## that we used to complete a 'sieve-sweep'.
set nextPrime 2
## We let the index of the 'parray' be integers starting at zero
## and increasing. We set the first 2 elements of the array, rather
## arbitrarily, to zero and one.
##
## For the other elements of the array, we assume that the
## index of the array is the integer which we are determining
## to be prime (one) or non-prime (zero).
set parray(0) 0
set parray(1) 1
## Build the set of one's and zero's in parray ---
## in a 'while' loop. Since we initialized the array to all ones,
## we just need to set the array to zero whenever an index is
## NOT prime.
while {$nextPrime <= $LIM} {
## For the current value of 'nextPrime', for each index-integer
## that is a multiple of 'nextPrime', set the 'parray' to zero
## at that index --- using another 'while' loop.
set i [expr {2 * $nextPrime}]
while {$i < $MN} {
set parray($i) 0
set i [expr {$i + $nextPrime}]
}
## END OF i-loop to set parray values to zero whenever the
## array index has the current 'nextPrime' value as a factor.
## FOR TESTING:
# puts "proc 'load_primes_sieve_array' > For prime $nextPrime, some loaded array values:"
# puts " parray($nextPrime): $parray($nextPrime)"
# puts " parray([expr {$nextPrime + 1}]): $parray([expr {$nextPrime + 1}])"
################################################################
## Get 'nextPrime'.
## It should be the next index for which the parray has value one,
## rather than zero.
################################################################
set prevPrime $nextPrime
for {set j [expr {$nextPrime + 1}]} {$j < $MN} {incr j} {
if {$parray($j) == 1} {
set nextPrime $j
}
## END OF check whether $j is the next prime
if {$nextPrime > $prevPrime} {break}
}
## END OF j-loop to get 'nextPrime'
## FOR TESTING: (un-comment the following 'puts' statement)
## The primes printed out by this statement have been verified
## by the list of the 1st 1,000 primes at
## http://primes.utm.edu/lists/small/1000.txt.
# puts "Found NEXT prime $nextPrime"
if {$nextPrime > $LIM} {break}
}
## END OF the 'while' sieve loop
## Put the array-creation-time in the status label.
## We use 'update' to make sure this info is 'posted'.
.fRstatus.labelSTATUS configure -text "\
$MN integers classified as primes or non-primes.
TIME TAKEN: [expr {[clock milliseconds] - $t0}] millisecs elapsed."
update
## FOR TESTING: (Set the 0 to 1 in the 1st 'if' statement, to show the primes.)
## The numbers printed out have been verified by looking at
## the primes listed at http://www.naturalnumbers.org/P-100000.txt
## --- which is a link from the page http://www.naturalnumbers.org/primes.html.
## The link shows the 1st 100,000 primes, between 1 and 1,299,709.
if {0} {
set primesSTR ""
set primesCNT 0
for {set j 1} {$j < $MN} {incr j} {
if {$parray($j) == 1} {
set primesSTR "$primesSTR $j"
incr primesCNT
}
}
puts "Found the following $primesCNT primes, from 1 to $MN :"
puts "$primesSTR"
puts "Found $primesCNT primes, from 1 to $MN ."
}
## END OF 'puts' display of the primes found.
}
## END OF proc 'load_primes_sieve_array'
##+#####################################################################
## proc redraw_primes
##
## PURPOSE:
## Draws the 'primes image' in an image structure on the canvas,
## using the 2 user-specified colors.
##
## METHOD: Clears the image structure (if any) and
## creates a new image structure according to the
## current width and height of the canvas widget ---
## and then draws the on/off (colored) pixels in the
## rectangluar image structure on the canvas.
##
## This proc does the draw a horizontal scan-line at a time,
## with calls like:
## imgID put $hexcolorsLIST -to 0 $y
## where 0 $y is the leftmost position of a horizontal line of
## hexcolors for the pixels.
##
## CALLED BY: The 'Additional GUI Initialization' section at the
## bottom of this script --- and by the
## 'redraw_if_canvas_resized' proc --- and by the
## two set-color procs.
##+#####################################################################
proc redraw_primes {} {
global parray COLOR1hex COLOR2hex
## FOR TESTING:
# puts "proc 'redraw_primes' > Some loaded array values:"
# puts " parray(0): $parray(0)"
# puts " parray(1): $parray(1)"
# puts " parray(2): $parray(2)"
# puts " parray(3): $parray(3)"
# puts " parray(4): $parray(4)"
# puts " parray(5): $parray(5)"
## Set the current time, for determining elapsed
## time for building the 'photo' image.
set t0 [clock milliseconds]
## Delete the current image structure.
## We especially need to do this when the canvas has been re-sized,
## so that we can redraw the image according to the new canvas size. (?)
catch {image delete imgID}
## Get the current canvas size.
set curCanWidthPx [winfo width .fRcan.can]
set curCanHeightPx [winfo height .fRcan.can]
## Initialize the width & height of the image that we are going to create
## --- to the size of the canvas. (If necessary, we could
## make each dimension of the image an even integer of pixels.)
set imgWidthPx $curCanWidthPx
set imgHeightPx $curCanHeightPx
# if {$imgWidthPx % 2 == 1} { incr imgWidthPx -1 }
# if {$imgHeightPx % 2 == 1} { incr imgHeightPx -1 }
## Make the new image structure.
image create photo imgID -width $imgWidthPx -height $imgHeightPx
## Put the image on the canvas.
## (Note to myself: Should this statement be at top or bottom of this proc?)
.fRcan.can create image 0 0 -anchor nw -image imgID
##############################################################
## HERE IS WHERE WE DRAW THE NEW IMAGE:
## In a double-loop over the image height and image width,
## draw each row of the image, using the 'parray' to determine
## the color to set each pixel in a given row of pixels.
##############################################################
## We now draw the image --- by horizontal scan-lines.
##
## For each y (going from the top of the image area to the bottom),
## we set the colors in the horizontal scan-lines.
##
## In more detail:
## We iterate from the top of the image y=0 to the bottom of the image
## y=img-height, and then iterate over x going from the left of the
## image x=0 to the right of the image x=image-width.
##
## We build each horizontal scanline by building a color-list in which
## we set a pixel color at location $i of the list to color1 if
## parray($i) is one, and set the color at $i to color2 if
## parray($i) is zero.
##
## We 'put' the list of colors on the image structure, with its
## 'left-location' at 0 $y.
####################################################################
for {set yPx 0} {$yPx < $imgHeightPx} {incr yPx} {
## Reset the string-vars for the next horizontal scanline.
set hexcolorsSTR ""
## We iterate over the pixels of the next horizontal scan-line.
for {set xPx 0} {$xPx < $imgWidthPx} {incr xPx} {
## Add the appropriate hexcolor for this pixel to the scanline
## string.
set idx [expr {($yPx * $imgWidthPx) + $xPx}]
if {$parray($idx) == 1} {
set hexcolor $COLOR1hex
} else {
set hexcolor $COLOR2hex
}
set hexcolorsSTR "$hexcolorsSTR $hexcolor"
## FOR TESTING:
# if {$xPx == 5} {
# puts "redraw_primes > xPx: $xPx yPx: $yPx hexcolor: $hexcolor"
# }
}
## END OF xPx loop
## Make a list from the color string.
set scanlineLIST [list $hexcolorsSTR]
## Draw the scanline at height $yPx.
imgID put $scanlineLIST -to 0 $yPx
## FOR TESTING: (show the progress after drawing each horizontal
## scanline for a yPx value)
# update
}
## END OF yPx loop
## FOR TESTING: (put a horizontal swath of color on each scanline)
# imgID put [list {#888888 #888888 #888888 #888888 #888888} ] -to 0 $yPx]
## FOR TESTING:
# puts "redraw_primes > hexcolorsSTR: $hexcolorsSTR"
## Make sure the text on the COLORS and STATUS label widgets
## is up to date.
.fRcolors.labelCOLORS configure -text "\
Primes color: $COLOR1hex ; Non-Primes color: $COLOR2hex"
## Put the image size (rows,cols of pixels) and the draw-time
## in the status label.
.fRstatus.labelSTATUS configure -text "\
${imgWidthPx}x$imgHeightPx pixels - width,height of canvas-image.
DRAW TIME: [expr {[clock milliseconds] - $t0}] millisecs elapsed."
}
## END OF proc 'redraw_primes'
##+#####################################################################
## proc 'set_color1'
##+#####################################################################
## PURPOSE:
##
## This procedure is invoked to get an RGB triplet
## via 3 RGB slider bars on the FE Color Selector GUI.
##
## Uses that RGB value to set color #1 for the image-rectangle.
##
## Arguments: none
##
## CALLED BY: .fRbuttons.buttCOLOR1 button
##+#####################################################################
proc set_color1 {} {
global COLOR1r COLOR1g COLOR1b COLOR1hex
# global feDIR_tkguis
## FOR TESTING:
# puts "COLOR1r: $COLOR1r"
# puts "COLOR1g: $COLOR1g"
# puts "COLOR1b: $COLOR1b"
set TEMPrgb [ exec \
./sho_colorvals_via_sliders3rgb.tk \
$COLOR1r $COLOR1g $COLOR1b]
# $feDIR_tkguis/sho_colorvals_via_sliders3rgb.tk \
## FOR TESTING:
# puts "TEMPrgb: $TEMPrgb"
if { "$TEMPrgb" == "" } { return }
scan $TEMPrgb "%s %s %s %s" r255 g255 b255 hexRGB
set COLOR1hex "#$hexRGB"
set COLOR1r $r255
set COLOR1g $g255
set COLOR1b $b255
## Set color of color1 button and update the colors label.
update_colors_label
## Redraw the rectangular image with the new color #1.
redraw_primes
}
## END OF proc 'set_color1'
##+#####################################################################
## proc 'set_color2'
##+#####################################################################
## PURPOSE:
##
## This procedure is invoked to get an RGB triplet
## via 3 RGB slider bars on the FE Color Selector GUI.
##
## Uses that RGB value to set color2 for the image rectangle.
##
## Arguments: none
##
## CALLED BY: .fRbuttons.buttCOLOR1 button
##+#####################################################################
proc set_color2 {} {
global COLOR2r COLOR2g COLOR2b COLOR2hex
# global feDIR_tkguis
## FOR TESTING:
# puts "COLOR2r: $COLOR2r"
# puts "COLOR2g: $COLOR2g"
# puts "COLOR2b: $COLOR2b"
set TEMPrgb [ exec \
./sho_colorvals_via_sliders3rgb.tk \
$COLOR2r $COLOR2g $COLOR2b]
# $feDIR_tkguis/sho_colorvals_via_sliders3rgb.tk \
## FOR TESTING:
# puts "TEMPrgb: $TEMPrgb"
if { "$TEMPrgb" == "" } { return }
scan $TEMPrgb "%s %s %s %s" r255 g255 b255 hexRGB
set COLOR2hex "#$hexRGB"
set COLOR2r $r255
set COLOR2g $g255
set COLOR2b $b255
## Set color of color2 button and update the colors label.
update_colors_label
## Redraw the rectangular image with the new color #2.
redraw_primes
}
## END OF proc 'set_color2'
##+#####################################################################
## proc 'update_colors_label'
##+#####################################################################
## PURPOSE:
## This procedure is invoked to update the text in a COLORS
## label widget, to show hex values of current color1, color2 settings.
##
## This proc ALSO sets the background color of each of those 2 buttons
## to its current color --- and sets foreground color to a
## suitable black or white color, so that the label text is readable.
##
## Arguments: global color vars
##
## CALLED BY: 2 colors procs:
## 'set_color1'
## 'set_color2'
## and the additional-GUI-initialization section at
## the bottom of this script.
##+#####################################################################
proc update_colors_label {} {
global COLOR1hex COLOR1r COLOR1g COLOR1b \
COLOR2hex COLOR2r COLOR2g COLOR2b
.fRcolors.labelCOLORS configure -text "\
Primes Color: $COLOR1hex ; Non-Primes Color: $COLOR2hex"
# set colorBREAK 300
set colorBREAK 250
.fRbuttons.buttCOLOR1 configure -bg $COLOR1hex
set sumCOLOR1 [expr {$COLOR1r + $COLOR1g + $COLOR1b}]
if {$sumCOLOR1 > $colorBREAK} {
.fRbuttons.buttCOLOR1 configure -fg "#000000"
} else {
.fRbuttons.buttCOLOR1 configure -fg "#f0f0f0"
}
.fRbuttons.buttCOLOR2 configure -bg $COLOR2hex
set sumCOLOR2 [expr {$COLOR2r + $COLOR2g + $COLOR2b}]
if {$sumCOLOR2 > $colorBREAK} {
.fRbuttons.buttCOLOR2 configure -fg "#000000"
} else {
.fRbuttons.buttCOLOR2 configure -fg "#f0f0f0"
}
}
## END OF proc 'update_colors_label'
##+#############################################################
## proc redraw_if_canvas_resized
##
## CALLED BY: bind . <Button1-Release> in the bindings section.
##+#############################################################
proc redraw_if_canvas_resized {} {
global PREVcanWidthPx PREVcanHeightPx
set CURcanWidthPx [winfo width .fRcan.can]
set CURcanHeightPx [winfo height .fRcan.can]
if { $CURcanWidthPx != $PREVcanWidthPx ||
$CURcanHeightPx != $PREVcanHeightPx} {
redraw_primes
set PREVcanWidthPx $CURcanWidthPx
set PREVcanHeightPx $CURcanHeightPx
}
}
## END OF redraw_if_canvas_resized
##+########################################################################
## PROC 'popup_msgVarWithScroll'
##+########################################################################
## PURPOSE: Report help or error conditions to the user.
##
## We do not use focus,grab,tkwait in this proc,
## because we use it to show help when the GUI is idle,
## and we may want the user to be able to keep the Help
## window open while doing some other things with the GUI
## such as putting a filename in the filename entry field
## or clicking on a radiobutton.
##
## For a similar proc with focus-grab-tkwait added,
## see the proc 'popup_msgVarWithScroll_wait' in a
## 3DterrainGeneratorExaminer Tk script.
##
## REFERENCE: page 602 of 'Practical Programming in Tcl and Tk',
## 4th edition, by Welch, Jones, Hobbs.
##
## ARGUMENTS: A toplevel frame name (such as .fRhelp or .fRerrmsg)
## and a variable holding text (many lines, if needed).
##
## CALLED BY: 'help' button
##+########################################################################
## To have more control over the formatting of the message (esp.
## words per line), we use this 'toplevel-text' method,
## rather than the 'tk_dialog' method -- like on page 574 of the book
## by Hattie Schroeder & Mike Doyel,'Interactive Web Applications
## with Tcl/Tk', Appendix A "ED, the Tcl Code Editor".
##+########################################################################
proc popup_msgVarWithScroll { toplevName VARtext } {
## global fontTEMP_varwidth #; Not needed. 'wish' makes this global.
## global env
# bell
# bell
#################################################
## Set VARwidth & VARheight from $VARtext.
#################################################
## To get VARheight,
## split at '\n' (newlines) and count 'lines'.
#################################################
set VARlist [ split $VARtext "\n" ]
## For testing:
# puts "VARlist: $VARlist"
set VARheight [ llength $VARlist ]
## For testing:
# puts "VARheight: $VARheight"
#################################################
## To get VARwidth,
## loop through the 'lines' getting length
## of each; save max.
#################################################
set VARwidth 0
#############################################
## LOOK AT EACH LINE IN THE LIST.
#############################################
foreach line $VARlist {
#############################################
## Get the length of the line.
#############################################
set LINEwidth [ string length $line ]
if { $LINEwidth > $VARwidth } {
set VARwidth $LINEwidth
}
}
## END OF foreach line $VARlist
## For testing:
# puts "VARwidth: $VARwidth"
###############################################################
## NOTE: VARwidth works for a fixed-width font used for the
## text widget ... BUT the programmer may need to be
## careful that the contents of VARtext are all
## countable characters by the 'string length' command.
###############################################################
#####################################
## SETUP 'TOP LEVEL' HELP WINDOW.
#####################################
catch {destroy $toplevName}
toplevel $toplevName
# wm geometry $toplevName 600x400+100+50
wm geometry $toplevName +100+50
wm title $toplevName "Note"
# wm title $toplevName "Note to $env(USER)"
wm iconname $toplevName "Note"
#####################################
## In the frame '$toplevName' -
## DEFINE THE TEXT WIDGET and
## its two scrollbars --- and
## DEFINE an OK BUTTON widget.
#####################################
text $toplevName.text \
-wrap none \
-font fontTEMP_varwidth \
-width $VARwidth \
-height $VARheight \
-bg "#f0f0f0" \
-relief raised \
-bd 2 \
-yscrollcommand "$toplevName.scrolly set" \
-xscrollcommand "$toplevName.scrollx set"
scrollbar $toplevName.scrolly \
-orient vertical \
-command "$toplevName.text yview"
scrollbar $toplevName.scrollx \
-orient horizontal \
-command "$toplevName.text xview"
button $toplevName.butt \
-text "OK" \
-font fontTEMP_varwidth \
-command "destroy $toplevName"
###############################################
## PACK *ALL* the widgets in frame '$toplevName'.
###############################################
## Pack the bottom button BEFORE the
## bottom x-scrollbar widget,
pack $toplevName.butt \
-side bottom \
-anchor center \
-fill none \
-expand 0
## Pack the scrollbars BEFORE the text widget,
## so that the text does not monopolize the space.
pack $toplevName.scrolly \
-side right \
-anchor center \
-fill y \
-expand 0
## DO NOT USE '-expand 1' HERE on the Y-scrollbar.
## THAT ALLOWS Y-SCROLLBAR TO EXPAND AND PUTS
## BLANK SPACE BETWEEN Y-SCROLLBAR & THE TEXT AREA.
pack $toplevName.scrollx \
-side bottom \
-anchor center \
-fill x \
-expand 0
## DO NOT USE '-expand 1' HERE on the X-scrollbar.
## THAT KEEPS THE TEXT AREA FROM EXPANDING.
pack $toplevName.text \
-side top \
-anchor center \
-fill both \
-expand 1
#####################################
## LOAD MSG INTO TEXT WIDGET.
#####################################
## $toplevName.text delete 1.0 end
$toplevName.text insert end $VARtext
$toplevName.text configure -state disabled
}
## END OF PROC 'popup_msgVarWithScroll'
set HELPtext "\
\ \ \ \ \ ** HELP for this 'Primes Sieve' Display Utility **
BACKGROUND:
I have seen some Tcl-Tk 'primes' demo scripts that show a few hundred integers
and then show the prime numbers among them by use of an 'Eratosthenes sieve'
technique.
But the demo scripts that I have seen just show a few hundred integers and
show them as text.
I decided that I would like to see the distribution of about a million to
10 million primes --- that is, how the density of that many primes looks
in an 'overview'. In order to see that many integers and primes at one
time, I decided to show each prime and non-prime on a rectangular Tk canvas
as a single pixel for each integer.
I wanted to use 2 different colors --- one for the primes and one for the
non-primes --- with the user having the option to choose the two colors.
I decided to show the integers (pixels) in the usual fashion --- in
rows, with the integers increasing from left to right.
And I wanted to make the canvas resizable so that the user can experiment
with seeing how the pattern of primes changes as one uses a different
number of pixels per row.
To make it easy and quick to change the canvas width, I decided to make the
canvas resizable by simply grabbing an edge or corner of the GUI window
and dragging, with the mouse cursor.
With those goals in mind, this utility ended up with features that can
be summarized as follows.
THE MAIN FEATURES:
This Tk GUI script shows the primes and non-primes in the first M times N
positive integers as colored pixels in a rectangular Tk Canvas --- where
- each postive integer is represented as a pixel in the canvas
- each prime is indicated by one color and each non-prime
is indicated by another color
- the user can choose the two colors
- the integers (the 'on-or-off pixels') are plotted 'row-wise'
in a canvas in the Tk GUI, where the size of the canvas is
determined by the current size and shape of the GUI window
- the integer-pixels are plotted in M rows of N columns of
pixels where M is the height of the canvas widget in pixels
and N is the width of the canvas widget in pixels.
- the total number of integers processed (when the GUI script
starts up) is Mscrn times Nscrn, where Mscrn and Nscrn
denote the resolution of the user's monitor (the number of
rows and columns of pixels being shown on the entire screen).
SOME OBSERVATIONS:
I must admit that I was rather surprised at first to see that
the 'on' (prime) pixels were pretty evenly distributed over the
entire rectangular canvas.
I was expecting to see that the primes would be thinning out
in the lower rows of the rectangle.
After some thought (and some web searches), I found that this
is not so surprising after all. There are lots of primes, even
when you look at integers out beyond a million or more.
When you think about how the sieve works, in the first pass,
it removes all the even integers (except 2). Thus about half
the integers are eliminated at the beginning.
(It may not be proper to talk about half of infinity, but
keep in mind that we are applying the sieve to a finite
number of integers, albeit that we are using a large
upper limit. So it is quite proper to say that we are
eliminating essentially half the integers in the first
step of the sieve operation.)
Then when we eliminate the multiples of 3 (except 3 itself)
in the second step, we are eliminating less than a third of
the remaining integers --- because we have already eliminated
multiples of 3 like 6 (=2*3) and 12 (=2*2*3) and 18 (=2*3*3) and
24 (=2*2*2*3) and on and on.
And when we eliminate the multiples of 5 (except 5 itself)
in the 3rd step, are eliminating less than a fifth of
the remaining integers --- because we have already eliminated
multiples of 5 like 10 (=2*5) and 15 (=3*5) and 20 (=2*2*5) and
30 (=2*3*5) and on and on.
And so on with 7 and 11. In fact, when we get to 11, we are
eliminating less than one-eleventh of the remaining integers.
We have already eliminated a 'strong majority' of the integers
by casting out the multiples of 2, 3, and 5.
After the first five passes of the sieve (with 2, 3, 5, 7, 11),
we have cast out about 80% or more of the integers as non-prime
--- and we are casting out fewer and fewer with each succeeding
step of the process.
So it really should not have been so surprising that the distribution
of the primes (shown as 'on' pixels in the rectangle of about a million
or more pixels) looks like a fairly even distribution of 'on'
pixels throughout the rectangle --- because the ones we are removing
are at quite regular spacings --- and we are removing relatively
few after the first several steps of the process.
In fact, you can find pages on the web --- such as
http://www.naturalnumbers.org/P-100000.txt --- which shows
the first 100,000 primes, between 1 and 1,299,709.
That listing shows that, throughout the listing, you keep seeing
prime integers that are only 2, 4, 6, or 8 units apart.
Here is a sample section of the listing around 700,000 :
57570, 713477, 10
57571, 713491, 14
57572, 713497, 6
57573, 713501, 4
57574, 713509, 8
57575, 713533, 24
57576, 713563, 30
57577, 713569, 6
57578, 713597, 28
57579, 713599, 2
57580, 713611, 12
57581, 713627, 16
57582, 713653, 26
57583, 713663, 10
57584, 713681, 18
57585, 713737, 56
57586, 713743, 6
57587, 713747, 4
57588, 713753, 6
57589, 713771, 18
57590, 713807, 36
57591, 713827, 20
57592, 713831, 4
57593, 713833, 2
57594, 713861, 28
57595, 713863, 2
The numbers in the middle column are the prime numbers. On the left
is the count of the number of the prime --- and the number on the
right is the difference of the prime from the preceding prime.
So we can expect to see primes only 2, 4, 6, or 8 units apart
as we go into the millions and billions.
In fact, if you look at a plot of the function pi(n) against n,
where pi(n) is the number of primes less than n, it looks
almost like a straight line --- but with a slight amount of
curvature below and away from a straight line that is tangent
to the start of the curve. So, indeed, the primes are thinning
out --- but very slowly.
You can see a plot of pi(n) for the 1st 1,000 primes at
http://curvebank.calstatela.edu/prime/prime.htm
----
Another aspect of the distribution of the primes in the rectangle
that surprised me is that there seem to be columns of non-primes
in the image (vertical strips of the non-prime color, across the
image) --- for certain choices of M, the number of integers
displayed per row.
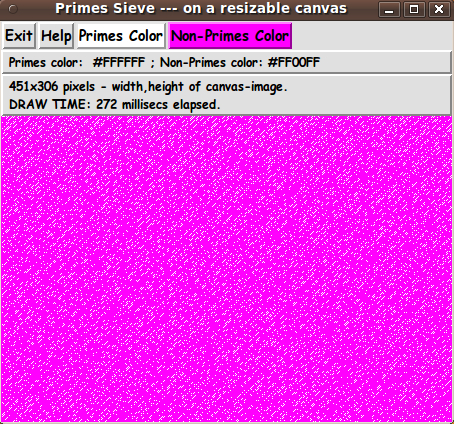
And by dragging the window into other widths, those columns of
solid color turn into diagonals. And for some canvas widths,
the columns and diagonals of solid color disappear altogether as
the 'on' pixels seem to be distributed pretty evenly throughout
the rectangle.
A prime numbers expert can probably explain why these phenomena
occur in this type of display of the distribution of the primes
--- but I am pretty sure that a rigorous technical explanation
would give me a headache that I would rather avoid.
---------------------------
SOME POTENTIAL ENHANCEMENTS (to the GUI) :
Eventually some other features may be added to this Tk script:
- the ability to have more precise control over the number of
rows (and columns) of pixels displayed --- say, via a couple
of entry fields (or scale widgets) to specify M and N.
- the ability to show the primes and non-primes as colored
'squares' of pixels, rather than individual pixels. (But
this would make the number of integers shown much smaller
--- unless you also made the canvas scrollable, to handle
many more pixels in the x and y directions.)
- provide an option to print out a list of the primes, similar
to the partial list shown above --- that is, each prime along
with its sequence number and the difference between it and the
prime preceding it.
- provide an option to print out a 2-column list of n, pi(n), pi2(n)
--- where pi2(n) denotes the number of 'twin primes' less than n
--- suitable for feeding into a plot utility. (Twin primes are
primes that differ by 2. In the listing above, we can see that
they are recurring. In fact, we could output pi4(n), pi6(n),
pi8(n) --- the number of primes differing by 4, 6, and 8.)
There are probably more options that I may think of in the future,
although some might be more suitable for putting in a separate
Tk script using somewhat different methods.
For example, this script makes the image using a 'create image'
technique on the Tk canvas --- and building the image from
'horizontal scanlines' of colors --- one pixel-color for each integer.
Another method would be to use 'create rectangle' commands on
the Tk canvas --- one rectangle for each integer."
##+######################################################
## End of PROC definitions.
##+#####################################################
## Additional GUI initialization, if needed (or wanted).
##+#####################################################
## Only the color button procs call the 'update_colors_label'
## proc to set the colors on the buttons ---
## when the user clicks on a color button.
##
## So we need to call that proc to set the color of the
## color buttons according to the initial default colors
## provided for the buttons (see near top of code). Also,
## this proc puts the hex color values in the colors label.
update_colors_label
## Set a msg in the GUI that a primes-array is being loaded,
## and display the GUI --- using the 'update' command.
set Mscrn [winfo screenwidth .]
set Nscrn [winfo screenheight .]
set MN [expr {$Mscrn * $Nscrn}]
.fRstatus.labelSTATUS configure -text "\
$MN integers are being classified as primes or non-primes.
*** PLEASE WAIT ABOUT 10 SECONDS ..."
update
## Load the array 'parray' of ones and zeros.
load_primes_sieve_array
## Initialize the canvas-image using the 'redraw_primes' proc.
##
## An 'update' is needed to set the size of the canvas,
## because 'redraw_primes' uses 'winfo' to get the width and
## height of the canvas.
##
## Wait about 5000 millisecs after the array-load, so that the
## user has time to see the msg about how long the array
## loading took.
after 5000
redraw_primes
## When this script drops into the Tk event-handling loop,
## the 'bind . <Configure> "redraw_if_canvas_resized"'
## command causes redraws whenever the canvas is resized.
## (Unfortunately, it still seems to cause more re-draws
## then we really need. We just want a re-draw when the
## mouse-button is released after re-sizing the window.)
##
## We initialize the PREVcanWidthPx and PREVcanHeightPx
## vars that are used in the 'redraw_if_canvas_resized' proc.
set PREVcanWidthPx [winfo width .fRcan.can]
set PREVcanHeightPx [winfo height .fRcan.can]
bind . <Configure> "redraw_if_canvas_resized"
OBSERVATIONS on distribution of primes
I must admit that I was rather surprised at first to see that the 'on' (prime) pixels were pretty evenly distributed over the entire rectangular canvas.
I was expecting to see that the primes would be thinning out in the lower rows of the rectangle.
After some thought (and some web searches), I found that this is not so surprising after all. There are lots of primes, even when you look at integers out beyond a million or more.
When you think about how the sieve works, in the first pass, it removes all the even integers (except 2). Thus about half the integers are eliminated at the beginning.
    (It may not be proper to talk about half of infinity, but
     keep in mind that we are applying the sieve to a finite
     number of integers, albeit that we are using a large
     upper limit. So it is quite proper to say that we are
     eliminating essentially half the integers in the first
     step of the sieve operation.)
Then when we eliminate the multiples of 3 (except 3 itself) in the second step, we are eliminating less than a third of the remaining integers --- because we have already eliminated multiples of 3 like 6 (=2*3) and 12 (=2*2*3) and 18 (=2*3*3) and 24 (=2*2*2*3) and on and on.
And when we eliminate the multiples of 5 (except 5 itself) in the 3rd step, we are eliminating less than a fifth of the remaining integers --- because we have already eliminated multiples of 5 like 10 (=2*5) and 15 (=3*5) and 20 (=2*2*5) and 30 (=2*3*5) and on and on.
And so on with 7 and 11. In fact, when we get to 11, we are eliminating less than one-eleventh of the remaining integers. We have already eliminated a 'strong majority' of the integers by casting out the multiples of 2, 3, and 5.
After the first five passes of the sieve (with 2, 3, 5, 7, 11), we have cast out about 80% or more of the integers as non-prime --- and we are casting out fewer and fewer with each succeeding step of the process.
So it really should not have been so surprising that the distribution of the primes (shown as 'on' pixels in the rectangle of about a million or more pixels) looks like a fairly even distribution of 'on' pixels throughout the rectangle --- because the integers that we are 'removing' are at quite regular spacings --- and we are removing relatively few after the first several steps of the process.
In fact, you can find pages on the web such as http://www.naturalnumbers.org/P-100000.txt --- which shows the first 100,000 primes, between 1 and 1,299,709.
That listing shows that, throughout the listing, you keep seeing prime integers that are only 2, 4, 6, or 8 units apart.
Here is a sample section of the listing near line 57,500 (prime numbers around 713,500):
 57570, 713477, 10
 57571, 713491, 14
 57572, 713497, 6
 57573, 713501, 4
 57574, 713509, 8
 57575, 713533, 24
 57576, 713563, 30
 57577, 713569, 6
 57578, 713597, 28
 57579, 713599, 2
 57580, 713611, 12
 57581, 713627, 16
 57582, 713653, 26
 57583, 713663, 10
 57584, 713681, 18
 57585, 713737, 56
 57586, 713743, 6
 57587, 713747, 4
 57588, 713753, 6
 57589, 713771, 18
 57590, 713807, 36
 57591, 713827, 20
 57592, 713831, 4
 57593, 713833, 2
 57594, 713861, 28
 57595, 713863, 2
The numbers in the middle column are the prime numbers. On the left is the count of the number of the prime --- and the number on the right is the difference of the prime from the preceding prime.
So we can expect to see primes only 2, 4, 6, or 8 units apart as we go into the millions and billions.
In fact, if you look at a plot of the function pi(n) against n, where pi(n) is the number of primes less than n, it looks almost like a straight line --- but with a slight amount of curvature below and away from a straight line that is tangent to the start of the curve. So, indeed, the primes are thinning out --- but very slowly.
You can see a plot of pi(n) for the 1st 1,000 positive integers at http://curvebank.calstatela.edu/prime/prime.htm
By the way, if you look at the first line in the list above, and look at the ratio of the number-of-primes-below-N to N, where N = 713,477 --- 57570 / 713477 = 0.0807. So when we get out to integers beyond 700,000 --- only about 8% of the integers below 700,000 are prime.
Another aspect of the distribution of the primes in the rectangle that surprised me is that there seem to be columns of non-primes in the image (vertical strips of the non-prime color, across the image) --- for certain choices of M, the number of integers displayed per row. For an example, see the image near the top of this page.
And by dragging the window to other widths, those columns of solid color turn into diagonals. And for some canvas widths, the columns and diagonals of solid color disappear altogether as the 'on' pixels seem to be distributed pretty evenly throughout the rectangle. For examples, see the following two images.
A prime numbers expert can probably explain why these phenomena occur in this type of display of the distribution of the primes --- but I am pretty sure that a rigorous technical explanation would give me a headache that I would rather avoid. (It would probably involve linear Diophantine equations [L1 ] --- linear equations with integer coefficients and integer unknowns.)
Discussions of the Riemann zeta function --- an important construct in prime number studies --- give me headaches like that. I may steer away from scripts having to do with the zeta function.
SOME POTENTIAL ENHANCEMENTS:
Eventually some other features may be added to this Tk script:
** the ability to have more precise control over the number of rows (and columns) of pixels displayed --- say, via a couple of entry fields (or scale widgets) to specify M and N.
** the ability to show the primes and non-primes as colored 'squares' of pixels, rather than individual pixels. (But this would make the number of integers shown much smaller --- unless you also made the canvas scrollable, to handle many more pixels in the x and y directions.)
** provide an option to print out a list of the primes, similar to the partial list shown above --- that is, each prime along with its sequence number and the difference between it and the prime preceding it.
** provide an option to print out a 3-column list of n, pi(n), pi2(n) --- where pi2(n) denotes the number of 'twin primes' less than n --- suitable for feeding into a plot utility. (Twin primes are primes that differ by 2. We can see from the list above that they are recurring. In fact, we could output pi4(n), pi6(n), pi8(n) --- the number of primes differing by 4, 6, and 8 ... and less than n.)
---
There may be more enhancements that I think of in the future, although some might be more suitable for putting in a separate Tk script using somewhat different methods.
For example, this script makes the image using a 'create image' technique on the Tk canvas --- and building the image from 'horizontal scanlines' of colors --- one pixel-color for each integer.
Another method would be to use 'create rectangle' commands on the Tk canvas --- one rectangle for each integer.
NEXT INTERACTIVE/ANIMATED MATH PROJECTS
One of the first ideas that I had for an interactive and/or animated Tk script that demonstrates some mathematical principles was to provide Tk scripts that demonstrate the Pythagorean relationship --- the sum of two squares being the area of a 3rd square.
In 1940, a mathematician named Loomis published a book that showed over 300 proofs of the Pythagorean theorem. I plan to write Tk scripts that provide an interactive and/or animated demonstration of at least two or three of those proofs.
On my 'bio' page at uniquename, I have expressed thanks to Keith Vetter who I consider to be the Martin Gardner of Tcl/Tk --- based on the many code samples that he has provided on this wiki. I particularly like Vetter's plane geometry theorem demos and Gear Animation on the Tk canvas.
His code contributions inspire me to try to live up to his many-years of creating interesting Tk GUI's --- like his Morley's Miracle demo.
I hope to add some scripts of that type.
IN CONCLUSION
There's a lot to like about a utility that is 'free freedom' --- that is, no-cost and open-source so that you can modify/enhance/fix it without having to wait for someone else to do it for you (which may be never).
I hope to provide some free scripts that can be used to demonstrate mathematical principles --- scripts that could be used in a classroom or self-teaching setting. As I have said on at least one other code-donation page on this wiki ...
A BIG THANK YOU to Ousterhout for starting Tcl-Tk, and a BIG THANK YOU to the Tcl-Tk developers and maintainers who have kept the simply MAH-velous 'wish' interpreter going.