GUI for Editing Photo-images with Functions
uniquename - 2012aug22
Introduction:
I am interested in making nice images for 'toolchest' and 'drawer' backgrounds, as I have indicated at Experiments in making embellished GUI's and at A color-gradient-button-maker GUI.
In doing some searches on this wiki, I ran across the Functional imaging page of Suchenwirth. I assembled the code from that page and was impressed by how quickly it could generate images from one or more functions that work singly or together to map the pixels in a rectangular canvas into colors or shades of gray.
There were over 40 (composite-)functions on that page (from Suchenwirth, DKF, and one or two others) that I might like to try out --- someday.
I am using the terminology '(composite-)function' to indicate either a single function f(x,y) or a compound function, like f(g(x,y)), f(g(h(x,y))), ...
The demo GUI at Functional imaging used a stack of buttons, on the left of the GUI, to present (composite-)functions that will draw into a canvas on the right side of the GUI. But that stack of buttons limits the number of (composite-)functions, that can be conveniently and quickly run, to about 20 or 30.
So I decided to change the GUI to use a listbox instead of buttons, and to put all 40-plus donated (composite-)functions into the GUI.
I provided the code for the Tk Script that makes that GUI at the page titled Functional Imaging with a High-Capacity GUI.
________________________________________________________________
Then, about a week later, I found that it would be nice to have a utility that 'contracts' the colors of an image away from black and away from white. The reason I find this handy is that I often color-correct images by using a 'gamma correction', which is an easy one-slider-bar correction method. (I usually use the 'mtpaint' image editor program on Linux to apply the gamma correction.)
However, with gamma correction, if an image has any black spots or white spots in it, the black spots stay black and the white spots stay white. This makes for high-contrast images, yet, in looking for images suitable for buttons on GUI's, I generally need images that make 'gentle' color transitions.
(I find that using other sliders, like a brightness slider, does not yield the kind of image I am looking for. Increasing brightness forces all color toward white --- eventually ALL white. That is usually not the effect that I am seeking. I am often trying to avoid color extremes like black and white, for GUI images. One of the few cases where I typically like to use black is in designating areas of an image to make transparent --- when making transparent GIF or PNG files.)
When I used to work on SGI/IRIX (Unix) workstations, back around 1996-2005, there were some handy command line programs, written by Paul Haeberli, that did handy image processing --- like color 'expansion' and 'contraction'. I remember there was a command named 'expand'.
I figured I should be able to do some similar image processing with a Tk script using commands like "image create photo image-ID" to import an image (GIF --- or PNG with Tk 8.6.x) --- and commands like "canvas-ID create image" to put the image on a canvas --- and "image-ID put" commands to change pixel colors in an in-memory image.
So I did a search on wiki.tcl.tk for keywords like 'image create photo put' and found that a Tcler whose nickname was 'ulis' had done a whole series of posts on processing images with Tk scripts. Examples:
In fact, color-tinting a gray image (or ANY image) is one type of image processing that I have wanted to do from time to time. I have found it hard to get good results when trying that in 'mtpaint'. If I could make my own Tk script to do the color tinting, then I would be able to tweak it to work like I want it to work.
I got to thinking how I could try enhancing the 'ulis' scripts to read image files, by adding 'tk_getOpenFile' to his scripts --- and making other changes --- like accepting parameters on a GUI, instead of having to edit the Tk script.
But then I thought how I would be repeating a lot of code in making a separate script for each of the many types of image operations I might eventually want --- like color-contract, color-tint, invert-colors, make-gray, make-black-and-white, blur, gamma-correct, etc. etc.
Then I realized that all these operations could be done by functions --- similar to the Suchenwirth 'Functional imaging' idea. That idea involved taking a blank canvas and creating an image on it. What I wanted was to put an arbitrary image on a canvas (a 'photo' image --- from a GIF or PNG file) and then apply functions to that loaded-into-memory image.
In other words, the script at Functional Imaging with a High-Capacity GUI is a 'CREATE-an-image-with-functions' script. The script that is presented on this page --- which is based on that CREATE script --- is an 'EDIT-an-image-with-functions' script.
A function example:
The contract-colors-away-from-black-and-white capability that I was looking for can be done by a function whose graph looks like this:
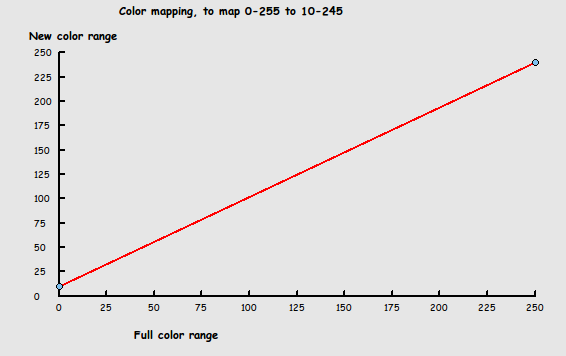
This function maps, linearly, the integers in the range from 0 to 255 to the integers in the range that goes from 10 to 245. The slope of this line is (245 - 10)/(255 - 0). In general, if I contract N color-units away from both black and white, the slope is (255 - 2 * N)/(255 - 0). So I can make a function with parameter N that acts at each x,y pixel in the image.
The function can be thought of as f(N,x,y), where the function gets the r-g-b colors (0 to 255) at pixel x,y in the image and applies the following three equations:
newr = (255 - 2 * N)/255 * r + N
newg = (255 - 2 * N)/255 * g + N
newb = (255 - 2 * N)/255 * b + N
where 0 < N < 128.
The resulting colors at all the pixels of the image will stay away from black and white --- and the mapping is 'smooth' in the sense that if pixels in a neighborhood have nearly the same color, their new colors will also be nearly the same colors.
And other image processing operations, such as 'colorizing' an image to give it a certain 'tint', could be done in a similar way --- by a function.
In fact, here are the equations from the 'colorize' proc of ulis at his page Coloring a gray image:
set newr expr {round($r * $rtint / 256.)}
set newg expr {round($g * $gtint / 256.)}
set newb expr {round($b * $btint / 256.)}
where the key input to his proc is an rgb-tint value.
Anyway, from that sequence of events and ideas came the following GUI and script code.
So here, finally, is what the above verbiage is meant to introduce.
End of Introduction.
____________________________________________________________________
Here is a sequence of images that shows
a) the GUI design that I devised, and
b) the 'work-flow' in applying a function to an image.
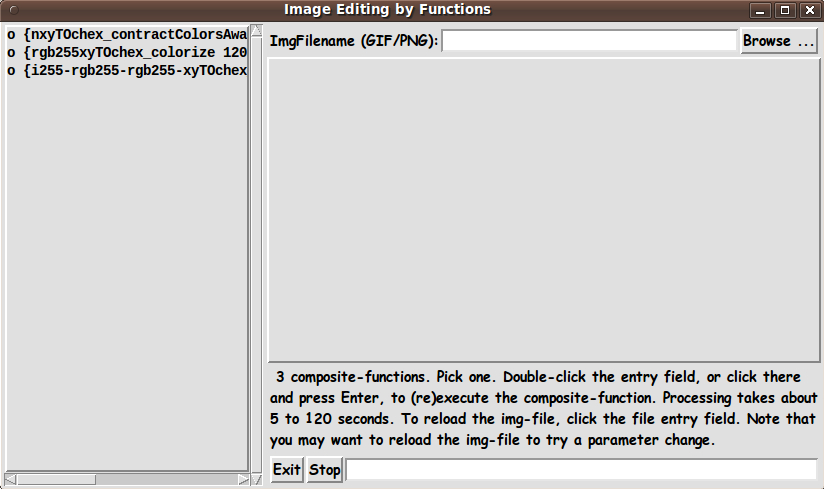
Here is an image that shows what the GUI looks like when the Tk script is first started --- before an image file has been loaded into the canvas.
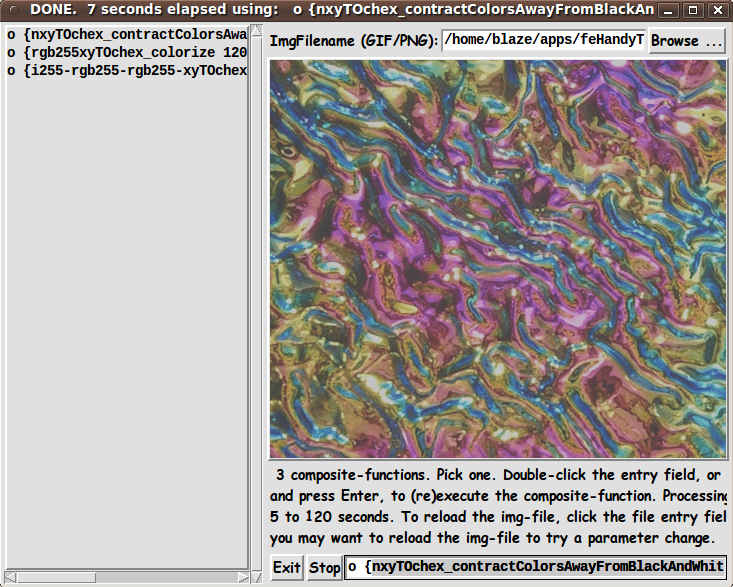
Here is an image that resulted after loading the canvas with an image via the 'Browse ...' button --- and after selecting a function from the listbox on the left.
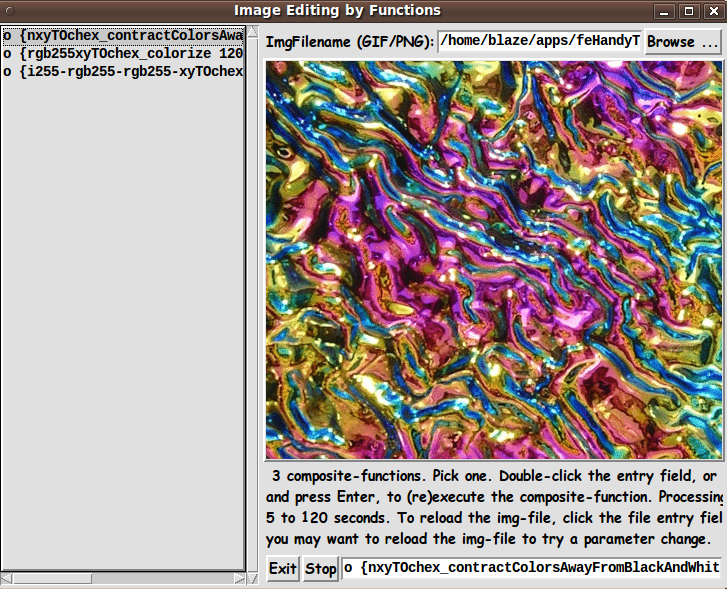
The filename has been loaded into the entry field at the top of the GUI, and the (composite-)function has been loaded into the entry field at the bottom of the GUI.
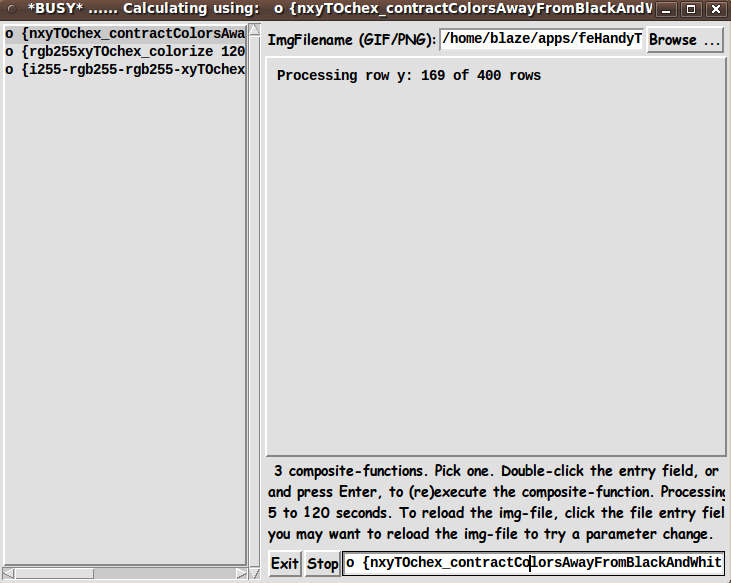
When you double-click on the bottom entry field (that holds the function), the canvas clears and the user can watch to see the progress revealed by the row number display. The row number actually changes so fast that the rightmost two digits are a blur.
And here is the resulting image when the processing completed --- in about 7 seconds on this particular computer. The function that was applied was a 'contract-colors-away-from-black-and-white' function.
_____________________________________________________________________
Below is the code that produced this GUI.
There are comments at the top and bottom of this sample code that describe how anyone could add to the (composite-)functions.
If anyone has enough free time to do such a wacky thing, they could use this code to test their new (composite-)function --- and any new 'mapping' procs that they had to add.
All I ask is that people preserve the basic 'canonical' structure of this code:
  0) Set general window parms (win-name, win-position, win-color-scheme,
                               fonts, widget-geom-parms, win-size-control).

  1) Define ALL frames (and sub-frames).  Pack them.

  2) Define & pack all widgets in the frames.

  3) Define key/mouse action BINDINGS, if needed.

  4) Define PROCS, if needed.

  5) Additional GUI initialization (typically with one or more of
     the procs), if needed.
This structure is discussed in more detail on the page A Canonical Structure for Tk Code --- and variations.
Contributors can change their copy of this code however they like. Just keep the code on this page relatively unchanged --- except for inserting new (composite-)functions in the listbox-loading proc --- and inserting new procs in the PROCS section --- with a dated-note at the bottom of the page telling what was added.
____________________________________________________________________
Although the initial 3 functions provided in the listbox do not use any of the procs from Suchenwirth's Functional imaging page, I have left those Suchenwirth-DKF-etc procs in the 'PROCS' section of this code.
However, I am actually using the RENAMED Suchenwirth-DKF-etc procs that I used on my Functional Imaging with a High-Capacity GUI page.
As noted on that page, most of the 'transform'/'mapping' procs are of 3 types:
    - point-to-color
    - color-to-color
    - point-to-point
In function composition, like f(g(args)), it is essential that the output of g is of a type compatible with the input type of f. In fact, it is essential that we know both the input type and the output type of f and g.
To make the input and output types of the procs (presented to the user in the listbox) clear, the name of each proc is prefixed by an input-TO-output indicator. Example prefixes:
   'xyTOchex_'   - an xy point is mapped to a hex-color
   'chexTOchex_' - a hex-color is mapped to a hex-color
   'xyTOxy_'     - an xy point is  mapped to an xy point
   'raTOxy_'     - a polar point (r,a - radius,angle) is mapped to an xy point
   'dTOchex_'    - a decimal number (scalar) is mapped to a hex-color
   '0or1TOchex_' - a one-digit binary number (0 or 1) is mapped to a hex-color
   'fgxyTOchex_' - 2 funcs, indicated by f and g, evaluated at xy, map to a hex-color
Example:
Proc 'xyTOchex_bwCheckers' maps an xy point to a hex-color, to make a black-and-white checkerboard pattern.
People who try out this code may want to try to make new (composite-)functions using the Suchenwirth-DKF-etc procs.
(Note to myself: I probably should check whether some occurrences of 'chex' and 'hex-color' on this page should be changed to 'rgb255' and 'rgb255-color', respectively.)
_____________________________________________________________________
The 3 initial '(composite-)functions' provided in this code are not actually composites --- they are single functions. They are
1) a 'contract-colors-away-from-black-and-white' proc based on the graph and equations presented above
2) a 'color-tinting' proc based on the ulis equations seen above
3) a 'map-to-2-colors(-luminosity-based)' proc that is described below this code, along with a screenshot
_____________________________________________________________________
That said, here's the code --- with plenty of comments to describe what most of the code-sections are doing. Since some of the coding techniques here are rather esoteric, the comments might help Tcl-Tk coding 'newbies' who might just give up if the code looked too cryptic.
Code for the Tk script 'photoFile_editing_viaFunctions.tk' :
#!/usr/bin/wish -f
##+###########################################################################
##
## SCRIPT: photoFile_editing_viaFunctions.tk
##
## PURPOSE: This script serves to edit image files via functions. The image
## files may be GIF files --- and PNG eventually, using 8.6.x
## versions of the 'wish' interpreter.
##
## This script provides a Tk GUI with the following widgets.
##
## 1) There is a FILENAME-ENTRY FIELD and 'Browse ...' BUTTON with
## which to get an image file to place on the canvas widget of
## this GUI.
##
## 2) There is a LISTBOX (on the left of the GUI) which provides a
## list of (composite-)functions that can be applied to the x,y
## locations of the pixels of the retrieved image.
##
## The functions --- or composite of functions --- map an
## x,y pixel location to a color.
##
## In other words, given a user-selected (composite-)function:
## For each x,y location in a new image (of the same size as
## the current image in the canvas), the color of the pixel
## at that x,y location is calculated by applying the
## (composite-)function --- and any of its parameters ---
## to whatever information we can glean via the x,y value
## passed into the (composite-)function.
##
## Note that we are not restricted to mapping a color at
## a given x,y location to a new color based on the original
## color at that location in the original image.
##
## For example, we could simply set the color of
## an xy pixel in the new image according to a math function
## independent of the current color at xy in the original image.
## This would mean that this utility can function like an
## image creation utility, like the 'Functional imaging'
## utility demo-ed by Suchenwirth at https://wiki.tcl-lang.org/3523.
##
## Ideally, we could, for example, create a function to 'flip'
## the original image around a horizontal axis by mapping
## the colors in rows at the top of the image to the bottom
## of the new image -- and proceeding with the 'flip' over
## all the rows of the new image.
##
## In fact, we can probably do various kinds of 'blur' operation,
## by devising functions that use colors at neighboring pixels as
## parameters/variables in the mapping to a new color. That is,
## colors at x+n,x-n,y+n,y-n, where n=1,2,3,... , as well as the
## color at x and y in the original image, can serve to determine
## a color at x,y in the new image.
##
## Hopefully, we can do operations like 'flip' and 'blur'
## without overhauling the 'fimg_make' proc that calls
## the specified (composite-)function --- row by row (i.e.
## varying x faster than y --- and passing only the values x,y at
## each point x,y in the double-loop.
##
## Since the entire 'img1' structure is available to the
## given (composite-)function --- and since we are putting the
## new color values in a separate 'img2' image structure/buffer
## in memory, hopefully, we can accomplish almost any
## kind of image transformation --- with the current double-loop
## implementation of the 'fimg_make' proc.
##
## If necessary, we could make a function that makes the
## entire image in the 'img2' buffer when x,y=0,0. And then
## the function would do nothing for the other values of x and y.
##
## There is more on the nature of the (composite)-functions
## in a 'DESCRIPTION OF THE COMPOSITE-FUNCTIONS' section below.)
##
## 3) a FUNCTION-ENTRY FIELD which holds a (composite-)function
## that was selected from the listbox. (The user double-clicks
## on the entry field --- or presses the Return/Enter key --- to
## cause the selected (composite-)function to be applied to
## the current image in the canvas. And the user may change
## any parameter values that appear in the entry field.)
##
###########################
## REFERENCES (and credits):
##
## - The 'Functional Imaging' script published by Richard Suchenwirth,
## circa 2002, at https://wiki.tcl-lang.org/3523.
##
## - The 'Functional Imaging' script was enhanced/generalized in the script
## published by Blaise Montandon 2012aug, at https://wiki.tcl-lang.org/36786 -
## 'Functional Imaging with a High-Capacity GUI'.
##
## - Various photo-image processing scripts by 'ulis' (French, died circa 2008)
## such as the script at 'Coloring a gray image' - https://wiki.tcl-lang.org/9666,
## posted circa 2003.
##
## See other posts by 'ulis'- some with improvements by others:
## - https://wiki.tcl-lang.org/10521 - Blurring an image
## - https://wiki.tcl-lang.org/10543 - Embossing an image
## - https://wiki.tcl-lang.org/10523 - Crisping an image
## - https://wiki.tcl-lang.org/10520 - Expanding an image
## - https://wiki.tcl-lang.org/10524 - Image Processing with HSV
## - https://wiki.tcl-lang.org/10504 - Shrinking an image
## These give ideas for new functions to add to this script.
##
## Related posts by Richard Suchenwirth:
## - https://wiki.tcl-lang.org/8448 - Image scaling
## - https://wiki.tcl-lang.org/4022 - Photo image rotation
## - https://wiki.tcl-lang.org/9521 - TkPhotoLab
## - https://wiki.tcl-lang.org/15163 - Drawing lines in photo images
##
## Related posts by David Easton:
## - https://wiki.tcl-lang.org/11196 - Fast image resizing
##
## Related posts by 'kroc':
## - https://wiki.tcl-lang.org/9045 - Canvas2Image
##
## Related posts by 'elfo':
## - https://wiki.tcl-lang.org/1155 - Canvas pixel painting
##
## Related posts by 'SRIV':
## - https://wiki.tcl-lang.org/14633 - Enhancing Satellite Weather Images
##
###################################################################
## DESCRIPTION OF THE COMPOSITE-FUNCTIONS:
##
## (Some of this description is paraphrased from Suchenwirth's description
## of the (composite-)functions at the 'Functional Imaging' web page, at
## https://wiki.tcl-lang.org/3523.)
##
## On 2002-06-15, Richard Suchenwirth said "Cameron Laird pointed me to
## Conal Elliott's 'Pan' project ('Functional Image Synthesis'), where
## images (of arbitrary size and resolution) are produced and manipulated
## in an elegant functional way."
##
## A description of that project was posted at
## http://research.microsoft.com/en-us/um/people/conal/papers/bridges2001/
##
## [That link is now dead. Googling the keywords
## 'conal elliott pan functional image synthesis'
## in 2012 August found: http://conal.net/papers/bridges2001/ ]
##
## The Haskell original could, with few modifications, be represented in Tcl.
## 'Functional composition' can be rewritten to Polish notation.
##
## Haskell's
##
## foo 1 o bar 2 o grill
##
## (where "o" is the composition operator) would, in Polish notation, look like
##
## o {foo 1} {bar 2} grill
##
## Additional arguments can be specified. Only the last argument is passed
## through the generated "function nest":
##
## proc f {x} {foo 1 [bar 2 [grill $x]]}
##
## [where $x is actually, in these functional imaging apps,
## typically an xy pair of values, corresponding to
## the coordinates of a pixel in an image canvas.]
##
## The name of the generated function can be much nicer than "f" ---
## namely, the complete "o" string can be used, so the example proc above
## can have the name
##
## "o {foo 1} {bar 2} grill"
##
## which is pretty self-documenting. (See the 'proc o' below in this code.)
##
## Suchenwirth points out that "a well-formed 'funimj composition' consists of":
##
## * the composition operator "o"
## * zero or more "painters" (color -> color) [color-map function]
## * one "draw-er" (point -> color) [geometry-to-color function]
## * zero or more "transformers" (point -> point) [geometry-map function]
##
## There should be at least one "draw-er" (point -> color).
## The "painters" [color-to-color mappers] and "transformers"
## [geometry-to-geometry mappers] are optional.
##
## The list above implies that
## - a geometry-transformer(s), if present, is/are typically applied first
## - the "draw-er' is applied next
## - a color-transformer, if present, is typically applied next.
##
## Or, more generally, the output of one function should be of a type
## supported by the input of the next function. And the final output of
## the 'composite function' should be a color.
##
## I follow a standard in naming the 'mapper' procs. I use function names
## with prefixes that indicate the type of input and output. Examples:
##
## 'rgb255-xyTOchex_' - an xy point (and rgb color, 0-255) is mapped to a hex-color
## 'chex-xyTOchex_' - an xy point (and hex color) is mapped to a hex-color
## 'xyTOchex_' - an xy point is mapped to a hex-color (this would ignore
## the color at the xy pixel; this could result in new
## image generation rather than editing of the 'photo' img)
## 'chexTOchex_' - a hex-color is mapped to a hex-color
## 'rgb255TOchex_' - an rgb-color (0-255) is mapped to a hex-color
## 'xyTOxy_' - an xy point is mapped to an xy point
## 'raTOxy_' - a polar point (r,a - radius,angle) is mapped to an xy point
## 'dTOchex_' - a decimal number (scalar) is mapped to a hex-color
## '0or1TOchex_' - a one-digit binary number (0 or 1) is mapped to a hex-color
## 'fgxyTOchex_' - 2 funcs, nicknamed f and g, evaluated at xy, map to a hex-color,
## i.e. the 'input' is 2 functions and an xy point.
##
## The prefixes have the disadvantage of making the function names and
## composite-function names rather long --- but it was well worth it to
## me because it makes it much clearer to me what the functions and
## composite-functions are intended to do. Furthermore, it really stands
## out if you are feeding improper output type from one function into
## another function in a composite-function.
##
#############################
## THE FUNCTION-ENTRY WIDGET:
##
## The (function-)ENTRY widget on the GUI is provided so that users can change
## parameter defaults of the functions that are provided with value(s)
## for parameter(s).
##
##+#######################################################################
## 'CANONICAL' STRUCTURE OF THIS CODE:
##
## 0) Set general window parms (win-name,win-position,win-color-scheme,
## fonts,widget-geom-parms, win-size-control).
## 1) Define ALL frames (and sub-frames). Pack them.
## 2) Define & pack all widgets in the frames.
##
## 3) Define key/mouse action BINDINGS, if needed.
## 4) Define PROCS, if needed.
## 5) Additional GUI initialization (typically with one or more of
## the procs), if needed.
##
##+#################################
## Some detail of the code structure of this particular script:
##
## 1a) Define ALL frames:
##
## Top-level :
## 'fRleft' - to contain a listbox and its scrollbars
## 'fRright' - to contain a canvas widget, with an entry widget below it
## and a file-selection entry-button pair above the canvas
##
## Sub-frames of 'fRleft': none, just one listbox widget with xy scrollbars
##
## Sub-frames of 'fRright' (top to bottom):
## 'fRfile' - to contain a triplet: label-entry-button widgets
## 'fRcan' - to contain the canvas widget.
## 'fRinfo' - to contain a label widget (for info).
## 'fRcontrols' - to contain an 'Exit' button,
## (a 'Help' button, someday?),
## and an entry widget to hold the selected
## (composite-)function, with its default parameter
## settings, if any.
##
## 1b) Pack ALL frames.
##
## 2) Define & pack all widgets in the frames -- basically going through
## frames & their interiors in left-to-right, top-to-bottom order:
##
## 3) Define bindings:
## - Button1-release on the filename entry field
## - Button1-release on the listbox
## - Return key press on the function-entry widget
## - Double-Button1-release on the function-entry widget
##
## 4) Define procs:
## - a proc to get the image filename
## - a function-composition operator 'o'
## - two procs to make and put an image on the canvas, from a given
## composite-function --- 'fimg_put', 'fimg_make'
## - about 20-plus 'transform'/'mapping' procs, eventually
## - a load-the-listbox proc, for GUI initialization
## - a put-a-selected-listbox-line-into-the-function-entry-field proc,
## for the Button1-release binding on the listbox
##
## 5) Additional GUI initialization:
## - run the load-the-listbox proc
##
## ****
## NOTE: If a new composite-function is to be added to the listbox:
## ****
## 1) Any new procs needed should be added to the MAPPING PROCS
## section below.
## 2) The new (composite-)function, formed using the 'o'
## operator/proc, should be added in a 'listbox-insert' command,
## in the load-the-listbox proc.
##
##+#######################################################################
## DEVELOPED WITH: Tcl-Tk 8.5 on Ubuntu 9.10 (2009-october, 'Karmic Koala')
##
## $ wish
## % puts "$tcl_version $tk_version"
##
## showed
## 8.5 8.5
## but this script should work in most previous 8.x versions, and probably
## even in some 7.x versions (if font handling is made 'old-style').
##+#######################################################################
## MAINTENANCE HISTORY:
## Started by: Blaise Montandon 2010aug20 Started development, on Ubuntu 9.10,
## based on my code at
## https://wiki.tcl-lang.org/36786 -
## "Functional Imaging with a
## High-Capacity GUI".
## Changed by: Blaise Montandon 2012aug21 Add 'Stop' button.
##+########################################################################
##+#######################################################################
## Set general window parms (title,position,size,color-scheme,fonts,etc.).
##+#######################################################################
wm title . "Image Editing by Functions"
wm iconname . "ImgFuncEdit"
wm geometry . +15+30
## We allow the window to be resizable and we pack the canvas with
## '-fill both' so that the canvas can be enlarged by enlarging the
## window.
##
## Just double-click on the entry field (or press the
## Enter key) to re-fill the canvas according to the
## the user-specified composite-function.
## If you want to make the window un-resizable,
## you can use the following statement.
# wm resizable . 0 0
##+######################################################
## Set the color scheme for the window and its widgets ---
## such as entry field background color.
##+######################################################
tk_setPalette "#e0e0e0"
set entryBKGD "#ffffff"
set listboxBKGD "#ffffff"
##+########################################################
## Use a VARIABLE-WIDTH font for text on label and
## button widgets.
##
## Use a FIXED-WIDTH font for the listbox list and for
## the text in the entry field.
##+########################################################
font create fontTEMP_varwidth \
-family {comic sans ms} \
-size -14 \
-weight bold \
-slant roman
## Some other possible (similar) variable width fonts:
## Arial
## Bitstream Vera Sans
## DejaVu Sans
## Droid Sans
## FreeSans
## Liberation Sans
## Nimbus Sans L
## Trebuchet MS
## Verdana
font create fontTEMP_fixedwidth \
-family {liberation mono} \
-size -14 \
-weight bold \
-slant roman
## Some other possible fixed width fonts (esp. on Linux):
## Andale Mono
## Bitstream Vera Sans Mono
## Courier 10 Pitch
## DejaVu Sans Mono
## Droid Sans Mono
## FreeMono
## Nimbus Mono L
## TlwgMono
##+###########################################################
## SET GEOM VARS FOR THE VARIOUS WIDGET DEFINITIONS.
## (e.g. width and height of canvas, and padding for Buttons)
##+###########################################################
set initCanWidthPx 300
set initCanHeightPx 300
set minCanWidthPx 24
set minCanHeightPx 24
# set BDwidthPx_canvas 2
set BDwidthPx_canvas 0
## BUTTON widget geom settings:
set PADXpx_button 0
set PADYpx_button 0
set BDwidthPx_button 2
## ENTRY widget geom settings:
set BDwidthPx_entry 2
set initEntryWidthChars 20
## LISTBOX geom settings:
set BDwidthPx_listbox 2
set initListboxWidthChars 30
set initListboxHeightChars 8
##+######################################################
## Set a minsize of the window according to the
## approx min width of the listbox and function-entry
## widgets (about 20 chars each)
## --- and according to the approx min height of the
## listbox widget, about 8 lines.
##+######################################################
set charWidthPx [font measure fontTEMP_fixedwidth "0"]
## Use the init width of the listbox and entry widgets, in chars,
## to calculate their total width in pixels. Then add some
## pixels to account for right-left-size of window-manager decoration,
## frame/widget borders, and the vertical listbox scrollbar.
set minWinWidthPx [expr 20 + ( $initListboxWidthChars * $charWidthPx ) + \
( $initEntryWidthChars * $charWidthPx )]
set charHeightPx [font metrics fontTEMP_fixedwidth -linespace]
## Get the height of the init number of lines in the listbox
## and add about 20 pixels for top-bottom window decoration --
## and about 8 pixels for frame/widget borders.
set minWinHeightPx [expr 28 + ( $initListboxHeightChars * $charHeightPx ) ]
## FOR TESTING:
# puts "minWinWidthPx = $minWinWidthPx"
# puts "minWinHeightPx = $minWinHeightPx"
wm minsize . $minWinWidthPx $minWinHeightPx
##+################################################################
## DEFINE *ALL* THE FRAMES:
##
## Top-level : '.fRleft' , '.fRright'
##
## Sub-frames: '.fRright.fRcan' and '.fRfile' and
## '.fRright.fRinfo' and '.fRright.fRcontrols'
##+################################################################
# set BDwidth_frame 0
set BDwidth_frame 2
# set RELIEF_frame raised
set RELIEF_frame flat
frame .fRleft -relief $RELIEF_frame -borderwidth $BDwidth_frame
frame .fRright -relief $RELIEF_frame -borderwidth $BDwidth_frame
frame .fRright.fRfile -relief $RELIEF_frame -bd $BDwidth_frame
frame .fRright.fRcan -relief raised -bd $BDwidth_frame
frame .fRright.fRinfo -relief $RELIEF_frame -bd $BDwidth_frame
frame .fRright.fRcontrols -relief $RELIEF_frame -bd $BDwidth_frame
##+##############################
## PACK the FRAMES.
##+##############################
pack .fRleft \
-side left \
-anchor nw \
-fill both \
-expand 1
pack .fRright \
-side left \
-anchor nw \
-fill both \
-expand 1
## Pack the sub-frames.
pack .fRright.fRfile \
-side top \
-anchor nw \
-fill x \
-expand 0
pack .fRright.fRcan \
-side top \
-anchor nw \
-fill both \
-expand 1
pack .fRright.fRinfo \
.fRright.fRcontrols \
-side top \
-anchor nw \
-fill x \
-expand 0
##+###############################
## In FRAME '.fRleft' -
## DEFINE-and-PACK a LISTBOX WIDGET,
## with scrollbars:
##+######################################################
## Originally, Suchenwirth's code used buttons instead
## of a listbox. He made the button stack (on the
## left side of the GUI) as follows.
## (This uses the $c var to represent the canvas.)
##+######################################################
##
## set n 0
## foreach imf [lsort [info procs "o *"]] {
## button .f.b[incr n] -text $imf -anchor w -pady 0 \
## -command [list fim_put $c $imf]
## }
##+######################################################
listbox .fRleft.listbox \
-width $initListboxWidthChars \
-height $initListboxHeightChars \
-font fontTEMP_fixedwidth \
-relief raised \
-borderwidth $BDwidthPx_listbox \
-state normal \
-yscrollcommand ".fRleft.scrbary set" \
-xscrollcommand ".fRleft.scrbarx set"
## Could experiment with
## -width 0 \
## -height 0 \
## and the -'fill' & 'expand' pack parms for '.fRleft'.
scrollbar .fRleft.scrbary \
-orient vertical \
-command ".fRleft.listbox yview"
scrollbar .fRleft.scrbarx \
-orient horizontal \
-command ".fRleft.listbox xview"
## Pack the listbox and its scrollbars.
pack .fRleft.scrbary \
-side right \
-anchor e \
-fill y \
-expand 0
pack .fRleft.scrbarx \
-side bottom \
-anchor s \
-fill x \
-expand 0
## We need to pack the listbox AFTER
## the scrollbars, to get the scrollbars
## positioned properly --- BEFORE
## the listbox FILLS the pack area.
pack .fRleft.listbox \
-side top \
-anchor nw \
-fill both \
-expand 1
##+###############################
## In FRAME '.fRright.fRfile' -
## DEFINE-and-PACK 3 widgets -
## LABEL, ENTRY, BUTTON:
##+###############################
label .fRright.fRfile.labelFILE \
-text "ImgFilename (GIF/PNG):" \
-font fontTEMP_varwidth \
-justify left \
-anchor w \
-relief flat \
-bd 0
set ENTRYfilename ""
entry .fRright.fRfile.entFILENAME \
-textvariable ENTRYfilename \
-bg $entryBKGD \
-font fontTEMP_fixedwidth \
-width $initEntryWidthChars \
-relief sunken \
-bd $BDwidthPx_entry
button .fRright.fRfile.buttBROWSE \
-text "Browse ..." \
-font fontTEMP_varwidth \
-padx $PADXpx_button \
-pady $PADYpx_button \
-relief raised \
-bd $BDwidthPx_button \
-command {get_img_filename}
## Pack the control widgets.
pack .fRright.fRfile.labelFILE \
-side left \
-anchor w \
-fill none \
-expand 0
pack .fRright.fRfile.entFILENAME \
-side left \
-anchor w \
-fill x \
-expand 1
pack .fRright.fRfile.buttBROWSE \
-side left \
-anchor w \
-fill none \
-expand 0
##+###############################
## In FRAME '.fRright.fRcan' -
## DEFINE-and-PACK a CANVAS WIDGET:
##+###############################
canvas .fRright.fRcan.can \
-width $initCanWidthPx \
-height $initCanHeightPx \
-relief raised \
-borderwidth $BDwidthPx_canvas
pack .fRright.fRcan.can \
-side top \
-anchor nw \
-fill both \
-expand 1
##+#########################################
## In FRAME '.fRright.fRinfo' -
## DEFINE-and-PACK 'INFO' WIDGETS
## --- a label widget --- and a scale widget
## (for changing the 'magnification' of the
## image in the current canvas area).
##+#########################################
## Label Widget on which to write the number of composite-functions
## read in by the 'loadfuncs2listbox' proc. See that proc for
## a statement to set the text in this label.
label .fRright.fRinfo.labelFNUM \
-font fontTEMP_varwidth \
-justify left \
-anchor w \
-relief flat \
-bd 0
# -text "" \
## Pack the '.fRinfo' frame's widgets.
pack .fRright.fRinfo.labelFNUM \
-side left \
-anchor w \
-fill none \
-expand 0
##+#################################
## In FRAME '.fRright.fRcontrols' -
## DEFINE-and-PACK 'CONTROL' WIDGETS
## --- button(s), entry field.
##+#################################
button .fRright.fRcontrols.buttEXIT \
-text "Exit" \
-font fontTEMP_varwidth \
-padx $PADXpx_button \
-pady $PADYpx_button \
-relief raised \
-bd $BDwidthPx_button \
-command {exit}
set STOPflag 0
button .fRright.fRcontrols.buttSTOP \
-text "Stop" \
-font fontTEMP_varwidth \
-padx $PADXpx_button \
-pady $PADYpx_button \
-relief raised \
-bd $BDwidthPx_button \
-command {set STOPflag 1}
# button .fRright.fRcontrols.buttHELP \
# -text "Help" \
# -font fontTEMP_varwidth \
# -padx $PADXpx_button \
# -pady $PADYpx_button \
# -relief raised \
# -bd $BDwidthPx_button \
# -command {help}
set ENTRYfunc ""
entry .fRright.fRcontrols.entCMD \
-textvariable ENTRYfunc \
-bg $entryBKGD \
-font fontTEMP_fixedwidth \
-width $initEntryWidthChars \
-relief sunken \
-bd $BDwidthPx_entry
## Pack the control widgets.
pack .fRright.fRcontrols.buttEXIT \
.fRright.fRcontrols.buttSTOP \
-side left \
-anchor w \
-fill none \
-expand 0
## .fRright.fRcontrols.buttHELP \
pack .fRright.fRcontrols.entCMD \
-side left \
-anchor w \
-fill x \
-expand 1
##+##################################################
## END OF DEFINITION of the GUI widgets.
##+##################################################
## Start of BINDINGS, PROCS, Added-GUI-INIT sections.
##+##################################################
##+#######################################################################
##+#######################################################################
## BINDINGS SECTION:
## - For MB1-release on a listbox line,
## put that line (function) in ENTRYfunc.
##
## - For Enter-key-press in the entry field,
## use the ENTRYfunc to draw in the canvas.
## - For MB1-release in the entry field,
## use the ENTRYfunc to draw in the canvas.
##+#######################################################################
bind .fRright.fRfile.entFILENAME <ButtonRelease-1> {
# image create photo img1 -file "$ENTRYfilename"
set img1 [image create photo -file "$ENTRYfilename"]
.fRright.fRcan.can create image 0 0 -anchor nw -image $img1
}
bind .fRleft.listbox <ButtonRelease-1> { listboxSelectionTOentryString }
bind .fRright.fRcontrols.entCMD <Return> { fim_put }
bind .fRright.fRcontrols.entCMD <Double-ButtonRelease-1> { fim_put }
##+##################################################################
##+##################################################################
## DEFINE PROCS SECTION:
##
## - 'get_img_filename' - to get the filename of an image (GIF/PNG) file
## and place the image on the canvas
##
## - 'o' - the function-composition proc
##
## - 'fim_put' - calls 'fim_make' to make the new image, in
## an image-holding instance, img2 say, then clears
## the canvas and puts the new image in img1,
## which is put on the canvas.
##
## (So img1 holds the currently displayed image,
## and img2 holds the in-process image. This
## is essentially a 'double-buffering' technique.)
##
## ('fim' short for 'functional image' --- duh.)
##
## - 'fim_make' - applies the selected (composite-)function
## to the pixels in img1, putting the result in img2.
##
## - 'stop' - sets the STOPflag var to 1. (That global var is
## checked in 'fim_make' at each row, and, if it is
## 1, 'fim_make' resets it to 0 and issues 'return'.)
##
## Then
## - about 20-plus 'transform'/'mapping' procs
##
## Then
## - 'loadfuncs2listbox' - to load the listbox (for GUI initialization).
##
## - 'listboxSelectionTOentryString' -
## to put a selected listbox line into the
## entry widget var, ENTRYfunc.
##
##+#################################################################
## Description of the 'transform' procs:
##
## Most of the 'transform' procs are of 3 types:
## - point-to-color
## - color-to-color
## - point-to-point
##
## In function composition, like f(g(args)), it is essential that
## the output of g is of a type compatible with the input type of f.
## In fact, it is essential that we know both the input type and
## the output type of f and g.
##
## To make the input and output types of the following procs/functions
## clear, the name of each proc is prefixed by an input-TO-output
## indicator. Example prefixes:
## 'xyTOchex_' - an xy point is mapped to a hex-color
## 'chexTOchex_' - a hex-color is mapped to a hex-color
## 'xyTOxy_' - an xy point is mapped to an xy point
## 'raTOxy_' - a polar point (r,a - radius,angle) is mapped to an xy point
## 'dTOchex_' - a decimal number (scalar) is mapped to a hex-color
## '0or1TOchex_' - a one-digit binary number (0 or 1) is mapped to a hex-color
## 'fgxyTOchex_' - 2 funcs, f and g, evaluated at xy, map to a hex-color
##
## Example:
## Proc 'xyTOchex_bwCheckers' maps an xy point to a hex-color, to
## make a black-and-white checkerboard pattern.
##+############################################################################
##+#########################################################################
## Proc 'get_img_filename' -
##
## To get the name of an image file (GIF/PNG) and put the
## filename into global var 'ENTRYfilename'.
##
## Used by: the '-command' option of the 'Browse ...' button.
##+#########################################################################
# set curDIR "$env(HOME)"
set curDIR [pwd]
proc get_img_filename {} {
global ENTRYfilename env curDIR img1
## Load data from an OBJ file
set fName [tk_getOpenFile -parent . -title "Select GIF/PNG file to load" \
-initialdir "$curDIR" ]
## FOR TESTING:
# puts "fName : $fName"
if {[file exists $fName]} {
set ENTRYfilename "$fName"
set CURdir [ get_chars_before_last / in "$ENTRYfilename" ]
# image create photo img1 -file "$ENTRYfilename"
set img1 [image create photo -file "$ENTRYfilename"]
## FOR TESTING:
# puts "get_img_filename - img1: $img1"
.fRright.fRcan.can create image 0 0 -anchor nw -image $img1
}
}
## END OF proc 'get_img_filename'
#########################################################################
## Proc 'get_chars_before_last' -
#########################################################################
## INPUT: A character and a string.
## Note: The "in" parameter is there only for clarity.
##
## OUTPUT: Returns all of the characters in the string "strng" that
## are BEFORE the last occurence of the characater "char".
##
## EXAMPLE CALL: To extract the directory from a fully qualified file name:
##
## set directory [ get_chars_before_last "/" in "/home/abc01/junkfile" ]
##
## $directory will now be the string "/home/abc01"
##
#########################################################################
proc get_chars_before_last { char in strng } {
set end [ expr [string last $char $strng ] - 1 ]
# set start 0
# set output [ string range $strng $start $end ]
set output [ string range $strng 0 $end ]
## FOR TESTING:
# puts "From 'get_chars_before_last' proc:"
# puts "STRING: $strng"
# puts "CHAR: $char"
# puts "RANGE up to LAST CHAR - start: 0 end: $end"
return $output
}
## END OF 'get_chars_before_last' PROCEDURE
##+#########################################################################
## Proc 'o' - combines the functions=procs (and parameters, if any) in input
## 'args' to make a left-and-right brackets-separated string.
## Puts the string into global var 'bracketsSTRING'.
##+#########################################################################
proc o args {
global bracketsSTRING
## FOR TESTING:
# puts "ENTERING 'o' proc."
########################################################################
## The next statement
## puts a left-bracket to the left of each of the function arguments,
## except the first one. Example output if 'args' is
##
## xyTOchex_grayCheckers {xyTOxy_rippleRad 8 0.3} {rxyTOxy_swirl 16}
##
## should be
##
## xyTOchex_grayCheckers [xyTOxy_rippleRad 8 0.3 [rxyTOxy_swirl 16 $xy
##
## Note the 2 left-brackets --- and note the addition of '$xy' to the
## end of the string.
########################################################################
set body "[join $args " \["] \$xy"
## FOR TESTING:
# puts "body: $body"
###########################################################################
## The next statement
## adds N-1 right-brackets to the end of the string of function arguments,
## where N is the number of arguments. Example output
##
## xyTOchex_grayCheckers [xyTOxy_rippleRad 8 0.3 [rxyTOxy_swirl 16 $xy]]
##
## Note the 2 right-brackets at the end of the string.
##########################################################################
append body [string repeat \] [expr {[llength $args]-1}]]
## FOR TESTING:
# puts "body: $body"
## Save the string in a global var.
set bracketsSTRING "$body"
## Alternatively, the string could be passed from this script with
## a 'set' statement as the last statement of this proc.
# set "$body"
## FOR TESTING:
# puts "EXITING 'o' proc."
}
## END OF proc 'o'
##+######################################################################
## proc 'fim_put':
## Put an image --- created by a call to proc 'fim_make',
## whose code is below --- on the canvas. Input is 'f'.
## 'f' is ENTRYfunc which contains the 'o'-format (composite-)function.
##+######################################################################
proc fim_put {} {
global ENTRYfunc img1
## FOR TESTING:
# puts "fim_put - img1: $img1"
wm title . "*BUSY* ...... Calculating using: $ENTRYfunc"
## Clear the canvas.
.fRright.fRcan.can delete all
## Set the current time, for determining execution
## time for building the photo image, below.
set t0 [clock seconds]
## Put an image in the canvas, using proc 'fim_make' to make the image.
set img1 [fim_make]
## Do we need this to put the new image on the canvas?
.fRright.fRcan.can create image 0 0 -anchor nw -image $img1
## Delete the in-memory-hold-area for the 'work-area' image, whose size
## is the current canvas size. (The canvas could be re-sized and the
## next image function-edit pass might need a different size work area.)
## Perhaps this should go at the top of the 'fim_make' proc. (?)
# image delete $img2
## Change the title of the window to show execution time.
wm title . \
"DONE. [expr [clock seconds]-$t0] seconds elapsed using: $ENTRYfunc"
}
## END OF proc 'fim_put'
##+######################################################################
## Proc 'fim_make' -
#########################################################################
## PURPOSE:
##
## For a given (composite-)function and for the current image/canvas
## width and height (in pixels), the (composite-)function is applied
## to each x,y pixel of the current image --- typically using the
## color at a location in the image to compute a new color.
##
## The double loop over y and x is put in this proc instead of in
## each of the function procs that are used to construct a
## (composite-)function.
##
## METHOD:
##
## Uses var ENTRYfunc, from the (composite-)function-entry widget,
## which contains the 'o'-format (composite-)function.
##
## Sets var bracketsSTRING, which is made from ENTRYfunc by
## evaluating the 'o' proc --- creating a string of procs in
## left and right brackets.
##
## Produces a photo image by applying the (composite-)function in
## $bracketsSTRING to xy positions corresponding to pixels in the canvas.
##
## The output of the (composite-)function should be a color.
##
## That color is appended to a list-of-colors-in-an-image-row var.
## For each y, the row var is appended to a data var that is
## loaded into an 'img2' work-area image with an 'img2 put' command.
##########################################################################
## The loops here over x and y --- and the retrieval of the current color
## at pixel location x,y --- are based on a combination of the
## 'fim_make' proc of Suchenwirth's 'Functional imaging' page at
## https://wiki.tcl-lang.org/3523---and the 'colorize' proc at the
## 'Coloring a gray image' page at https://wiki.tcl-lang.org/9666 -
## by 'ulis'. (French, died circa 2008. May he R.I.P. Thanks, 'ulis'.)
##+######################################################################
proc fim_make {} {
global ENTRYfunc img1 STOPflag
## FOR TESTING:
# puts "fim_make - img1: $img1"
## Var 'ENTRYfunc' is used to make the var 'bracketsSTRING',
## which holds the (composite-) function in the
## left-and-right-bracket form, rather than the 'o' form.
## bracketsSTRING is set by 'eval $ENTRYfunc' below.
## 'img1' holds the current image that is being displayed in
## the canvas. We build the new image in a 'work-area'
## image we call 'img2'.
## Change the cursor to a 'watch' cursor.
. config -cursor watch
update ;# to make the cursor visible
## Get the current width & height of the canvas (in pixels).
# set width [winfo width .fRright.fRcan.can]
# set height [winfo height .fRright.fRcan.can]
## OR use width & height of the img1 structure.
set width [image width $img1]
set height [image height $img1]
## Initialize a 'work-area' image structure at the current canvas size.
set img2 [image create photo -height $height -width $width]
## Run the 'o' proc to make the global var bracketsSTRING ---
## the left-and-right-brackets form of the (composite-)function
## --- from the current ENTRYfunc.
set bracketsSTRING [eval $ENTRYfunc]
## Initialize the 'listColors4allXY' local list-var, empty.
## Also initialize the 'listTranspAlphaALLxy' local list-var, empty.
set listColors4allXY {}
# set processTransparency 0
set processTransparency 1
set listTranspAlphaALLxy {}
## Start incrementing over the height of the image.
## In other words, set a row of the image to process.
.fRright.fRcan.can create text 10 10 -anchor nw \
-text "starting processing." -tag canmsg
for {set y 0} {$y < $height} {incr y} {
if { $STOPflag == 1} {
set STOPflag 0
.fRright.fRcan.can create image 0 0 -anchor nw -image $img1
return $img1
}
.fRright.fRcan.can delete tag canmsg
.fRright.fRcan.can create text 10 10 -anchor nw \
-font fontTEMP_fixedwidth \
-text "Processing row y: [expr $y + 1] of $height rows" -tag canmsg
update ;# to make the msg visible
## Initialize the 'listRowOFcolors' local list-var.
## This var is to hold colors at pixels in the current row.
set listRowOFcolors {}
## Start incrementing over the width of the image,
## to set colors at pixels in the current row.
for {set x 0} {$x < $width} {incr x} {
if { $processTransparency == 1} {
## Save each transparency (alpha value) in the row
## as a triplet: $x $y $t
set t [$img1 transparency get $x $y]
## FOR TESTING:
if { $x == 0 && $y == 0} {
puts "t: $t"
}
lappend listTransAlphaALLxy $x $y $t
}
## Compute the new color using the composite function in
## $bracketsSTRING. (Note that bracketsSTRING was created
## by the 'o' proc to have $xy at the end of the string.
## So we need to create var xy with $x and $y.)
##
## In case there is a syntax error in bracketsSTRING,
## we put the following statement
## lappend listRowOFcolors [eval $bracketsSTRING]
## in an error catching routine.
set xy [list $x $y]
lappend listRowOFcolors [eval $bracketsSTRING]
# if [catch {lappend listRowOFcolors [eval $bracketsSTRING]}] {
# .fRright.fRcan.can create text 10 10 -anchor nw -text $errorInfo
# ## Reset the cursor from a 'watch' cursor.
# . config -cursor {}
# return
# }
}
## END OF loop over x
## Append the row of colors to the ALL-xy-colors data var.
lappend listColors4allXY $listRowOFcolors
}
## END OF loop over y
## Put the colors of the data var into the 'work-area' image structure.
$img2 put $listColors4allXY
## Restore transparency.
if { $processTransparency == 1} {
foreach {x y t} $listTranspAlphaALLxy { $img2 transparency set $x $y $t }
}
## Reset the cursor from a 'watch' cursor.
. config -cursor {}
## Return the image ID.
set img2
}
## END OF proc 'fim_make'
##+######################################################################
##+######################################################################
## TRANSFORM/MAPPING PROCS :
## In the following mapping procs that map from an x,y location,
## the argument 'p' is used where p is to be a 2-element list ---
## generally given by passing [list $x $y] as the p argument of the proc.
##+######################################################################
## Typical arguments (inputs) and outputs are points and/or colors. Examples:
## - a Cartesian 2D point - a pair of integer or floating point numbers {x y}
## - a polar 2D point - a pair of floating point numbers {r a} (radius,angle)
## - a Tk color name, like "green"
## - a hex color value, like #010203
##
## Other argument (input) or output examples:
## - 0 or 1
## - a number between 0.0 and 1.0
## - a color expressed as 3 integers, between 0 and 255
## - two functions and an xy point
## - an integer and an xy point
##+######################################################################
#########################################################################
## PROC to 'Contract' the color of each pixel away from black and white
## by a linear mapping of range (0,255) to range (n,255-n).
#########################################################################
proc nxyTOchex_contractColorsAwayFromBlackAndWhite { n p } {
global img1
## Put the 2 components of p into x and y.
foreach {x y} $p break
## Get the current rgb color at x,y.
## These will be decimal integer values (0-255) --- NOT hex.
foreach {r g b} [$img1 get $x $y] break
## FOR TESTING:
# if {$x == 0 && $y == 0} {
# puts "row y: $y"
# puts "x: $x r: $r g: $g b: $b"
# }
## Map the RGB values from range (0,255) to range (n, 255-n).
set newr [expr ((255 - (2 * $n)) * $r / 255) + $n]
set newg [expr ((255 - (2 * $n)) * $g / 255) + $n]
set newb [expr ((255 - (2 * $n)) * $b / 255) + $n]
## FOR TESTING:
# if {$x == 0 && $y == 0} {
# puts "row y: $y n: $n"
# puts "x: $x newr: $newr newg: $newg newb: $newb"
# }
## Return the hex color value --- to be appended to the
## current row-of-colors variable.
set hexcolor [format #%2.2x%2.2x%2.2x $newr $newg $newb]
## FOR TESTING:
# if {$x == 0} {
# puts "hexcolor: $hexcolor"
# }
return $hexcolor
}
## END OF proc nxyTOchex_contractColorsAwayFromBlackAndWhite
#####################################################################
## PROC to 'colorize' the color of each pixel with a given
## RGB color. Example: 0,0,255 makes the image bluish.
##
## Based on the 'colorize' proc at the 'Coloring a gray image' page
## at https://wiki.tcl-lang.org/9666 --- by 'ulis'. (French, died circa 2008)
#####################################################################
proc rgb255xyTOchex_colorize { r255 g255 b255 p } {
global img1
## Put the 2 components of p into x and y.
foreach {x y} $p break
## Get the current rgb color at x,y.
## These will be decimal integer values (0-255) --- NOT hex.
foreach {r g b} [$img1 get $x $y] break
## FOR TESTING:
# if {$x == 0} {
# puts "row y: $y"
# puts "x: $x r: $r g: $g b: $b"
# }
## Bias the RGB values of the image by multiplying
## r by r255, g by g255, b by b255 --- i.e. multiply
## the image RGB's by the RGB's passed into this routine.
##
## Note that after the multiplication, the range (0,255)
## goes to range (0,255*255) = (0,65025).
set newr [expr {round($r * $r255 / 256.)}]
set newg [expr {round($g * $g255 / 256.)}]
set newb [expr {round($b * $b255 / 256.)}]
## FOR TESTING:
# if {$x == 0} {
# puts "row y: $y"
# puts "x: $x newr: $newr newg: $newg newb: $newb"
# }
## Return the hex color value --- to be appended to the
## current row-of-colors variable.
# set hexcolor [format #%4.4x%4.4x%4.4x $newr $newg $newb]
set hexcolor [format #%2.2x%2.2x%2.2x $newr $newg $newb]
## FOR TESTING:
# if {$x == 0} {
# puts "hexcolor: $hexcolor"
# }
return $hexcolor
}
## END OF proc rgb255xyTOchex_colorize
#####################################################################
## PROC i127-rgb1-rgb2-xyTO2chex_luminance -
##
## to set pixels to one of 2 colors depending on
## 'luminance' of the color of each pixel.
##
## Inputs:
## i127 represents an integer between 0 and 128.
## rgb1 represents 3 integers in 0-255.
## rgb2 represents 3 integers in 0-255.
##
## Example:For 150 255 0 255 0 255 255, if the luminance of
## the pixel at xy is less than 250, its color is changed to
## (255,0,255)=magenta --- and if the luminance of the
## pixel at xy is greater than 250, its color is changed to
## (0,255,255)=cyan.
##
## See the formula for 'luminance' below.
#####################################################################
proc i127-rgb255-rgb255-xyTOchex_luminance_low-hi-to-2colors { icutoff r1 g1 b1 r2 g2 b2 p } {
global img1
## Put the 2 components of p into x and y.
foreach {x y} $p break
## Get the current rgb color at x,y.
## These will be decimal integer values (0-255) --- NOT hex.
foreach {r g b} [$img1 get $x $y] break
######################################################
## Compute the 'Luminance' (Y) of the zy pixel,
## is given by a weighted average of RGB values,
## according to the formula:
##
## Y = .299*R + .587*G + .114*B
#####################################################
set LUMval [ expr .299*$r + .587*$g + .114*$b ]
## FOR TESTING:
# if {$x == 0} {
# puts "row y: $y"
# puts "x: $x r: $r g: $g b: $b"
# }
if { $LUMval < $icutoff } {
set newr $r1
set newg $g1
set newb $b1
} else {
set newr $r2
set newg $g2
set newb $b2
}
## FOR TESTING:
# if {$x == 0} {
# puts "row y: $y"
# puts "x: $x newr: $newr newg: $newg newb: $newb"
# }
## Return the hex color value --- to be appended to the
## current row-of-colors variable.
# set hexcolor [format #%4.4x%4.4x%4.4x $newr $newg $newb]
set hexcolor [format #%2.2x%2.2x%2.2x $newr $newg $newb]
## FOR TESTING:
# if {$x == 0} {
# puts "hexcolor: $hexcolor"
# }
return $hexcolor
}
## END OF proc i127-rgb255-rgb255-xyTOchex_luminance_low-hi-to-2colors
#################################################################
## This first group of procs/mappings was provided by Suchenwirth
## for the 'Functional imaging' page.
## NOTE:
## We may be able to use some of these 'Functional imaging' procs
## for this 'photo/image-file editing via functions' utility.
#################################################################
proc 0or1TOchex_whiteORblack {binarydigit} {
## 0 -> white, 1 -> black
expr {$binarydigit? "#000" : "#FFF"}
}
proc dTOchex_0to1TOgrays {greylevel} {
## convert 0..1 to #000000..#FFFFFF
set hex [format %02X [expr {round($greylevel*255)}]]
return #$hex$hex$hex
}
proc c255TOchex {r g b} {
## make Tk color name: {0 128 255} -> #0080FF
format #%02X%02X%02X $r $g $b
}
proc 0or1TOchex_binaryPaint {color0 color1 pixel} {
## convert a binary pixel to one of two specified colors
expr {$pixel=="#000"? $color0 : $color1}
}
proc xyTOchex_bwVstrip p {
## Makes a simple vertical bar:
## xy points where x is between -0.5 and 0.5 map to black.
0or1TOchex_whiteORblack [expr {abs([lindex $p 0]) < 0.5}]
}
proc xyTOchex_udisk p {
## Makes a unit disk, radius 1, black on white bkgnd.
foreach {x y} $p break
0or1TOchex_whiteORblack [expr {hypot($x,$y) < 1}]
}
proc fgxyTOchex_xor {f1 f2 p} {
lappend f1 $p; lappend f2 $p
0or1TOchex_whiteORblack [expr {[eval $f1] != [eval $f2]}]
}
proc fgxyTOchex_and {f1 f2 p} {
lappend f1 $p; lappend f2 $p
0or1TOchex_whiteORblack [expr {[eval $f1] == "#000" && [eval $f2] == "#000"}]
}
proc xyTOchex_bwCheckers p {
## Makes a black and white checkerboard.
foreach {x y} $p break
0or1TOchex_whiteORblack [expr {int(floor($x)+floor($y)) % 2 == 0}]
}
proc xyTOchex_grayCheckers p {
## Makes greylevels corresponding to fractional part of x,y.
foreach {x y} $p break
dTOchex_0to1TOgrays [expr {(fmod(abs($x),1.)*fmod(abs($y),1.))}]
}
proc xyTOchex_bwRings p {
## Makes binary (black or white) concentric rings.
foreach {x y} $p break
0or1TOchex_whiteORblack [expr {round(hypot($x,$y)) % 2 == 0}]
}
proc xyTOchex_grayRings p {
## Makes grayscale concentric rings.
foreach {x y} $p break
dTOchex_0to1TOgrays [expr {(1 + cos(3.14159265359 * hypot($x,$y))) / 2.}]
}
proc nxyTOchex_bwWedges {n p} {
## Makes n wedge slices (black/white) starting at (0,0).
foreach {r a} [xyTOra $p] break
0or1TOchex_whiteORblack [expr {int(floor($a*$n/3.14159265359))%2 == 0}]
}
proc xyTOchex_bwXpos-neg p {
## Makes left/right halves of xy plane white/black.
0or1TOchex_whiteORblack [expr {[lindex $p 0]>0}]
}
proc xyTOchex_colorGradient p {
## color gradients
foreach {x y} $p break
if {abs($x)>1.} {set x 1.}
if {abs($y)>1.} {set y 1.}
set r [expr {int((1.-abs($x))*255.)}]
set g [expr {int((sqrt(2.)-hypot($x,$y))*180.)}]
set b [expr {int((1.-abs($y))*255.)}]
c255TOchex $r $g $b
}
proc expr-xyTOchex_bwPlot {expr p} {
##########################################################################
## Another point->color(black-white) proc:
## Beyond the examples in Conal Elliott's paper "Functional Image Synthesis",
## Suchenwirth found out that function imaging can also be 'abused' for a
## (slow and imprecise) function plotter, which displays the graph for
## y = f(x) if you call it with $y + f($x) as first argument:
###########################################################################
foreach {x y} $p break
0or1TOchex_whiteORblack [expr abs($expr)<=0.04] ;# double eval required here!
}
##+########################################################################
## Arjen Markus provided the following 2 contour (point -> color) procs
## for a little extension to the repertoire.
##+########################################################################
proc fxyTOcname_contour {expr p} {
foreach {x y} $p break
colourClass {-10 -5 0 5 10} [expr $expr] ;# double eval required here!
}
proc colourClass { classbreaks value } {
set nobreaks [llength $classbreaks]
set colour [lindex {darkblue blue green yellow orange red magenta} end ]
for { set i 0 } { $i < $nobreaks} { incr i } {
set break [lindex $classbreaks $i]
if { $value <= $break } {
set colour \
[lindex {darkblue blue green yellow orange red magenta} $i ]
break
}
}
return $colour
}
proc fgxyTOcname_bin2 {f1 f2 p} {
#########################################################################
## A combinator for two binary images that shows in different
## colors for which point both or either are "true" - nice but slow.
#########################################################################
set a [eval $f1 [list $p]]
set b [eval $f2 [list $p]]
expr {
$a == "#000" ?
$b == "#000" ? "green"
: "yellow"
: $b == "#000" ? "blue"
: "black"
}
}
proc grayTOchex_gPaint {color pixel} {
###################################################################
## This painter colors a grayscale image in hues of the given color.
## It normalizes the given color through dividing by the corresponding
## values for "white", but appears pretty slow too.
## This uses the 'rgb' proc right after this proc, below.
#####################################################################
set abspixel [lindex [rgb $pixel] 0]
set rgb [rgb $color]
set rgbw [rgb white]
foreach var {r g b} in $rgb ref $rgbw {
set $var [expr {round(double($abspixel)*$in/$ref/$ref*255.)}]
}
c255TOchex $r $g $b
}
proc rgb {color} {
#############################################################################
## This proc caches the results of [winfo rgb] calls, because these
## are quite expensive, especially on remote X displays. - rmax (Reinhard Max)
############################################################################
upvar "#0" rgb($color) rgb
if {![info exists rgb]} {set rgb [winfo rgb . $color]}
set rgb
}
##+#############################################################
## DKF (Donal Fellow) offers some fancier operators for working
## with gradients ... g2 , g+ , g- , invert
##+#############################################################
proc fgxyTOchex_g2 {f1 f2 p} {
foreach {r1 g1 b1} [rgb [eval $f1 [list $p]]] {break}
foreach {r2 g2 b2} [rgb [eval $f2 [list $p]]] {break}
set r3 [expr {($r1+$r2)/2/256}]
set g3 [expr {($g1+$g2)/2/256}]
set b3 [expr {($b1+$b2)/2/256}]
c255TOchex $r3 $g3 $b3
}
proc fgxyTOchex_g+ {f1 f2 p} {
foreach {r1 g1 b1} [rgb [eval $f1 [list $p]]] {break}
foreach {r2 g2 b2} [rgb [eval $f2 [list $p]]] {break}
set r3 [expr {($r1>$r2?$r1:$r2)/256}]
set g3 [expr {($g1>$g2?$g1:$g2)/256}]
set b3 [expr {($b1>$b2?$b1:$b2)/256}]
c255TOchex $r3 $g3 $b3
}
proc fgxyTOchex_g- {f1 f2 p} {
foreach {r1 g1 b1} [rgb [eval $f1 [list $p]]] {break}
foreach {r2 g2 b2} [rgb [eval $f2 [list $p]]] {break}
set r3 [expr {($r1<$r2?$r1:$r2)/256}]
set g3 [expr {($g1<$g2?$g1:$g2)/256}]
set b3 [expr {($b1<$b2?$b1:$b2)/256}]
c255TOchex $r3 $g3 $b3
}
proc chexTOchex_invert {c} {
foreach {r1 g1 b1} [rgb $c] {break}
set r3 [expr {0xff-$r1/256}]
set g3 [expr {0xff-$g1/256}]
set b3 [expr {0xff-$b1/256}]
c255TOchex $r3 $g3 $b3
}
proc raTOxy p {
## ra to xy conversion. Was called 'fromPolars'.
foreach {r a} $p break
list [expr {$r*cos($a)}] [expr {$r*sin($a)}]
}
proc xyTOra p {
## xy to ra conversion. Was called 'toPolars'.
foreach {x y} $p break
# for Sun, we have to make sure atan2 gets no two 0's
list [expr {hypot($x,$y)}] [expr {$x||$y? atan2($y,$x): 0}]
}
proc xyTOxy_radInvert p {
## Inverts the radius of xy points.
foreach {r a} [xyTOra $p] break
raTOxy [list [expr {$r? 1/$r: 9999999}] $a]
}
proc xyTOxy_rippleRad {n s p} {
## Ripples the radius (sinusoidally) of xy points.
foreach {r a} [xyTOra $p] break
raTOxy [list [expr {$r*(1.+$s*sin($n*$a))}] $a]
}
proc nraTOra_slice {n p} {
## desc?
foreach {r a} $p break
list $r [expr {$a*$n/3.14159265359}]
}
proc axyTOxy_rotate {angle p} {
## Rotates xy points thru a given angle.
foreach {x y} $p break
set x1 [expr {$x*cos(-$angle) - $y*sin(-$angle)}]
set y1 [expr {$y*cos(-$angle) + $x*sin(-$angle)}]
list $x1 $y1
}
proc rxyTOxy_swirl {radius p} {
## Moves xy points thru an angle determined by the radius
## of the circle on which the point xy lies. Thus 'swirl'.
foreach {x y} $p break
set angle [expr {hypot($x,$y)*6.283185306/$radius}]
axyTOxy_rotate $angle $p
}
##+#####################################################################
## PROCEDURE -- loadfuncs2listbox
##
## Purpose: Loads composite-functions to listbox.
## Done once, at GUI initialization.
##
## Called by: other-GUI-initialization section at bottom of this Tk script
##+#####################################################################
proc loadfuncs2listbox {} {
## Make sure the listbox is empty.
.fRleft.listbox delete 0 end
#############################################################
## Insert each composite-function into the listbox list.
#############################################################
## NOTE: We can change the order of funcs in the list by
## moving these 'insert' statements around.
#############################################################
.fRleft.listbox insert end {o {nxyTOchex_contractColorsAwayFromBlackAndWhite 80} }
.fRleft.listbox insert end {o {rgb255xyTOchex_colorize 120 120 255} }
.fRleft.listbox insert end {o {i127-rgb255-rgb255-xyTOchex_luminance_low-hi-to-2colors 150 0 0 0 255 255 255} }
################################################################
## Get the number of composite-functions loaded into the listbox.
##
## Then show the number of funcs, in a label in the GUI ---
## for users to know how many are in the listbox, out of sight.
## Also put some GUI usage help info in the label.
###############################################################
set numfuncs [.fRleft.listbox index end]
.fRright.fRinfo.labelFNUM configure -text "\
$numfuncs composite-functions. Pick one. Double-click the entry field, or click there
and press Enter, to (re)execute the composite-function. Processing takes about
5 to 120 seconds. To reload the img-file, click the file entry field. Note that
you may want to reload the img-file to try a parameter change."
}
## END of 'loadfuncs2listbox' proc
## Deactivate the following insert statements.
##
## These statements could be movied into the
## 'loadfuncs2listbox' proc above
## if they prove to be useful.
if { 1 == 0 } {
############################################################################
## Suchenwirth-contributed function combinations:
## NOTE:
## As we/I find which ones of these 'Functional imaging' procs are of use
## in this 'photo/image-file editing with functions' utility.
############################################################################
.fRleft.listbox insert end {o xyTOchex_colorGradient }
.fRleft.listbox insert end {o xyTOchex_bwCheckers }
.fRleft.listbox insert end {o xyTOchex_grayRings }
.fRleft.listbox insert end {o xyTOchex_bwVstrip }
.fRleft.listbox insert end {o xyTOchex_bwXpos-neg }
.fRleft.listbox insert end {o {0or1TOchex_binaryPaint brown beige} xyTOchex_bwCheckers }
.fRleft.listbox insert end {o xyTOchex_bwCheckers {nraTOra_slice 10} xyTOra }
.fRleft.listbox insert end {o xyTOchex_bwCheckers {axyTOxy_rotate 0.1} }
.fRleft.listbox insert end {o xyTOchex_bwVstrip {rxyTOxy_swirl 1.5} }
.fRleft.listbox insert end {o xyTOchex_bwCheckers {rxyTOxy_swirl 16} }
.fRleft.listbox insert end {o {expr-xyTOchex_bwPlot {$y + exp($x)}} }
.fRleft.listbox insert end {o xyTOchex_bwCheckers xyTOxy_radInvert }
.fRleft.listbox insert end {o xyTOchex_grayRings {xyTOxy_rippleRad 8 0.3} }
.fRleft.listbox insert end {o xyTOchex_bwXpos-neg {rxyTOxy_swirl .75} }
.fRleft.listbox insert end {o xyTOchex_grayCheckers }
.fRleft.listbox insert end {o {grayTOchex_gPaint red} xyTOchex_grayRings }
.fRleft.listbox insert end {o {fgxyTOcname_bin2 {nxyTOchex_bwWedges 7} xyTOchex_udisk} }
}
if { 2 == 0 } {
############################################################################
## DKF (Donal Fellow) pointed out some of his favourite function combinations:
############################################################################
.fRleft.listbox insert end {o xyTOchex_grayRings {xyTOxy_rippleRad 8 0.3} {rxyTOxy_swirl 16} }
.fRleft.listbox insert end {o xyTOchex_grayCheckers {xyTOxy_rippleRad 8 0.3} {rxyTOxy_swirl 16} }
.fRleft.listbox insert end {o xyTOchex_grayCheckers {xyTOxy_rippleRad 6 0.2} {rxyTOxy_swirl 26} }
## Yellow Rose: (ill formed?)
# .fRleft.listbox insert end {o {grayTOchex_gPaint yellow} xyTOchex_grayCheckers {xyTOxy_rippleRad 6 0.2} {rxyTOxy_swirl 26} xyTOra }
.fRleft.listbox insert end {o xyTOchex_colorGradient {rxyTOxy_swirl 8} {nraTOra_slice 110} xyTOxy_radInvert }
## Toothpaste:
.fRleft.listbox insert end {o xyTOchex_colorGradient {xyTOxy_rippleRad 8 0.3} {rxyTOxy_swirl 8} xyTOxy_radInvert {rxyTOxy_swirl 8} }
#############################################################################
## And DKF pointed out some stranger ones:
#############################################################################
.fRleft.listbox insert end {o {grayTOchex_gPaint yellow} xyTOchex_grayCheckers raTOxy {xyTOxy_rippleRad 6 0.2} {rxyTOxy_swirl 26} xyTOra }
.fRleft.listbox insert end {o {grayTOchex_gPaint yellow} xyTOchex_grayCheckers xyTOra {xyTOxy_rippleRad 6 0.2} {rxyTOxy_swirl 26} raTOxy }
}
if { 3 == 0 } {
##########################################################################
## A few more to try: (Suchenwirth?)
##########################################################################
.fRleft.listbox insert end {o {fgxyTOcname_bin2 xyTOchex_bwCheckers xyTOchex_bwRings} {rxyTOxy_swirl 5} xyTOxy_radInvert }
.fRleft.listbox insert end {o xyTOchex_colorGradient {xyTOxy_rippleRad 8 .3} {rxyTOxy_swirl 8} }
.fRleft.listbox insert end {o xyTOchex_bwVstrip {rxyTOxy_swirl 1.5} {xyTOxy_rippleRad 8 .3} }
.fRleft.listbox insert end {o {expr-xyTOchex_bwPlot {($x*$x-$y*$y)/10}} {rxyTOxy_swirl 15} {xyTOxy_rippleRad 8 .3} }
## Two kissing fish:
.fRleft.listbox insert end {o xyTOchex_grayCheckers {axyTOxy_rotate .1} {nraTOra_slice 10} xyTOxy_radInvert }
## Neon galaxy:
.fRleft.listbox insert end {o xyTOchex_colorGradient raTOxy {rxyTOxy_swirl 16} }
}
if { 4 == 0 } {
##############################################################################
## Arjen Markus provided a 'contour' proc and pointed out that an implementation
## that will show you the contour plot (isoline-like) of the map f(x,y) = xy.
##############################################################################
.fRleft.listbox insert end {o {fxyTOcname_contour {$x*$y}} }
##########################################################################
## RS (Suchenwirth) pointed out some 'cute variations' on using 'contour'
## --- and on using a 'colorGradient' proc:
##########################################################################
.fRleft.listbox insert end {o {fxyTOcname_contour {($x+$y)*$y}} }
.fRleft.listbox insert end {o {fxyTOcname_contour {sin($x)/cos($y)}} }
.fRleft.listbox insert end {o {fxyTOcname_contour {exp($y)-exp($x)}} }
.fRleft.listbox insert end {o {fxyTOcname_contour {exp($y)-cos($x)}} }
.fRleft.listbox insert end {o {fxyTOcname_contour {exp($x)*tan($x*$y)}} }
.fRleft.listbox insert end {o {fxyTOcname_contour {sin($y)-tan($x)}} }
.fRleft.listbox insert end {o {fxyTOcname_contour {exp($x)-tan($x*$y)}} xyTOra }
.fRleft.listbox insert end {o xyTOchex_colorGradient xyTOxy_radInvert }
.fRleft.listbox insert end {o xyTOchex_colorGradient {rxyTOxy_swirl 8} }
}
if { 5 == 0 } {
############################################################################
## DKF (Donal Fellow) pointed out the following function
## combinations that provide some pretty demos...
############################################################################
.fRleft.listbox insert end {o chexTOchex_invert {grayTOchex_gPaint red} xyTOchex_grayRings }
.fRleft.listbox insert end {o {fgxyTOchex_g2 {{o xyTOchex_grayRings}} {{o xyTOchex_grayRings {xyTOxy_rippleRad 8 0.3}}}} }
.fRleft.listbox insert end {o {fgxyTOchex_g+ {{o {grayTOchex_gPaint red} xyTOchex_grayRings}} {{o xyTOchex_grayRings {xyTOxy_rippleRad 8 0.3}}}} }
.fRleft.listbox insert end {o {fgxyTOchex_g+ {[o {grayTOchex_gPaint red} xyTOchex_grayCheckers {rxyTOxy_swirl 16}]} {{o xyTOchex_grayRings {xyTOxy_rippleRad 8 0.3}}}} }
.fRleft.listbox insert end {o {fgxyTOchex_g+ {[o {grayTOchex_gPaint red} xyTOchex_grayRings {xyTOxy_rippleRad 8 0.3} {rxyTOxy_swirl 19}]} {[o {grayTOchex_gPaint green} xyTOchex_grayRings {xyTOxy_rippleRad 8 0.3} {rxyTOxy_swirl 20}]}} }
.fRleft.listbox insert end {o {fgxyTOchex_g+ {[o {grayTOchex_gPaint yellow} xyTOchex_grayRings {xyTOxy_rippleRad 8 0.9} {rxyTOxy_swirl 28}]} {[o {grayTOchex_gPaint blue} xyTOchex_grayRings {xyTOxy_rippleRad 6 1.5} {rxyTOxy_swirl 14}]}} }
}
## END OF 'if { 1 == 0 }' section to deactivate insert statements.
##+#####################################################################
## PROC listboxSelectionTOentryString
##
## Purpose: Puts the selected listbox line into the ENTRYfunc var.
##
## Called by: binding on button1-release on the listbox
##+#####################################################################
proc listboxSelectionTOentryString {} {
global ENTRYfunc
set sel_index [ .fRleft.listbox curselection ]
if { $sel_index != "" } {
set ENTRYfunc [ .fRleft.listbox get $sel_index ]
}
}
## END of 'listboxSelectionTOentryString' proc
##+########################
## END of PROC definitions.
##+########################
##+######################################################
##+######################################################
## Additional GUI INITIALIZATION:
## - Put the composite-function strings in the listbox,
## by use of the 'loadfuncs2listbox' proc above.
##+###################################################################
## See the code for proc 'loadfuncs2listbox' above.
##
## Here is an important note that was put in the 'CANONICAL Structure
## of This Code' comments section at the top of this script. The
## note is important enough to repeat here, to make it likely that
## users will see this.
##
## ****
## NOTE: If a new (composite-)function is to be added to the listbox:
## ****
## 1) Any new procs needed should be added to the MAPPING PROCS section
## of this script.
## 2) The new (composite-)function, formed using the 'o'
## operator/proc, should be added in a 'listbox-insert' command,
## in the load-the-listbox proc.
##+###################################################################
loadfuncs2listbox
Here is an example of using the 3rd function in the listbox of the GUI. It is based on calculating the 'luminosity' of the color at a pixel --- which is simply a specific weighted average of the RGB colors of the pixel.
This function has 7 integer parameters: a liminosity 'cut-off' value, and 2 RGB values. Any pixel whose luminosity is BELOW the cut-off is given the first RGB value. Any pixel whose luminosity is ABOVE the cut-off is given the second RGB value. The default colors are black and white, and the result of applying this 'to-black-and-white' function to the colored image seen at the top of this page is the following black-white image.
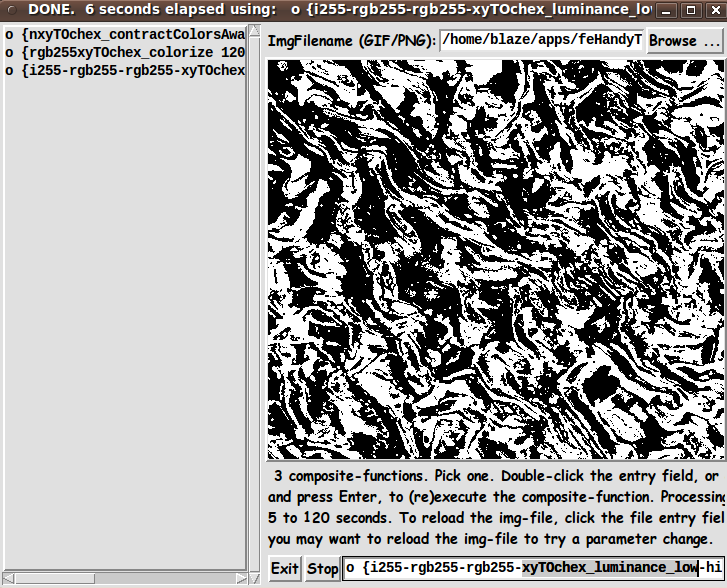
_____________________________________________________________________
I have left the Suchenwirth and DKF functions (procs) --- from Functional imaging, and renamed as in Functional Imaging with a High-Capacity GUI --- in this code. And I have commented out the 'Functional imaging' (composite-)functions in the load-the-listbox proc.
I just need to take time over the coming months to see which of those (composite-)functions might be useful to apply to EDITING 'photo' images --- as well as to CREATING images on a blank canvas.
For example, I could combine the 3 functions provided in the listbox of this code with one or more of the swirl-type procs of the Suchenwirth/DKF/etc procs, to add actual composite-functions to the listbox.
In any case, now I have ANOTHER tool with which to do some experimenting --- to see what kinds of functions (or function combinations) are useful to apply to GIF or PNG image files --- to make images for decorating Tk GUI's.
Thanks to 'ulis' (French) for his many contributions to this site. Unfortunately, a post on his page ulis indicates that he died around 2008. R.I.P., ulis. Many thanks.