Paste BASE64 or XBM image data - then SHOW IMAGE
uniquename - 2013aug16
I see 'BASE64 photo' and 'XBM bitmap' image data in various Tk scripts on this wiki.tcl.tk web site, and sometimes I would like to see what the images look like. But, often, I do not want to take the time to paste the entire script code into a text file and try to get the code running on my operating system (Liunx, Ubuntu 9.10) --- for which I have not installed Tcl-Tk extensions --- not 'Img', not 'http', nor any other extensions.
Because of all my experience over the past 15+ years with (scrollable) text widgets and (scrollable) canvas widgets, I realized that I could make a Tk GUI into which I could paste BASE64 or XBM code (into a text widget) and then cause the image to be displayed in a canvas widget of the GUI.
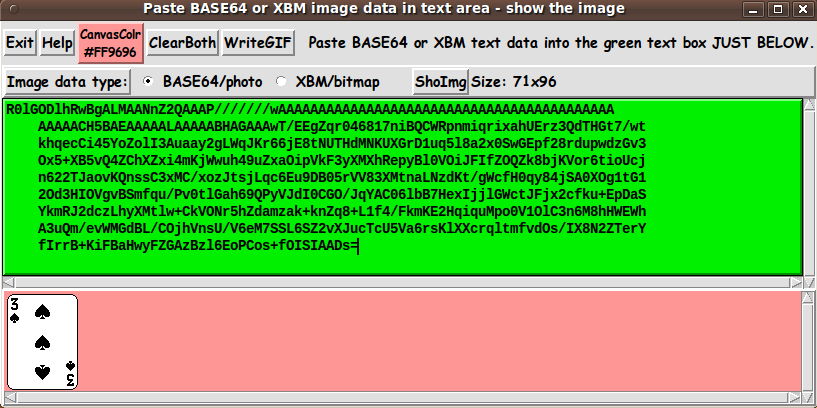
I set about making such a GUI, and after several iterations (at first I just handled BASE64 'photo' data --- then I realized I could use the same GUI for XBM 'bitmap' data), I ended up with the GUI seen in the following image.
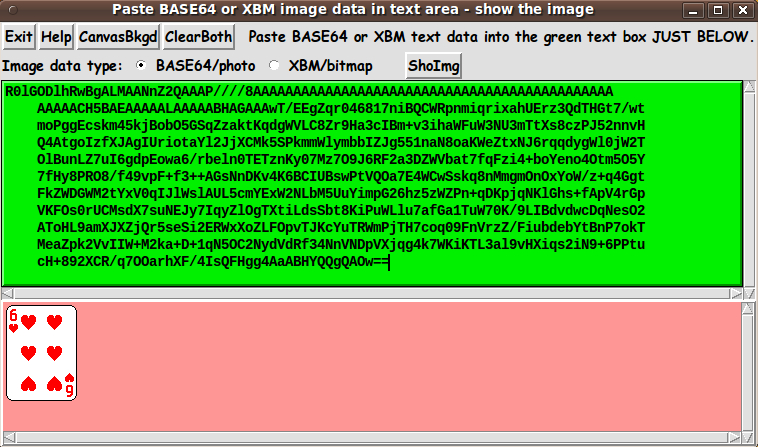
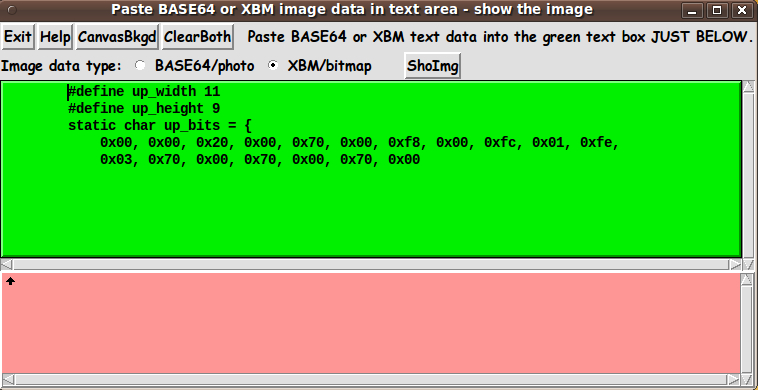
Above is an example with 'base64' data. Here is an example with XBM bitmap data:
When the GUI first pops up, the text (green) and canvas (pink) areas are empty.
For the first image, I navigated to the Crazy Eights page (using my Seamonkey web browser running on old 2009-October Ubuntu, 'Karmic Koala'), and then I pasted the base64 code labelled '6h' (for 6 of hearts) into the text area. A click on the 'ShoImg' button immediately showed the 6-of-hearts card image seen above.
For the second image, I navigated to the 3D Hilbert Curve page, and then I pasted the 'bitmap' code for an up-arrow into the text area. A click on the 'ShoImg' button immediately showed the tiny black up-arrow seen above.
Originally, I did not have a 'ClearBoth' button on the GUI. I would simply mouse-swipe all the text in the text widget and hit the Backspace or Delete key to remove the text. Later, I decided to add the 'ClearBoth' button to clear both the text and canvas widgets with a single click.
Speaking of swiping-and-deleting text: When you have base64 text in the text window, you can delete chunks of base64 code at the bottom of the code and, when you click on the 'ShoImg' button, you will get a partial image still shown in the text area. So, for example, for the 6-of-hearts above, you can remove a few lines of base64 code at a time, to slowly erase the 6-of-hearts card from the bottom to the top.
CHANGING CANVAS BACKGROUND COLOR:
Originally, I had the canvas background color set to black. When I first tested the XBM code (using the XBM code for a small black arrow), I could not see the arrow. I decided to make the background pink, because the black bitmaps, typical of a lot of Tk scripts on this site, would then show up quite well --- and it is unlikely that anyone will use pink for one of their base64 images.
Later, when I was adding the BASE64 and XBM radiobuttons and the 'ClearBoth' button, I decided I may as well make a 'CanvasBkgd' button, so that the user can choose any background color (from among 16-million-plus colors), to provide sufficient contrast to any image they might encounter.
Note that the Canvas-Color button calls on a color-selector-GUI script to set the canvas background color. You can make that color-selector script by selecting-and-pasting the code from the page A non-obfuscated color selector GUI on this site.
CAPTURING THE GENERATED IMAGE:
In most uses of this GUI, the user will probably just want to look at the image briefly. But in case the user might want to capture the image:
A screen/window capture utility (like 'gnome-screenshot' on Linux) can be used to capture the GUI image in a PNG or GIF file, say.
If necessary, an image editor (like 'mtpaint' on Linux) can be used to crop the window-capture image. The image could also be pixel-edited --- say, to slightly change the image captured in a GIF file. In 'mtpaint', one can go into an 800%-zoom mode to edit individual pixels easily.
I captured the images shown above using 'gnome-screenshot' and 'mtpaint'.
The 'Help' button on the GUI provides pretty complete and detailed help for using the GUI --- including some of the information in the paragraphs above.
The code
Below, I provide the Tk script code for this 'BASE64/XBM image-data viewer' utility.
I follow my usual 'canonical' structure for Tk code for this Tk script:
  0) Set general window & widget parms (win-name, win-position,
     win-color-scheme, fonts, widget-geometry-parms, win-size-control,
     text-array-for-labels-etc).

  1a) Define ALL frames (and sub-frames, if any).
  1b) Pack   ALL frames and sub-frames.

  2) Define & pack all widgets in the frames, frame by frame.
              Within each frame, define ALL the widgets.
              Then pack the widgets.

  3) Define keyboard and mouse/touchpad/touch-sensitive-screen action
     BINDINGS, if needed.

  4) Define PROCS, if needed.

  5) Additional GUI initialization (typically with one or more of
     the procs), if needed.
This Tk coding structure is discussed in more detail on the page A Canonical Structure for Tk Code --- and variations.
This structure makes it easy for me to find code sections --- while generating and testing a Tk script, and when looking for code snippets to include in other scripts (code re-use).
I call your attention to step-zero. One new thing that I have started doing recently is using a text-array for text in labels, buttons, and other widgets in the GUI. This can make it easier for people to internationalize my scripts. I will be using a text-array like this in most of my scripts in the future.
Experimenting with the GUI
As in all my scripts that use the 'pack' geometry manager (which is all of my 100-plus scripts, so far), I provide the four main pack parameters --- '-side', '-anchor', '-fill', '-expand' --- on all of the 'pack' commands for the frames and widgets.
That helps me when I am initially testing the behavior of a GUI (the various widgets within it) as I resize the main window.
I think that I have used a nice choice of the 'pack' parameters. The label and button and radiobutton widgets stay fixed in size and relative-location as the window is re-sized --- while the text and canvas areas expand/contract reasonably well whenever the window is re-sized.
You can experiment with the '-side', '-anchor', '-fill', and '-expand' parameters on the 'pack' commands for the various frames and widgets --- to get the widget behavior that you want.
___
Additional experimentation: You might want to change the fonts used for the various GUI widgets. For example, you could change '-weight' from 'bold' to 'normal' --- or '-slant' from 'roman' to 'italic'. Or change font families.
In fact, you may NEED to change the font families, because the families I used may not be available on your computer --- and the default font that the 'wish' interpreter chooses may not be very pleasing.
I use variables to set geometry parameters of widgets --- parameters such as border-widths and padding. And I have included the '-relief' parameter on the definitions of frames and widgets. Feel free to experiment with those 'appearance' parameters as well.
Some features in the code
That said, here's the code --- with plenty of comments to describe what most of the code-sections are doing.
You can look at the top of the PROCS section of the code to see a list of the procs used in this script, along with brief descriptions of how they are called and what they do.
The main proc is the 'sho_img' proc which is used to
- create a 'photo' structure from base64 text (or create a 'bitmap' structure from 'xbm' text) --- from the text currently in the text widget --- according to the current image-type radiobutton settings
- put the new, in-memory image-structure on the canvas.
The 'set_canvas_color' proc is used to
- set the canvas background color
- colorize the canvas-color button with that same color
- update the hex-RGB-color-code text string on the canvas-color button.
(The latter 2 features were implemented after the images on this page were captured.)
It is my hope that the copious comments in the code will help Tcl-Tk coding 'newbies' get started in making GUI's like this.
Without the comments, potential young Tcler's might be tempted to return to their iPhones and iPads and iPods --- to watch videos of people burning their eyebrows off (usually accidentally).
Code for Tk script 'pasteBASE64orXBMdata_showIMAGE.tk' :
#!/usr/bin/wish -f
##+###########################################################################
##
## SCRIPT: pasteBASE64orXBMdata_showIMAGE.tk
##
## PURPOSE: This Tk GUI script provides a Tk text widget in which the user
##          can paste BASE64 (or XBM) data --- such as 'image create photo'
##          data (or 'image create bitmap' data) seen in a Tk script.
##
##          Then the user can click on a 'ShowImg' button on the GUI
##          to create a 'photo' (or 'bitmap') image structure and then
##          show the image on a canvas widget of the GUI.
##
##          Thus this script allows a user to see what the BASE64 'photo' image
##          data (or XBM 'bitmap' data) is meant to show --- without having
##          to put an entire script/program, that uses the BASE64 or XBM data,
##          into runnable form and run the script/program.
##
##          For example, if the user finds a game program at a web site ---
##          like a Tk game script at wiki.tcl.tk --- the user can paste
##          BASE64 or XBM data from the Tk script code into this GUI and
##          see what the image looks like --- without putting the Tk
##          script into a runnable form for the user's operating system,
##          and then running the script.
##
## THE GUI:
##          This script provides a Tk GUI with the following widgets.
##
##         0) There are some BUTTONS such as 'Exit', 'Help', and 'ShoImg'.
##
##         2) There are a couple of RADIOBUTTONS, to specify 'photo' or
##            'bitmap'.
##
##         2) There is a (scrollable) TEXT widget, in which to paste
##            BASE64 data.
##
##         3) There is a (scrollable) CANVAS widget on which the image
##            may be shown.
##
##+#######################################################################
## 'CANONICAL' STRUCTURE OF THIS CODE:
##
##  0) Set general window and widget parms (win-name, win-position,
##     win-color-scheme, fonts, win-min-size, text-array-for-labels-etc).
##  1a) Define ALL frames (and sub-frames, if any).
##  1b) Pack   all the frames.
##  2) Define & pack all widgets in the frames, frame by frame.
##
##  3) Define BINDINGS for key and mouse/touchpad/touch-screen 'events',
##     if needed.
##  4) Define PROCS, if needed.
##  5) Additional GUI initialization (typically with one or more of
##     the procs), if needed.
##
##+#################################
## Some detail of the code structure of this particular script:
##
##  1a) Define ALL frames:
##
##      Top-level :
##       'fRbuttons'  - to contain several button widgets.
##       'fRoptions'  - to contain a couple of radiobutton widgets.
##       'fRtext'     - to contain a text widget, with scrollbars
##       'fRcanvas'   - to contain a canvas widget, with scrollbars
##
##      Sub-frames: none
##
##  1b) Pack ALL frames.
##
##  2) Define & pack all WIDGETS in the frames -- basically going through
##     frames & their interiors in left-to-right and/or top-to-bottom order.
##
##  3) Define BINDINGS:
##
##  4) Define PROCS:
##        - a proc to get the image data from the text widget and show
##          the image in the canvas widget
##        ....
##        .... a few more procs
##        ....
##        - a proc to present the help text
##
##  5) ADDITIONAL GUI INITIALIZATION: none (?)
##
##+#######################################################################
## DEVELOPED WITH: Tcl-Tk 8.5 on Ubuntu 9.10 (2009-october, 'Karmic Koala')
##
##   $ wish
##   % puts "$tcl_version $tk_version"
##
## showed
##     8.5 8.5
## but this script should work in most previous 8.x versions, and probably
## even in some 7.x versions (if font handling is made 'old-style').
##+#######################################################################
## MAINTENANCE HISTORY:
## Started by: Blaise Montandon 2013aug15 Started development, on Ubuntu 9.10.
## Changed by: Blaise Montandon 2013aug20 Added 'WriteGIF' button and
##                                        added 'labelIMGSIZE' label.
##+########################################################################

##+#######################################################################
## Set WINDOW TITLE and POSITION.
##+#######################################################################

wm title    . "Paste BASE64 or XBM image data in text area - show the image"
wm iconname . "shoBASE64orXBMimg"

wm geometry . +15+30


##+######################################################
## Set the COLOR SCHEME for the window and its widgets ---
## such as entry field background color.
##+######################################################

tk_setPalette "#e0e0e0"

# set entryBKGD   "#ffffff"
# set listboxBKGD "#ffffff"
  set radbuttBKGD "#ffffff"

## CYAN background for the text area.
# set textBKGD   "#00f0f0"
## GREEN background for the text area.
  set textBKGD   "#00f000"


## Initialize the background color for the canvas.

if {0} {
## Dark gray
set COLORBKGDr 60
set COLORBKGDg 60
set COLORBKGDb 60
}

if {0} {
## Light gray
set COLORBKGDr 190
set COLORBKGDg 190
set COLORBKGDb 190
}

if {1} {
## Pink
set COLORBKGDr 255
set COLORBKGDg 150
set COLORBKGDb 150
}

set COLORBKGDhex \
   [format "#%02X%02X%02X" $COLORBKGDr $COLORBKGDg $COLORBKGDb]


##+########################################################
## Set (temp) FONT NAMES.
##
## We use a VARIABLE-WIDTH font for text on LABEL and
## BUTTON widgets.
##
## We use a FIXED-WIDTH font for the text in ENTRY, LISTBOX,
## and TEXT (or MESSAGE) widgets.
##+########################################################

font create fontTEMP_varwidth \
   -family {comic sans ms} \
   -size -14 \
   -weight bold \
   -slant roman

font create fontTEMP_SMALL_varwidth \
   -family {comic sans ms} \
   -size -12 \
   -weight bold \
   -slant roman

## Some other possible (similar) variable width fonts:
##  Arial
##  Bitstream Vera Sans
##  DejaVu Sans
##  Droid Sans
##  FreeSans
##  Liberation Sans
##  Nimbus Sans L
##  Trebuchet MS
##  Verdana


font create fontTEMP_fixedwidth  \
   -family {liberation mono} \
   -size -14 \
   -weight bold \
   -slant roman

font create fontTEMP_SMALL_fixedwidth  \
   -family {liberation mono} \
   -size -12 \
   -weight bold \
   -slant roman

## Some other possible fixed width fonts (esp. on Linux):
##  Andale Mono
##  Bitstream Vera Sans Mono
##  Courier 10 Pitch
##  DejaVu Sans Mono
##  Droid Sans Mono
##  FreeMono
##  Nimbus Mono L
##  TlwgMono


##+###########################################################
## Set variables for GEOMETRIC attributes of various widgets.
## (e.g. width and height of canvas, and padding for Buttons)
##+###########################################################

set initCanWidthPx  100
set initCanHeightPx 100

set minCanWidthPx  24
set minCanHeightPx 24

# set BDwidthPx_canvas 2
  set BDwidthPx_canvas 0


## BUTTON widget geom settings:

set PADXpx_button 0
set PADYpx_button 0
set BDwidthPx_button 2


## LABEL widget geom settings:

set PADXpx_label 0
set PADYpx_label 0
set BDwidthPx_label 2


## ENTRY widget geom settings:

# set BDwidthPx_entry 2
# set initEntryWidthChars 20


## LISTBOX geom settings:

# set BDwidthPx_listbox 2
# set initListboxWidthChars 30
# set initListboxHeightChars 8


## TEXT geom settings:

set initTextWidthChars  80
set initTextHeightChars 10

# set BDwidthPx_text 2
  set BDwidthPx_text 0


##+######################################################
## Set a MIN-SIZE of the window (roughly).
##
## We set approx MIN WIDTH of the window based on a width
## allowance for, at least, several buttons in the
## 'fRbuttons' frame.
##
## We set the approx MIN HEIGHT of the window based on
## allowance for
##     1 char   high for the 'fRbuttons' frame
##     1 char   high for the 'fRoptions' frame
##    24 chars  high for the 'fRtext'    frame
##    24 pixels high for the 'fRcanvas'  frame.
##+######################################################

set minWinWidthPx [font measure fontTEMP_fixedwidth \
   " Exit  Help  ShoImg "]

## Add some pixels to account for right-left-size of window-manager
## decoration (about 8 pixels) --- and add some pixels for
## frame/widget borders (about 3 widgets x 4 pixels/widget):

set minWinWidthPx [expr {20 + $minWinWidthPx}]

## Get approx min-HEIGHT for the window allowing
##     1 char   high for the 'fRbuttons' frame
##     1 char   high for the 'fRoptions' frame
##    14 chars  high for the 'fRtext'    frame
##    24 pixels high for the 'fRcanvas'  frame.
##
## Add about 20 pixels for top-bottom window decoration --
## and about 4 frames x 4 pixels/frame for frame/widget borders.

set charHeightPx [font metrics fontTEMP_fixedwidth -linespace]

set minWinHeightPx [expr {( 16 * $charHeightPx ) + 24 + 36 }]

## FOR TESTING:
#   puts "minWinWidthPx = $minWinWidthPx"
#   puts "minWinHeightPx = $minWinHeightPx"

wm minsize . $minWinWidthPx $minWinHeightPx

## We allow the window to be resizable and we pack the canvas with
## '-fill both' so that the canvas can be enlarged by enlarging the
## window.

## If you want to make the window un-resizable,
## you can use the following statement.
#  wm resizable . 0 0


##+####################################################################
## Set a TEXT-ARRAY to hold text for buttons & labels on the GUI.
##     NOTE: This can aid INTERNATIONALIZATION. This array can
##           be set according to a nation/region parameter.
##+####################################################################

## if { "$VARlocale" == "en"}

set aRtext(buttonEXIT)     "Exit"
set aRtext(buttonHELP)     "Help"
set aRtext(buttonCOLORCAN) "CanvasColr"
set aRtext(buttonCLEAR)    "ClearBoth"
set aRtext(buttonWRITE)    "WriteGIF"

set aRtext(labelINFO)  "  Paste BASE64 or XBM text data into the green text box JUST BELOW."

set aRtext(labelIMGTYPE)  "Image data type:"
set aRtext(radbuttPHOTO)  "BASE64/photo"
set aRtext(radbuttBITMAP) "XBM/bitmap     "
set aRtext(buttonSHOIMG)  "ShoImg"

## END OF  if { "$VARlocale" == "en"}


##+################################################################
## DEFINE *ALL* THE FRAMES:
##
##   Top-level : '.fRbuttons'  '.fRtext'  'fRcanvas'
##
##   Sub-frames: none
##+################################################################

## FOR TESTING: (of resizing of frames during window resizing):
# set feRELIEF_frame raised
# set feBDwidth_frame 2

set RELIEF_frame flat
set BDwidth_frame 0

frame .fRbuttons   -relief $RELIEF_frame  -bd $BDwidth_frame
frame .fRoptions   -relief raised         -bd 2
frame .fRtext      -relief $RELIEF_frame  -bd $BDwidth_frame
frame .fRcanvas    -relief raised         -bd 2


##+##############################
## PACK ALL the FRAMES.
##+##############################

pack .fRbuttons \
   -side top \
   -anchor nw \
   -fill x \
   -expand 0

pack .fRoptions \
   -side top \
   -anchor nw \
   -fill x \
   -expand 0

pack .fRtext \
   -side top \
   -anchor nw \
   -fill both \
   -expand 1

pack .fRcanvas \
   -side top \
   -anchor nw \
   -fill both \
   -expand 1


##+#################################
## In FRAME '.fRbuttons' -
## DEFINE-and-PACK BUTTON widgets
## --- 'Exit','Help','ShoImg'.
##+#################################

button .fRbuttons.buttEXIT \
   -text "$aRtext(buttonEXIT)" \
   -font fontTEMP_varwidth \
   -padx $PADXpx_button \
   -pady $PADYpx_button \
   -relief raised \
   -bd $BDwidthPx_button \
   -command {exit}

button .fRbuttons.buttHELP \
   -text "$aRtext(buttonHELP)" \
   -font fontTEMP_varwidth \
   -padx $PADXpx_button \
   -pady $PADYpx_button \
   -relief raised \
   -bd $BDwidthPx_button \
   -command {popup_msgVarWithScroll .topHelp $HELPtext}

button .fRbuttons.buttCOLORCAN \
   -text "$aRtext(buttonCOLORCAN)" \
   -font fontTEMP_SMALL_varwidth \
   -padx $PADXpx_button \
   -pady $PADYpx_button \
   -relief raised \
   -bd $BDwidthPx_button \
   -command {set_canvas_color}

button .fRbuttons.buttCLEAR \
   -text "$aRtext(buttonCLEAR)" \
   -font fontTEMP_varwidth \
   -padx $PADXpx_button \
   -pady $PADYpx_button \
   -relief raised \
   -bd $BDwidthPx_button \
   -command {clear_textANDcanvas}

button .fRbuttons.buttWRITE \
   -text "$aRtext(buttonWRITE)" \
   -font fontTEMP_varwidth \
   -padx $PADXpx_button \
   -pady $PADYpx_button \
   -relief raised \
   -bd $BDwidthPx_button \
   -command {write_gif}

label .fRbuttons.labelINFO \
   -text "$aRtext(labelINFO)" \
   -font fontTEMP_varwidth \
   -justify left \
   -anchor w \
   -relief flat \
   -bd 0


## Pack the widgets of frame 'fRbuttons'.

pack .fRbuttons.buttEXIT \
     .fRbuttons.buttHELP \
     .fRbuttons.buttCOLORCAN \
     .fRbuttons.buttCLEAR \
     .fRbuttons.buttWRITE \
     .fRbuttons.labelINFO \
   -side left \
   -anchor w \
   -fill none \
   -expand 0


##+########################################################
## IN THE '.fRoptions' frame --
## and 2 RADIOBUTTONS (for 'photo' or 'bitmap'),
## with a LABEL widget.
##+########################################################

label .fRoptions.labelIMGTYPE \
   -text "$aRtext(labelIMGTYPE)" \
   -font fontTEMP_varwidth \
   -justify left \
   -anchor w \
   -relief raised \
   -bd 2

## 'VARimgtype' is the var for these 2 radiobuttons.

set VARimgtype "photo"

radiobutton .fRoptions.radbuttPHOTO \
   -text "$aRtext(radbuttPHOTO)" \
   -font fontTEMP_varwidth \
   -anchor w \
   -variable VARimgtype \
   -value "photo" \
   -selectcolor "$radbuttBKGD" \
   -relief flat \
   -bd 0

radiobutton .fRoptions.radbuttBITMAP \
   -text "$aRtext(radbuttBITMAP)" \
   -font fontTEMP_varwidth \
   -anchor w \
   -variable VARimgtype \
   -value "bitmap" \
   -selectcolor "$radbuttBKGD" \
   -relief flat \
   -bd 0

button .fRoptions.buttSHOIMG \
   -text "$aRtext(buttonSHOIMG)" \
   -font fontTEMP_varwidth \
   -padx $PADXpx_button \
   -pady $PADYpx_button \
   -relief raised \
   -bd $BDwidthPx_button \
   -command {sho_img}

## The text for this label will be provided
## by the 'sho_img' proc.

label .fRoptions.labelIMGSIZE \
   -text "" \
   -font fontTEMP_varwidth \
   -justify left \
   -anchor w \
   -relief  flat \
   -bd 0


## PACK the widgets in frame 'fRoptions'.

pack .fRoptions.labelIMGTYPE \
     .fRoptions.radbuttPHOTO \
     .fRoptions.radbuttBITMAP \
     .fRoptions.buttSHOIMG \
     .fRoptions.labelIMGSIZE \
   -side left \
   -anchor w \
   -fill none \
   -expand 0

#   .fRooptions.labelINFO2 \


##+###############################
## In FRAME '.fRtext' -
## DEFINE-and-PACK a TEXT widget,
## with SCROLLBARS.
##+###############################

text .fRtext.text \
   -relief raised \
   -borderwidth 2 \
   -height $initTextHeightChars \
   -width  $initTextWidthChars \
   -wrap none \
   -font fontTEMP_fixedwidth \
   -bg $textBKGD \
   -state normal \
   -yscrollcommand ".fRtext.scrbary set" \
   -xscrollcommand ".fRtext.scrbarx set"

scrollbar .fRtext.scrbary \
   -command ".fRtext.text yview"

scrollbar .fRtext.scrbarx \
   -orient horizontal \
   -command ".fRtext.text xview"


## Pack the widgets in frame 'fRtext'.
## (Pack the scrollbars first, so that
##  the text widget does not expand into
##  the entire space.)

pack .fRtext.scrbary \
   -side right \
   -anchor center \
   -fill y \
   -expand 0

pack .fRtext.scrbarx \
   -side bottom \
   -anchor center \
   -fill x \
   -expand 0

pack .fRtext.text \
   -side top \
   -anchor n \
   -fill both \
   -expand 1

## Make sure the text widget is empty.

.fRtext.text insert 1.0 ""


##+###############################
## In FRAME '.fRcanvas' -
## DEFINE-and-PACK a CANVAS widget,
## with SCROLLBARS.
##+###############################
## We set highlightthickness & borderwidth of the canvas to
## zero, as suggested on page 558, Chapter 37, 'The Canvas
## Widget', in the 4th edition of the book 'Practical
## Programming in Tcl and Tk'.
##+######################################################

canvas .fRcanvas.can \
   -width $initCanWidthPx \
   -height $initCanHeightPx \
   -relief flat \
   -highlightthickness 0 \
   -borderwidth 0 \
   -bg $COLORBKGDhex \
   -yscrollcommand ".fRcanvas.scrbary set" \
   -xscrollcommand ".fRcanvas.scrbarx set"

scrollbar .fRcanvas.scrbary \
   -orient vertical -command ".fRcanvas.can yview"

scrollbar .fRcanvas.scrbarx \
   -orient horizontal -command ".fRcanvas.can xview"


## Pack the widgets in frame 'fRcanvas'.
## (Pack the scrollbars before the canvas so that
##  the canvas does not fill the available area first.)

pack .fRcanvas.scrbary \
   -side right \
   -anchor e \
   -fill y \
   -expand 0

pack .fRcanvas.scrbarx \
   -side bottom \
   -anchor sw \
   -fill x \
   -expand 0

pack .fRcanvas.can \
   -side top \
   -anchor nw \
   -fill both \
   -expand 1


##+##################################################
## END OF DEFINITION of the GUI widgets.
##+##################################################
## Start of BINDINGS, PROCS, Added-GUI-INIT sections.
##+##################################################

##+#######################################################################
##+#######################################################################
##  BINDINGS SECTION: none
##+#######################################################################


##+#####################################################################
##+#####################################################################
## DEFINE PROCS SECTION:
##
##  'sho_img'    - to create a 'photo' structure from base64 text (or
##                 create a 'bitmap' structure from 'xbm' text) in the
##                 text widget and put the new image on the canvas.
##
##  'set_canvas_color'    - set the canvas background color and put
##                          the same color on the button, along with
##                          the hex code of the color
##
##  'clear_textANDcanvas' - clear both the text and canvas widgets
##
##  'write_gif'           - to write a GIF file from the 'photo' structure.
##
## 'get_chars_before_last' - to get the string before the last
##                           occurrence of a specified char in a filename
##
##  'popup_msgWithScroll' - to show text in var $HELPtext
##
##+#####################################################################

## Initialize photo and bitmap images, to avoid error from delete below.
image create photo  img1
image create bitmap img2

##+#####################################################################
## proc 'sho_img'
##
## PURPOSE: Create a 'photo' structure from base64 text (or
##          create a 'bitmap' structure from 'xbm' text) in the
##          text widget, and put the new image on the canvas.
##
## CALLED BY: the '-command' option of the 'ShoImg' button.
##+#####################################################################

proc sho_img {} {

   global VARimgtype

   ## Get text data from the text widget, into a temp variable.

   set HOLDtext [.fRtext.text get 1.0 end]

   set HOLDtext [string trim "$HOLDtext"]

   ## FOR TESTING:
   #   puts "HOLDtext: **->$HOLDtext<-**"
   #   puts "length: [string length "$HOLDtext"]"

   ## If the text widget is empty or contains only a line feed, bail out.

   if {"$HOLDtext" == "" || "$HOLDtext" == "
"} {.fRcanvas.can delete all ; return}

   ## Create the 'photo' or 'bitmap' structure from the text,
   ## and put the image on the canvas.

   if {"$VARimgtype" == "photo"} {
      if {[info exists img1]} {image delete img1}
      .fRcanvas.can delete all
      # set img1 [image create photo -data "$HOLDtext"]
      ## FOR TESTING:
      #   puts "img1 : $img1"
      image create photo img1 -data "$HOLDtext"
      .fRcanvas.can create image 3 3 -anchor nw -image img1
      set imgWIDTHpx  [image width img1]
      set imgHEIGHTpx [image height img1]
      .fRoptions.labelIMGSIZE configure -text "Size: ${imgWIDTHpx}x$imgHEIGHTpx"
   } else {
      if {[info exists img2]} {image delete img2}
      .fRcanvas.can delete all
      image create bitmap img2 -data "$HOLDtext"
      .fRcanvas.can create image 3 3 -anchor nw -image img2
      set imgWIDTHpx  [image width img2]
      set imgHEIGHTpx [image height img2]
      .fRoptions.labelIMGSIZE configure -text "Size: ${imgWIDTHpx}x$imgHEIGHTpx"
   }

}
## END OF proc 'sho_img'


##+########################################################################
##  proc 'set_canvas_color'
##
## PURPOSE: Sets the canvas background color and puts
##          the same color on the Color button, along with
##          the hex code of the color.
##
## CALLED BY: 'CanvasBkgd' button
##+########################################################################

proc set_canvas_color {} {

   global COLORBKGDr COLORBKGDg COLORBKGDb aRtext
   # global feDIR_tkguis

   ## FOR TESTING:
   #    puts "COLORBKGDr: $COLORBKGDr"
   #    puts "COLORBKGDg: $COLORBKGDb"
   #    puts "COLORBKGDb: $COLORBKGDb"

   set TEMPrgb [ exec \
       ./sho_colorvals_via_sliders3rgb.tk \
       $COLORBKGDr $COLORBKGDg $COLORBKGDb]

   #   $feDIR_tkguis/sho_colorvals_via_sliders3rgb.tk \

   ## FOR TESTING:
   #    puts "TEMPrgb: $TEMPrgb"

   if { "$TEMPrgb" == "" } { return }

   scan $TEMPrgb "%s %s %s %s" r255 g255 b255 hexRGB

   set COLORBKGDhex "#$hexRGB"
   set COLORBKGDr $r255
   set COLORBKGDg $g255
   set COLORBKGDb $b255

   ## Set the color of the canvas.

   .fRcanvas.can config -bg $COLORBKGDhex

   ## Update the text and color of the button.

   update_color_label

}
## END OF proc 'set_canvas_color'


##+########################################################################
##  proc 'update_color_label'
##
## PURPOSE: Puts the current canvas color on the Color button, along with
##          updating the text on the button with the hex-RGB-code of the color.
##
## CALLED BY: the 'Additional GUI Initialization' section at the bottom
##            of this script, and by the 'set_canvas_color' proc
##+########################################################################

proc update_color_label {} {

   global COLORBKGDr COLORBKGDg COLORBKGDb COLORBKGDhex aRtext

   ## Set background color on the COLORCAN button, and
   ## put the background color in the text on the button, and
   ## set the foreground color of the button.

   .fRbuttons.buttCOLORCAN configure -bg $COLORBKGDhex

   .fRbuttons.buttCOLORCAN configure -text "$aRtext(buttonCOLORCAN)
$COLORBKGDhex"

   set sumCOLORBKGD [expr {$COLORBKGDr + $COLORBKGDg + $COLORBKGDb}]
   if {$sumCOLORBKGD > 300} {
      .fRbuttons.buttCOLORCAN configure -fg "#000000"
   } else {
      .fRbuttons.buttCOLORCAN configure -fg "#f0f0f0"
   }

}
## END OF proc 'update_color_label'


##+########################################################################
##  proc 'clear_textANDcanvas'
##
## PURPOSE: Clears both the text and canvas widgets.
##
## CALLED BY: 'ClearBoth' button
##+########################################################################

proc clear_textANDcanvas {} {

   .fRtext.text delete 1.0 end
   .fRcanvas.can delete all

}
## END OF proc 'clear_textANDcanvas'


##+#########################################################################
## proc 'write_gif'
##
## PURPOSE: To write a GIF file from the 'img1' 'photo' structure.
##
## CALLED BY: the 'WriteGIF' button.
##+#########################################################################

# set curDIR "$env(HOME)"
  set curDIR [pwd]

proc write_gif {} {

   global env curDIR VARimgtype

   if {"$VARimgtype" != "photo"} {
      set MSGtext "Need BASE64/photo data to write a GIF file."
      popup_msgVarWithScroll .topMsg $MSGtext
      return
   }

   set imgWIDTHpx [image width img1]
   if {"$imgWIDTHpx" == 0} {
      set MSGtext "It appears that there is no data to write."
      popup_msgVarWithScroll .topMsg $MSGtext
      return
   }

   ## Call on file selector to get the name of an output image file.
   ## (We build a 'suggested' filename.)

   set suggestname "temp.gif"

   set outname [tk_getSaveFile -parent . -title "Save '.gif' file" \
      -initialdir "$curDIR" -initialfile "$suggestname"]

   if {"$outname" == ""} {return}

   img1 write "$outname" -format GIF

}
## END OF proc 'write_gif'


#########################################################################
## Proc 'get_chars_before_last' -
#########################################################################
## INPUT:  A character and a string.
##         Note: The "in" parameter is there only for clarity.
##
## OUTPUT: Returns all of the characters in the string "strng" that
##         are BEFORE the last occurence of the characater "char".
##
## EXAMPLE CALL: To extract the directory from a fully qualified file name:
##
## set directory [ get_chars_before_last "/" in "/home/abc01/junkfile" ]
##
##      $directory will now be the string "/home/abc01"
##
#########################################################################

proc get_chars_before_last { char in strng } {

   set endIDX [ expr [string last $char $strng ] - 1 ]
   set output [ string range $strng 0 $endIDX ]

   ## FOR TESTING:
   # puts "From 'get_chars_before_last' proc:"
   # puts "STRING: $strng"
   # puts "CHAR: $char"
   # puts "RANGE up to LAST CHAR - start: 0   endIDX: $endIDX"

   return $output

}
## END OF 'get_chars_before_last' PROCEDURE


##+########################################################################
## PROC 'popup_msgVarWithScroll'
##+########################################################################
## PURPOSE: Report help or error conditions to the user.
##
##       We do not use focus,grab,tkwait in this proc,
##       because we use it to show help when the GUI is idle,
##       and we may want the user to be able to keep the Help
##       window open while doing some other things with the GUI
##       such as putting a filename in the filename entry field
##       or clicking on a radiobutton.
##
##       For a similar proc with focus-grab-tkwait added,
##       see the proc 'popup_msgVarWithScroll_wait' in a
##       3DterrainGeneratorExaminer Tk script.
##
## REFERENCE: page 602 of 'Practical Programming in Tcl and Tk',
##            4th edition, by Welch, Jones, Hobbs.
##
## ARGUMENTS: A toplevel frame name (such as .fRhelp or .fRerrmsg)
##            and a variable holding text (many lines, if needed).
##
## CALLED BY: 'help' button
##+########################################################################
## To have more control over the formatting of the message (esp.
## words per line), we use this 'toplevel-text' method,
## rather than the 'tk_dialog' method -- like on page 574 of the book
## by Hattie Schroeder & Mike Doyel,'Interactive Web Applications
## with Tcl/Tk', Appendix A "ED, the Tcl Code Editor".
##+########################################################################

proc popup_msgVarWithScroll { toplevName VARtext } {

   ## global fontTEMP_varwidth #; Not needed. 'wish' makes this global.
   ## global env

   # bell
   # bell

   #################################################
   ## Set VARwidth & VARheight from $VARtext.
   #################################################
   ## To get VARheight,
   ##    split at '\n' (newlines) and count 'lines'.
   #################################################

   set VARlist [ split $VARtext "\n" ]

   ## For testing:
   #  puts "VARlist: $VARlist"

   set VARheight [ llength $VARlist ]

   ## For testing:
   #  puts "VARheight: $VARheight"


   #################################################
   ## To get VARwidth,
   ##    loop through the 'lines' getting length
   ##     of each; save max.
   #################################################

   set VARwidth 0

   #############################################
   ## LOOK AT EACH LINE IN THE LIST.
   #############################################
   foreach line $VARlist {

      #############################################
      ## Get the length of the line.
      #############################################
      set LINEwidth [ string length $line ]

      if { $LINEwidth > $VARwidth } {
         set VARwidth $LINEwidth
      }

   }
   ## END OF foreach line $VARlist

   ## For testing:
   #   puts "VARwidth: $VARwidth"


   ###############################################################
   ## NOTE: VARwidth works for a fixed-width font used for the
   ##       text widget ... BUT the programmer may need to be
   ##       careful that the contents of VARtext are all
   ##       countable characters by the 'string length' command.
   ###############################################################


   #####################################
   ## SETUP 'TOP LEVEL' HELP WINDOW.
   #####################################

   catch {destroy $toplevName}
   toplevel  $toplevName

   # wm geometry $toplevName 600x400+100+50

   wm geometry $toplevName +100+50

   wm title     $toplevName "Note"
   # wm title   $toplevName "Note to $env(USER)"

   wm iconname  $toplevName "Note"


   #####################################
   ## In the frame '$toplevName' -
   ## DEFINE THE TEXT WIDGET and
   ## its two scrollbars --- and
   ## DEFINE an OK BUTTON widget.
   #####################################

   if {$VARheight > 10} {
      text $toplevName.text \
         -wrap none \
         -font fontTEMP_varwidth \
         -width  $VARwidth \
         -height $VARheight \
         -bg "#f0f0f0" \
         -relief raised \
         -bd 2 \
         -yscrollcommand "$toplevName.scrolly set" \
         -xscrollcommand "$toplevName.scrollx set"

      scrollbar $toplevName.scrolly \
         -orient vertical \
         -command "$toplevName.text yview"

      scrollbar $toplevName.scrollx \
         -orient horizontal \
         -command "$toplevName.text xview"
   } else {
      text $toplevName.text \
         -wrap none \
         -font fontTEMP_varwidth \
         -width  $VARwidth \
         -height $VARheight \
         -bg "#f0f0f0" \
         -relief raised \
         -bd 2
   }

   button $toplevName.butt \
      -text "OK" \
      -font fontTEMP_varwidth \
      -command  "destroy $toplevName"

   ###############################################
   ## PACK *ALL* the widgets in frame '$toplevName'.
   ###############################################

   ## Pack the bottom button BEFORE the
   ## bottom x-scrollbar widget,

   pack  $toplevName.butt \
      -side bottom \
      -anchor center \
      -fill none \
      -expand 0


   if {$VARheight > 10} {
      ## Pack the scrollbars BEFORE the text widget,
      ## so that the text does not monopolize the space.

      pack $toplevName.scrolly \
         -side right \
         -anchor center \
         -fill y \
         -expand 0

      ## DO NOT USE '-expand 1' HERE on the Y-scrollbar.
      ## THAT ALLOWS Y-SCROLLBAR TO EXPAND AND PUTS
      ## BLANK SPACE BETWEEN Y-SCROLLBAR & THE TEXT AREA.

      pack $toplevName.scrollx \
         -side bottom \
         -anchor center \
         -fill x  \
         -expand 0

      ## DO NOT USE '-expand 1' HERE on the X-scrollbar.
      ## THAT KEEPS THE TEXT AREA FROM EXPANDING.

      pack $toplevName.text \
         -side top \
         -anchor center \
         -fill both \
         -expand 1
   } else {
      pack $toplevName.text \
         -side top \
         -anchor center \
         -fill both \
         -expand 1
   }


   #####################################
   ## LOAD MSG INTO TEXT WIDGET.
   #####################################

   ##  $toplevName.text delete 1.0 end

   $toplevName.text insert end $VARtext

   $toplevName.text configure -state disabled

}
## END OF PROC 'popup_msgVarWithScroll'


##+########################
## END of PROC definitions.
##+########################
## Set HELPtext variable.
##+########################

set HELPtext "\
*** HELP for this PASTE-BASE64-or-XBM-data and SHOW-IMAGE utility ***

This Tk GUI script provides a Tk text widget in which the user
can paste BASE64 (or XBM) data --- such as 'image create photo' data
(or 'image create bitmap' data) seen in a Tk script.

After pasting the BASE64 (or XBM) data into the (scrollable) text widget,
the user can click on a 'ShoImg' button on the GUI to create
a 'photo' (or 'bitmap') image structure in computer memory. The image,
from the 'photo' (or 'bitmap') structure, is immediately displayed on a
(scrollable) canvas widget of the GUI.

Thus this script allows a user to see what the BASE64 'photo' image
data (or XBM 'bitmap' data) is meant to show --- without having
to put an entire script/program, that uses the BASE64 or XBM data,
into runnable form --- and running the script/program.

For example, if the user finds a game program at a web site ---
like a Tk game script at wiki.tcl.tk --- the user can paste
BASE64 or XBM data from the Tk script code into this GUI and
see what the image looks like --- without putting the Tk
script into a runnable form for the user's operating system,
and then running the script.

EXAMPLE BASE64 DATA:

You can find BASE64 data for 52 playing cards in more than 5 different
card game pages at wiki.tcl.tk, such as

https://wiki.tcl-lang.org/8810  - scat
https://wiki.tcl-lang.org/14895 - Hold'Em Solitaire
https://wiki.tcl-lang.org/17461 - Crazy Eights


EXAMPLE XBM DATA :

At the web page https://wiki.tcl-lang.org/8723, titled '3D Hilbert Curve', the
Tk script code includes an  'image create bitmap ... -data' statement,
for a downward-pointing black arrow, followed by this data ---
typical of a '.xbm' file:

   #define down_width 11
   #define down_height 9
   static char down_bits = {
      0x70, 0x00, 0x70, 0x00, 0x70, 0x00, 0xfe, 0x03, 0xfc, 0x01, 0xf8,
      0x00,0x70, 0x00, 0x20, 0x00, 0x00, 0x00

This is the look of XBM data. (The ending right-brace is not necessary.)

The leading spaces in XBM (or BASE64) data are OK.
They will be ignored by the 'image create' processing.

CAPTURING THE IMAGE:

The user of this utility may be satisfied with just seeing
the image. But, if the user wants to capture the image
into an image file (such as PNG or GIF), the user can use
a screen/window capture utility (like 'gnome-screenshot'
on Linux) to capture the GUI image in a PNG or GIF file, say.

If necessary, an image editor (like 'mtpaint' on Linux)
can be used to crop the window capture image.

For BASE64/photo data, the user also has the option of
using the 'WriteGIF' button on the GUI to write out
a GIF file from the image that is currently showing
on the canvas.
"

##+######################################################
##+######################################################
## Additional GUI INITIALIZATION:
##+######################################################

## Apply current canvas color to the color button, and put
## the hex-RGB-code of the color in the text of the button.

update_color_label
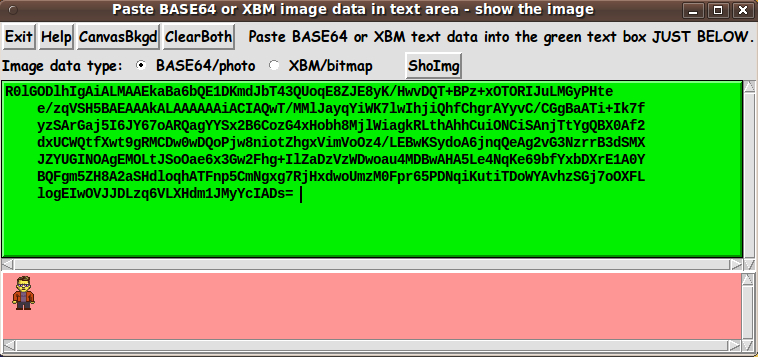
ONE MORE EXAMPLE:
I navigated to the Tk Robots2 page of Keith Vetter, and pasted in the base64 data for 'M4' --- a little man (avatar). Here he is.
Although I do not plan to do much Tcl-Tk programming for games --- because I have too many 'user-friendly useful utilities' (UUU's) that are on my 'to-do' list --- I plan to make a few more utilities related to BASE64 and XBM (and PGM and PPM and GIF and PNG) data that might be useful to those Tcler's who ARE interested in making games.
A list of those utilities will be accumulating in a 'CGA' (Code for GAming) section near the bottom of my 'bio' page at uniquename --- or in the 'CIP' (Code for Interactive image Processing) group.
IN CONCLUSION
This utility was fun to write --- and I think I will find it useful in the future.
I will probably set up this script as an icon on my desktop, so that I can bring it up quickly when I see code (Tcl-Tk, C, C++, whatever) that contains base64 or xbm data.
As I have said on several other code-donation pages on this wiki ...
There's a lot to like about a utility that is 'free freedom' --- that is, no-cost and open-source so that you can modify/enhance/fix it without having to wait for someone else to do it for you (which may be never).
Furthermore, it is great that Tcl-Tk is a powerful scripting language --- no compile step to go through before calling on the executable --- AND most of the libraries that you need are built into the interpreter. And the interpreter is quite efficient: Even the most complex GUI's pop up in a fraction of a second.
A BIG THANK YOU to Ousterhout for starting Tcl-Tk, and a BIG THANK YOU to the Tcl-Tk developers and maintainers who have kept the simply MAH-velous 'wish' interpreter going.
uniquename UPDATE 2013aug20
I found that it would be handy to show the width and height (in pixels) of the image currently showing on the canvas. So I updated the code to show the size in a label just to the right of the 'ShowImg' button.
Also, I have added a 'WriteGIF' button to the GUI, since it is faster than doing screen captures. This gives the user the ability to use this GUI to convert BASE64 data to a GIF file, pretty quickly. This can be handy in those cases in which the user wants to provide their game with a set of GIF files rather than having a lot of BASE64 data embedded in the game code. This can be a flexible approach, for example, in the case that one wants to provide two (or more) different sizes of playing cards --- to accommodate either large monitors or small display devices.
Here is an image that shows the new Image-Size label and the WriteGIF button.