Spiraling Squares - Outlines or Filled(-with-Color-Gradient)
uniquename - 2012nov27
There is a rather old (1986) but nice book on computer graphics called 'Programming Principles in Computer Graphics', by Leendert Ammeraal, published by Wiley & Sons.
There are many nice examples of 2D and 3D graphics programs in that book. The graphics were apparently rendered on a black-and-white pen plotter, with essentially all the figures done in 'wireframe' mode.
Ammeraal provided code for many of the figures (in the C programming language). The first figure in the book is the output of a program that he called SQUARES, and the output looked like this.
His figure did not have these jaggies. He apparently did the plots on a pen plotter (or high-resolution raster-image plotter circa 1985?) with a resolution of around 150 dots/inch or better.
(I did this rendering with the Tk script whose code is below. The rendering was on an LCD monitor at 1024x768 resolution, whose screen width and height were about 13.4 and 10.6 inches --- or about 1024/13.4 ~ 76 pixels/inch horizontally --- and 768/10.6 ~ 73 pixels/inch vertically.)
On seeing the SQUARES figure and the code, and based on my recent coding experiences with Tcl-Tk, I figured that this 2D graphics example was due for an update --- about 26 years later. But done on a Tk canvas instead of with a black-on-white plotter.
Using the Tk canvas, I could provide some colors --- colors for the outlines of the squares (using the '-outline' option of the Tk canvas 'create rectangle' command) and color for the canvas background.
Furthermore, I could use the '-fill' option of the Tk canvas 'create rectangle' command to make a sequence of color-filled squares. But if I used the same constant color for the squares, I would end up with a canvas filled with a solid color. So I decided to 'gradiate' the color of the filled-squares from one user-specified color to another.
And as a basis for all this, I could use the C code that Ammeraal presented. For reference, here is the code that I keyed from my copy of the book.
   /* SQUARES: This program draws 50 squares inside each other */
   main ()
   { float xA, yA, xB, yB, xC, yC, xD, yD,
      xxA, yyA, xxB, yyB, xxC, yyC,xxD, yyD, p ,q ;
      int i;
      p=0.95; q=1.0-p;
      xA=2.0; xB=8.0; xC=8.0; xD=2.0;
      yA=0.5; yB=0.5; yC=6.5; yD=6.5;
      intgr();
      for (i=0; i<50; i++)
      { move(xA, yA);
         draw(xB, yB); draw(xC, yC); draw(xD, yD); draw(xA, yA);
         xxA=p*xA+q*xB; yyA=p*yA+q*yB; xxB=p*xB+q*xC; yyB=p*yB+q*yC;
         xxC=p*xC+q*xD; yyC=p*yC+q*yD; xxD=p*xD+q*xA; yyD=p*yD+q*yA;
         xA=xxA; xB=xxB; xC=xxC; xD=xxD;
         yA=yyA; yB=yyB; yC=yyC; yD=yyD;
      }
      endgr();
   }
After a couple of days of Tcl-Tk coding and enhancing, I arrived at the following Tk GUI to implement the spiraling squares --- with an option to show the squares in 'outline' mode or in 'fill' mode, with gradiation between 2 user-specified 'fill' colors.
The 'Proportion to advance' slider bar allows the user to specify a fraction between 0 and 1. By specifying exactly 0.5, one gets a spiral like the following.
And if you unset the 'Outline' checkbutton, the Tk script goes into 'Fill' mode and makes a spiral of squares that gradiate in color from one user-chosen color (yellow in the following image) to another user-chosen color (black in this example).
After experimenting with this GUI a little, I realized that it would be nice to have some control over the 'rate' at which the color gradiation was occurring between the two colors --- for a given N, where N is the number of squares to be drawn.
In the intitial implementation, I simply had the colors graduating 'linearly' between the two colors as the index 'i' advanced from 1 to N. This was equivalent to weighting the 2 colors with two factors: (1 - i/N) and (i/N). One factor essentially goes from one to zero; the other from zero to one.
I have written a few 2D graphics Tk scripts that put nice color-shaded edges on geometric shapes:
- GUI for Drawing 'Super-ellipses', with nice shaded edges
- GUI for Drawing Rectangular 'Buttons' with nice shaded edges
- GUI for Drawing a 3D Donut (a ring) with nice shaded edges
In those, I used a 'color metric', v, over the geometric shape, where v varied between zero and 1. Then I used factors (1 - v^M) and v^M, applied to two user-selected colors --- where M is an exponent, positive integer or real number. I used the Tcl 'pow' (power) function to compute v^M via pow(v,M).
In this spiraling-squares case, I used a similar 'color metric', v = i/N. And I provided a scale widget on the GUI, so that the user can set the exponent M. The following GUI is the result.

The exponent M controls what I call the 'extensity' of the color gradient, because it seems to control the 'extent' and/or 'intensity' of the color at the edges of the shape --- in this case, at the outer square's edges and the inner square's edges.
In this image and the one above it, I used the same values for the 'Proportion' and 'Number of squares' scales -- 0.01 and 91.
So, by comparing the 2 images, you can see the difference that one can make between the linear-gradiation of the colors (in the upper image) and an image made with an 'extensity' exponent, of 6.0, for example. The linear color gradient is given by setting the 'extensity' exponent to 1.0.
---
Some uses of these images
This 'spiraling squares' program seems to be just 'for grins'. But I can see some uses for the resulting images:
- backgrounds for logos
- backgrounds for icons
- backgrounds for web page title blocks
- frames for photos
and no doubt you can think of some more.
I present an example 'photo-frame' image below the code that is presented below.
The code
I provide the code for this 'spiraling squares' GUI below.
I follow my usual 'canonical' structure for Tk code, for this Tk script:
  0) Set general window & widget parms (win-name, win-position,
     win-color-scheme, fonts, widget-geometry-parms, win-size-control,
     text-array-for-labels-etc).

  1a) Define ALL frames (and sub-frames, if any).
  1b) Pack   ALL frames and sub-frames.

  2) Define & pack all widgets in the frames, frame by frame.

  3) Define keyboard and mouse/touchpad/touch-sensitive-screen action
     BINDINGS, if needed.

  4) Define PROCS, if needed.

  5) Additional GUI initialization (typically with one or more of
     the procs), if needed.
This structure is discussed in more detail on the page A Canonical Structure for Tk Code --- and variations.
This structure makes it easy for me to find code sections --- while generating and testing a Tk script, and when looking for code snippets to include in Tk scripts (code re-use).
I call your attention to step-zero. One new thing that I have started doing recently is using a text-array for text in labels, buttons, and other widgets in the GUI. This can make it easier for people to internationalize my scripts. I will be using a text-array like this in most of my scripts in the future.
Experimenting with the GUI
As in all my scripts that use the 'pack' geometry manager (which is all of my 100-plus scripts, so far), I provide the four main pack parameters --- '-side', '-anchor', '-fill', '-expand' --- on all of the 'pack' commands for the frames and widgets.
That helps me when I am initially testing the behavior of a GUI (the various widgets within it) as I resize the main window.
I think that I have used a nice choice of the 'pack' parameters. The labels and buttons and scales stay fixed in size and relative-location as the window is re-sized --- while the 'canvas' expands/contracts as the window is re-sized.
You can experiment with the '-side', '-anchor', '-fill', and '-expand' parameters on the 'pack' commands for the various frames and widgets --- to get the widget behavior that you want.
___
In addition, you might want to change the fonts used for the various GUI widgets. For example, you could change '-weight' from 'bold' to 'normal' --- or '-slant' from 'roman' to 'italic'. Or change font families.
In fact, you may NEED to change the font families, because the families I used may not be available on your computer --- and the default font that the 'wish' interpreter chooses may not be very pleasing.
I use variables to set geometry parameters of widgets --- parameters such as border-widths and padding. And I have included the '-relief' parameter on the definitions of frames and widgets. Feel free to experiment with those 'appearance' parameters as well.
___
Note that the color buttons call on a color-selector-GUI script to set the colors. You can make that color-selector script by cutting-and-pasting the code from the page A non-obfuscated color selector GUI on this site.
Some features in the code
That said, here's the code --- with plenty of comments to describe what most of the code-sections are doing.
The Tcl-Tk code that is adapted from Ammeraal's SQUARES C-code is in the proc 'ReDraw'. Note that Ammeraal hard-coded the values for p (what I call 'Proportion to advance') and N (the number of squares to draw). I allow the user to change those 2 parameters via a couple of scale widgets on the GUI.
Ammeraal also fixed the size of the starting square. With this GUI, when the window is re-sized, the canvas is re-sized accordingly, and the initial square size is determined from the current canvas size.
___
One interesting feature of this GUI is that when the user 'turns off' the 'Outline' option via the checkbox, the GUI changes --- an additional color button is added to the row of buttons at the top of the GUI. This is to allow the user to specify a 2nd color for the color-gradient in the 'fill' mode of drawing the squares.
I originally had all the buttons showing, but the button labelling was rather confusing and the extra button when in 'outline' mode was also rather confusing. So I decided to make the buttons change according to the setting of the 'outline checkbutton'.
___
It is my hope that the copious comments in the code will help Tcl-Tk coding 'newbies' get started in making GUI's like this.
Without the comments, it might not be clear the purpose of some of the code --- for example, how the 'pack forget' command is being used to hide/show the additional color button.
Without the comments, potential young Tcler's might be tempted to return to their iPhones and iPads and iPods --- to watch videos of people being bashed to the street by large vehicles.
Code of the Tk script 'draw_squares_spiral.tk' :
#!/usr/bin/wish -f
##
## SCRIPT: draw_squares_spiral.tk
##
## PURPOSE:  This Tk GUI script facilitates the creation of a colored
##           sequence of 'spiraling squares' --- via polygons
##           (filled or outlines) drawn on a canvas widget --- where
##           the canvas widget has a given (background) color.
##
##           This Tk script is based on a C program in a book by Leendert
##           Ammeraal, 'Programming Principles of Computer Graphics'.
##
########################
## GUI LAYOUT and METHOD:
##
##    The GUI made by this Tk script contains a rectangular
##    CANVAS widget on which the sequence of squares
##    (color-filled or outlines) will be drawn.
##
##    The GUI includes a CHECKBOX widget to specify whether the
##    squares are to be drawn with a COLOR-OUTLINE (or with COLOR FILL).
##
##    The GUI also includes 2 BUTTON widgets to call a color selector GUI
##    to set
##            - the fill or outline color of the squares
##    and, using the same color selector GUI,
##            - the background color --- the color of the canvas.
##
##    Other BUTTONs may be an EXIT button and a HELP button.
##
#########
##
##    We denote the 4 corners of the sequence of squares as A,B,C,D.
##
##    They start at
##       A = Ax,Ay =  0,0
##       B = Bx,By =  a,0
##       C = Cx,Cy =  a,a
##       D = Dx,Dy =  0,a
##    measured from the top-left corner of a square in the middle of
##    the canvas, where a is given as an integer, in pixels.
##
##        (NOTE: We can set 'a' from the minimum of the current
##               width and height of the canvas.)
##
##    For the purpose of drawing the image on the canvas,
##    we let all computations of the corner coordinates be in pixels
##    (integers) rather than floating point numbers.
##
##    We rotate the square by using 2 decimal valued parameters p and
##    q=1-p, where is a value like 0.95. A SCALE widget on the GUI
##    can be used to allow the user to set the value of p, between
##    0.5 and 1.0.
##
##    We can think of the square as being 4 lines: AB, BC, CD, DA.
##    We rotate the 4 (connected) lines by computing the new coordinates
##    of the 4 corners by the following formulas:
##
##        newAx = int(p * Ax + q * Bx)
##        newAy = int(p * Ay + q * By)
##        newBx = int(p * Bx + q * Cx)
##        newBy = int(p * By + q * Cy)
##        newCx = int(p * Cx + q * Dx)
##        newCy = int(p * Cy + q * Dy)
##        newDx = int(p * Dx + q * Ax)
##        newDy = int(p * Dy + q * Ay)
##
##    Then the square is drawn with a canvas 'create polygon' command ---
##    using either '-fill' or '-outline'.
##
##    Then we reset the 4 corner coordinates with
##        Ax = newAx
##        Ay = newAy
##        Bx = newBx
##        By = newBy
##        Cx = newCx
##        Cy = newCy
##        Dx = newDx
##        Dy = newDy
##
##   This sequence of draws can be done N times, where we can let N
##   be set by another SCALE widget on the GUI --- say, N from 1 to 200.
##
##   The loop is put in a 'ReDraw' proc which is called upon by
##   button1-release BINDINGS on the following widgets:
##       - the CHECKBUTTON widget for outline/fill
##       - the color-BUTTON for outline/fill
##         (NOTE: The color-BUTTON for canvas background does not need to
##                call the 'ReDraw' proc. It simply re-configures the '-bg'
##                option of the canvas widget.)
##       - the SCALE that resets factor 'p'
##       - the SCALE that resets N, the number of squares to draw.
##
##   In the ReDraw proc, we can use the Tcl '' command to
##   report on the number of milliseconds that it took to draw the
##   complete sequence for given 'p' and 'N' and outline/fill.
##
##
##       (NOTE: If erasing the canvas and redrawing the sequence of squares
##              completes within a very small fraction of a second --- say
##              less about 50 milliseconds per completed 'frame', which
##              corresponds to movie rate of at least 20 frames per second,
##              it will be feasible to do the redraws 'dynamically' with
##              the sliderbar of 'p' or 'N'.)
##
## USING THE GENERATED IMAGE:
##           A screen/window capture utility (like 'gnome-screenshot'
##           on Linux) can be used to capture the GUI image in a GIF
##           or PNG file, say.
##
##           If necessary, an image editor (like 'mtpaint' on Linux)
##           can be used to crop the window capture image.  The image
##           could be used as the background of a logo, for example.
##
##           The image could also be down-sized --- say to make a 'bullet'
##           image file or an icon (or icon-background) image file.
##
##           The editor could also be used to blur the image slightly to
##           'feather' the edges of the polygons (squares).
##
##           The colored image file could be used with a utility (like the
##           ImageMagick 'convert' command) to change the background
##           color to TRANSPARENT, making a partially transparent GIF
##           (or PNG) file. Then the semi-transparent image file could be used,
##           for 'bullets' in HTML pages or in Tk GUI's --- or for the
##           background of icons for use in GUIs --- or for a frame around
##           a photograph, say to be used in a web page or an email.
##
##           The image could also be taken into a scalable vector graphics
##           (SVG) editor (like Inkscape on Linux) and the SVG editor used
##           to add anti-aliased text to the image.
##
##+########################################################################
## 'CANONICAL' STRUCTURE OF THIS TK CODE:
##
##  0) Set general window & widget parms (win-name, win-position,
##     win-color-scheme, fonts, widget-geometry-parms, win-size-control,
##     text-array-for-labels-etc).
##
##  1a) Define ALL frames (and sub-frames, if any).
##  1b) Pack   ALL the frames and sub-frames.
##
##  2) Define all widgets in the frames, frame-by-frame.
##     When ALL the widgets for a frame are defined, pack ALL the widgets.
##
##  3) Define keyboard and mouse/touchpad/touch-sensitive-screen 'event'
##     BINDINGS, if needed.
##
##  4) Define PROCS, if needed.
##
##  5) Additional GUI INITIALIZATION (typicall with 1 or 2 procs),
##     if needed/wanted.
##
##
## Some detail about the code structure of this particular script:
##
##  1a) Define ALL frames:
##
##      Top-level : '.fRleft' and '.fRright'
##
##      Sub-frames:  '.fRleft.fRbuttons'
##                   '.fRleft.fRcolors'
##                   '.fRleft.fRoptions'
##                   '.fRleft.fRscale1'
##                   '.fRleft.fRscale2'
##                   '.fRleft.fRscale3'
##
##                   '.fRright.fRcanvas'
##
##  1b) Pack ALL frames.
##
##  2) Define all widgets in the frames (and pack them):
##
##     - In '.fRbuttons':   1 exit BUTTON widget,
##                            and
##                          3 color BUTTONs (for setting the squares'
##                            outline/fill1 color, fill2 color, and the
##                            background/canvas color),
##
##     - In '.fRcolors':    1 LABEL widget to display current color values.
##
##     - In '.fRoptions':   1 CHECKBOX widget (for outline/fill)
##                            and
##                          1 LABEL widget for 'info'
##
##     - In '.fRscale1'     1 SCALE widget (for factor 'p')
##
##     - In '.fRscale2'     1 SCALE widget (for number of squares, N).
##
##     - In '.fRscale3'     1 SCALE widget (for color 'extensity' exponent).
##
##     - In '.fRcanvas':    1 'canvas' widget
##
##  3) Define BINDINGS:

##
##    - button1-release on the outline/fill CHECKBUTTON should call
##          the 'ReDraw' proc
##
##    - button1-release on the SCALE widget for 'p' should call
##          the 'ReDraw' proc (if we do not use the '-command' option
##          of the scale widget to call ReDraw)
##
##    - button1-release on the SCALE widget for 'N' should call
##          the 'ReDraw' proc (if we do not use the '-command' option
##          of the scale widget to call ReDraw)
##
##    - a <Configure> (resize) event on the window should cause a redraw
##
##    NOTE: We DO NOT need a binding on the 3 color-BUTTONS.
##          They will call on set-color procs that can call the 'ReDraw'
##          proc after a color is set.
##
##  4) Define PROCS:
##
##     - 'ReDraw'          - clears the canvas and redraws the
##                           spiral of squares within the canvas
##                           --- for the current values of canvas width
##                           and height (their minimum), p, N, and the
##                           outline/fill checkbutton-variable setting.
##
##     - 'set_squares_color1'   - shows a color selector GUI and uses the
##                                user-selected color to set the
##                                outline (or 1st-fill) color of the squares
##                                --- and redraw the squares on the canvas
##
##     - 'set_squares_color2'   - shows a color selector GUI and uses the
##                                user-selected color to set the '2nd fill'
##                                color of the squares, to gradiate to, from
##                                fill-color1, as the square-number 'i'
##                                goes from 1 to N --- and redraw the
##                                squares on the canvas
##
##     - 'set_color_background' - shows a color selector GUI and uses the
##                                user-selected color to reset the color of
##                                the canvas background (A redraw is not
##                                needed. The background UNDER the squares
##                                changes.)
##
##  - 'show_hide_fill_buttons'  - called by button1-release on the outline
##                                checkbutton
##
##  - 'ReDraw_if_canvas_resized' - called by <Configure> event on the canvas
##
##  5) Additional GUI initialization:  Execute proc 'ReDraw' once with
##                                     an initial, example set of parms
##                                     --- canvas width-height, p, N,
##                                     outline/fill setting, COLOR1hex,
##                                     COLOR2hex, COLORbkGNDhex ---
##                                     to start with a sequence of squares on
##                                     the canvas rather than a blank canvas.
##
##+########################################################################
## DEVELOPED WITH:
##   Tcl-Tk 8.5 on Ubuntu 9.10 (2009-october release, 'Karmic Koala').
##
##   $ wish
##   % puts "$tcl_version $tk_version"
##                                  showed   8.5 8.5   on Ubuntu 9.10
##    after Tcl-Tk 8.4 was replaced by 8.5 --- to get anti-aliased fonts.
##+#######################################################################
## MAINTENANCE HISTORY:
## Created by: Blaise Montandon 2012nov21
## Changed by: Blaise Montandon 2012nov23 Add the extensity scale.
##+#######################################################################

##+#######################################################################
## Set WINDOW TITLES.
##+#######################################################################

wm title    . "Spiraling Colored Squares on a Canvas (wireframe or 2-color-gradient)"
wm iconname . "Squares"


##+#######################################################################
## Set initial WINDOW POSITION.
##+#######################################################################

wm geometry . +15+30


##+######################################################
## Set the COLOR SCHEME for the window
## --- and its widgets.
##+######################################################

# set Rpal 0
# set Gpal 100
# set Bpal 200
set Rpal 210
set Gpal 210
set Bpal 210
set hexCOLORpal [format "#%02X%02X%02X" $Rpal $Gpal $Bpal]
tk_setPalette "$hexCOLORpal"


set BKGDcheckbutton "#cccccc"

# set BKGDtext    "#f0f0f0"
# set BKGDentry   "#f0f0f0"
# set BKGDlistbox "#f0f0f0"


##+########################################################
## Set (temporary) FONT-NAMES.
## Use a VARIABLE-WIDTH FONT for label and button widgets.
##
## Use a FIXED-WIDTH FONT for listboxes and entry fields
## and text widgets, if any.
##+########################################################

font create fontTEMP_varwidth \
   -family {comic sans ms} \
   -size -14 \
   -weight bold \
   -slant roman

font create fontTEMP_SMALL_varwidth \
   -family {comic sans ms} \
   -size -12 \
   -weight bold \
   -slant roman


## Some other possible (similar) variable width fonts:
##  Arial
##  Bitstream Vera Sans
##  DejaVu Sans
##  Droid Sans
##  FreeSans
##  Liberation Sans
##  Nimbus Sans L
##  Trebuchet MS
##  Verdana

font create fontTEMP_fixedwidth  \
   -family {liberation mono} \
   -size -14 \
   -weight bold \
   -slant roman

font create fontTEMP_SMALL_fixedwidth  \
   -family {liberation mono} \
   -size -12 \
   -weight bold \
   -slant roman

## Some other possible fixed width fonts (esp. on Linux):
##  Andale Mono
##  Bitstream Vera Sans Mono
##  Courier 10 Pitch
##  DejaVu Sans Mono
##  Droid Sans Mono
##  FreeMono
##  Nimbus Mono L
##  TlwgMono


##+###########################################################
## SET GEOM VARS FOR THE VARIOUS WIDGET DEFINITIONS.
## (e.g. width and height of canvas, and padding for Buttons)
##+###########################################################

## CANVAS parms:

set initCanWidthPx 300
set initCanHeightPx 300
set minCanHeightPx 24
# set BDwidthPx_canvas 2
set BDwidthPx_canvas 0


## BUTTON parms:

set PADXpx_button 0
set PADYpx_button 0
set BDwidthPx_button 2


## LABEL parms:

set PADXpx_label 0
set PADYpx_label 0
set BDwidthPx_label 2


## SCALE parms:

set BDwidthPx_scale 2
set scaleWidthPx 10


##+###################################################################
## Set a MINSIZE of the window.
##
## For WIDTH, allow for the minwidth of the '.fRbuttons' frame:
##            about 3 buttons (Exit,Color1,ColorBkgnd), and
##            the initial width of the canvas widget on the right.
##
## For HEIGHT, allow
##       2 chars  high for the 2-line buttons in the '.fRbuttons' frame,
##       2 chars  high for the scale widgets  in the '.fRoptions' frame,
##      24 pixels high for the '.fRcanvas' frame.
##+######################################################################
## We allow the window to be resizable, because we pack the canvas with
## '-fill both -expand 1' so that the canvas can be enlarged by enlarging
## the window.
#########################################################################

set minWinWidthPx [font measure fontTEMP_varwidth \
   "Exit Outline Background"]

set minWinWidthPx [expr {$initCanWidthPx + $minWinWidthPx}]

## Add some pixels to account for right-left-side window decoration
## (about 8 pixels), about 4 widgets x 6 pixels/widget for borders/padding
## for 4 widgets --- 3 buttons and 1 label.

set minWinWidthPx [expr {32 + $minWinWidthPx}]


## MIN HEIGHT --- allow
##    2 chars  high for 'fRbuttons'
##    2 chars  high for 'fRoptions'
##   24 pixels high for 'fRcanvas'

set CharHeightPx [font metrics fontTEMP_varwidth -linespace]

set minWinHeightPx [expr {24 + (4 * $CharHeightPx)}]

## Add about 28 pixels for top-bottom window decoration, and
## about 3 frames x 6 pixels/frame for each of the 3 stacked frames
## and their widgets (their borders/padding).

set minWinHeightPx [expr {46 + $minWinHeightPx}]


## FOR TESTING:
#   puts "minWinWidthPx = $minWinWidthPx"
#   puts "minWinHeightPx = $minWinHeightPx"

wm minsize . $minWinWidthPx $minWinHeightPx


## If you want to make the window un-resizable,
## you can use the following statement.
# wm resizable . 0 0


#######################################################################
## Set a TEXT-ARRAY to hold text for buttons & labels on the GUI.
##     NOTE: This can aid INTERNATIONALIZATION. This array can
##           be set according to a nation/region parameter.
#######################################################################

## if { "$VARlocale" == "en"}

set aRtext(buttonEXIT)   "Exit"
# set aRtext(buttonHELP)  "Help"

set aRtext(buttonCOLOR1) "Outline
Color"
set aRtext(buttonCOLOR1b) "Fill1
Color"

set aRtext(buttonCOLOR2) "Fill2
Color"

set aRtext(buttonBkgndCOLOR) "Background
Color"

set aRtext(chkbuttOUTLINE)  "OUTLINE
squares
(don't fill)"

set aRtext(labelP) "Proportion
to advance:"

set aRtext(labelN) "Number
of squares:"

set aRtext(labelM) "'Extensity' of
color at outer edges
and at the center:"


## END OF  if { "$VARlocale" == "en"}


##+################################################################
## DEFINE *ALL* THE FRAMES:
##
##      Top-level : '.fRleft' and '.fRright'
##
##      Sub-frames:  '.fRleft.fRbuttons'
##                   '.fRleft.fRcolors'
##                   '.fRleft.fRoptions'
##                   '.fRleft.fRscale1'
##                   '.fRleft.fRscale2'
##                   '.fRleft.fRscale3'
##
##                   '.fRright.fRcanvas'
##+################################################################

## FOR TESTING: (to check frame behavior as window expands/contracts)
# set BDwidth_frame 2
# set RELIEF_frame raised

set BDwidth_frame 0
set RELIEF_frame flat

frame .fRleft  -relief $RELIEF_frame  -borderwidth $BDwidth_frame
frame .fRright -relief $RELIEF_frame  -borderwidth $BDwidth_frame

frame .fRleft.fRbuttons  -relief $RELIEF_frame  -borderwidth $BDwidth_frame
frame .fRleft.fRcolors   -relief raised  -borderwidth 2

frame .fRleft.fRoptions  -relief $RELIEF_frame  -borderwidth $BDwidth_frame
frame .fRleft.fRscale1   -relief raised  -borderwidth 2
frame .fRleft.fRscale2   -relief raised  -borderwidth 2
frame .fRleft.fRscale3   -relief raised  -borderwidth 2

frame .fRright.fRcanvas  -relief $RELIEF_frame  -borderwidth $BDwidth_frame


##+##############################
## PACK the top-level FRAMES.
##+##############################

pack .fRleft \
   -side left \
   -anchor nw \
   -fill none \
   -expand 0

pack .fRright \
   -side left \
   -anchor nw \
   -fill both \
   -expand 1


pack .fRleft.fRbuttons \
   -side top \
   -anchor nw \
   -fill none \
   -expand 0

pack .fRleft.fRcolors \
     .fRleft.fRoptions \
     .fRleft.fRscale1 \
     .fRleft.fRscale2 \
     .fRleft.fRscale3 \
   -side top \
   -anchor nw \
   -fill x \
   -expand 0

pack .fRright.fRcanvas \
   -side top \
   -anchor nw \
   -fill both \
   -expand 1


##+#########################################################
## OK. Now we are ready to define the widgets in the frames.
##+#########################################################


##+#####################################################################
## In the '.fRleft.fRbuttons' FRAME -
## DEFINE BUTTONS (Exit and 2 color buttons), and
## a LABEL widget, to show current color values.
##+#####################################################################

button .fRleft.fRbuttons.buttEXIT \
   -text "$aRtext(buttonEXIT)" \
   -font fontTEMP_varwidth \
   -padx $PADXpx_button \
   -pady $PADYpx_button \
   -relief raised \
   -bd $BDwidthPx_button \
   -command {exit}

button .fRleft.fRbuttons.buttCOLOR1 \
   -text "$aRtext(buttonCOLOR1)" \
   -font fontTEMP_SMALL_varwidth \
   -padx $PADXpx_button \
   -pady $PADYpx_button \
   -relief raised \
   -bd $BDwidthPx_button \
   -command "set_squares_color1"

button .fRleft.fRbuttons.buttCOLOR2 \
   -text "$aRtext(buttonCOLOR2)" \
   -font fontTEMP_SMALL_varwidth \
   -padx $PADXpx_button \
   -pady $PADYpx_button \
   -relief raised \
   -bd $BDwidthPx_button \
   -command "set_squares_color2"

button .fRleft.fRbuttons.buttCOLORbkGND \
   -text "$aRtext(buttonBkgndCOLOR)" \
   -font fontTEMP_SMALL_varwidth \
   -padx $PADXpx_button \
   -pady $PADYpx_button \
   -relief raised \
   -bd $BDwidthPx_button \
   -command "set_background_color"


##+######################################################
## Pack ALL the widgets in the '.fRleft.fRbuttons' frame.
##+######################################################

pack .fRleft.fRbuttons.buttEXIT \
     .fRleft.fRbuttons.buttCOLOR1 \
     .fRleft.fRbuttons.buttCOLORbkGND \
   -side left \
   -anchor w \
   -fill none \
   -expand 0

## We start with the outline checkbutton set to outline-mode,
## so we do not show the fill2-color button.
#     .fRleft.fRbuttons.buttCOLOR2 \


##+##################################################################
## In the '.fRleft.fRcolors' FRAME -
## DEFINE a LABEL widget, to display current hexcolor settings.
## Pack it.
#####################################################################

label .fRleft.fRcolors.labelCOLORS \
   -text "" \
   -font fontTEMP_SMALL_varwidth \
   -justify left \
   -anchor w \
   -relief flat \
   -bd $BDwidthPx_button

pack .fRleft.fRcolors.labelCOLORS \
   -side left \
   -anchor w \
   -fill none \
   -expand 0


##+##################################################################
## In the '.fRleft.fRoptions' FRAME -
## DEFINE a CHECKBUTTON widget (for outline/fill),
## and a LABEL widget, for 'info'.
##+##################################################################

if {0} {
label .fRleft.fRoptions.labelOUTLINE \
   -text "$aRtext(chkbuttOUTLINE)" \
   -font fontTEMP_SMALL_varwidth \
   -justify left \
   -anchor w \
   -relief flat \
   -bd $BDwidthPx_button
}

set outline0or1 0

checkbutton .fRleft.fRoptions.chkbuttOUTLINE \
   -text "$aRtext(chkbuttOUTLINE)" \
   -font  fontTEMP_SMALL_varwidth \
   -variable outline0or1 \
   -selectcolor "$BKGDcheckbutton" \
   -relief raised \
   -bd 2

label .fRleft.fRoptions.labelINFO \
   -text "" \
   -font fontTEMP_SMALL_varwidth \
   -justify left \
   -anchor w \
   -relief flat \
   -bd $BDwidthPx_button


## Pack ALL the widgets of FRAME '.fRoptions' ---
## label, checkbutton, and scale widgets.

pack .fRleft.fRoptions.chkbuttOUTLINE \
   -side left \
   -anchor w \
   -fill none \
   -expand 0 \
   -padx {0 10}

pack .fRleft.fRoptions.labelINFO \
   -side left \
   -anchor w \
   -fill none \
   -expand 0


##+##################################################################
## In the '.fRleft.fRscale1' FRAME -
## DEFINE a SCALE widget (for 'p' proportion factor), with LABEL widget.
##+##################################################################

## SCALE for 'p':

label .fRleft.fRscale1.labelP \
   -text "$aRtext(labelP)" \
   -font fontTEMP_SMALL_varwidth \
   -justify left \
   -anchor w \
   -relief flat \
   -bd $BDwidthPx_label

## Set this widget var in the GUI initialization section
## at the bottom of this script.
# set p 0.05

scale .fRleft.fRscale1.scaleP \
   -from 0.001 -to 0.999 \
   -resolution 0.001 \
   -length 400 \
   -font fontTEMP_SMALL_varwidth \
   -variable p \
   -showvalue true \
   -orient horizontal \
   -bd $BDwidthPx_scale \
   -width $scaleWidthPx


## Pack ALL the widgets of FRAME '.fRleft.fRscale1' ---
## label and scale widgets.

pack .fRleft.fRscale1.labelP \
   -side left \
   -anchor w \
   -fill none \
   -expand 0

pack .fRleft.fRscale1.scaleP \
   -side left \
   -anchor w \
   -fill none \
   -expand 0


##+##################################################################
## In the '.fRleft.fRscale2' FRAME -
## DEFINE a SCALE widget (for N number of squares), with LABEL widget.
##+##################################################################

## SCALE for 'N':

label .fRleft.fRscale2.labelN \
   -text "$aRtext(labelN)" \
   -font fontTEMP_SMALL_varwidth \
   -justify left \
   -anchor w \
   -relief flat \
   -bd $BDwidthPx_label

## Set this widget var in the GUI initialization section
## at the bottom of this script.
# set N 50

scale .fRleft.fRscale2.scaleN \
   -from 1 -to 600 \
   -resolution 1 \
   -length 300 \
   -font fontTEMP_SMALL_varwidth \
   -variable N \
   -showvalue true \
   -orient horizontal \
   -bd $BDwidthPx_scale \
   -width $scaleWidthPx

## Pack ALL the widgets of FRAME '.fRleft.fRscale2' ---
## label and scale widgets.

pack .fRleft.fRscale2.labelN \
   -side left \
   -anchor w \
   -fill none \
   -expand 0

pack .fRleft.fRscale2.scaleN \
   -side left \
   -anchor w \
   -fill none \
   -expand 0 \
   -padx {0 10}


##+##################################################################
## In the '.fRleft.fRscale3' FRAME -
## DEFINE a SCALE widget (for color 'extensity' exponent M), with
## a LABEL widget.
##+##################################################################

## SCALE for 'M':

label .fRleft.fRscale3.labelM \
   -text "$aRtext(labelM)" \
   -font fontTEMP_SMALL_varwidth \
   -justify left \
   -anchor w \
   -relief flat \
   -bd $BDwidthPx_label

## Set this widget var in the GUI initialization section
## at the bottom of this script.
# set M 6

scale .fRleft.fRscale3.scaleM \
   -from 0.1 -to 10 \
   -resolution 0.1 \
   -length 200 \
   -font fontTEMP_SMALL_varwidth \
   -variable M \
   -showvalue true \
   -orient horizontal \
   -bd $BDwidthPx_scale \
   -width $scaleWidthPx

## Pack ALL the widgets of FRAME '.fRleft.fRscale3' ---
## label and scale widgets.

pack .fRleft.fRscale3.labelM \
   -side left \
   -anchor w \
   -fill none \
   -expand 0

pack .fRleft.fRscale3.scaleM \
   -side left \
   -anchor w \
   -fill none \
   -expand 0 \
   -padx {0 10}


##+######################################################
## In the '.fRright.fRcanvas' FRAME -
## DEFINE-and-PACK the 'canvas' widget.
##+######################################################
## We set '-highlightthickness' and '-borderwidth' to
## zero, to avoid covering some of the viewable area
## of the canvas, as suggested on page 558 of the 4th
## edition of 'Practical Programming with Tcl and Tk'.
##+###################################################

canvas .fRright.fRcanvas.can \
   -width $initCanWidthPx \
   -height $initCanHeightPx \
   -relief flat \
   -highlightthickness 0 \
   -borderwidth 0

pack .fRright.fRcanvas.can \
   -side top \
   -anchor nw \
   -fill both \
   -expand 1


## OK. The widgets are defined and packed.
## Now define bindings and procs.


##+###############################
## BINDINGS SECTION:
##+###############################

## The following <Configure> bind can cause an extra ReDraw
## when the GUI is first configured via an 'update' below
## in the GUI initialization section.
##
## We move this statement to the bottom of this script.

# bind .fRright.fRcanvas.can <Configure> "ReDraw_if_canvas_resized"

bind .fRleft.fRoptions.chkbuttOUTLINE <ButtonRelease-1>  \
   "show_hide_fill_buttons ; ReDraw 0"

bind .fRleft.fRscale1.scaleP   <ButtonRelease-1>  "ReDraw 0"

bind .fRleft.fRscale2.scaleN   <ButtonRelease-1>  "ReDraw 0"

bind .fRleft.fRscale3.scaleM   <ButtonRelease-1>  "ReDraw 0"


##+######################################################################
## PROCS SECTION:
##
##  - ReDraw       - Clears the canvas and redraws the sequence
##                   of spiraling squares --- for the given outline/fill
##                   color, outline/fill var, p var, N var.
##
##                   Called by:
##                   - the 'set_squares_color1' proc
##                   - button1-release binding on the outline/fill checkbutton
##                   - button1-release binding on the 'p' scale
##                   - button1-release binding on the 'N' scale
##                   - a <Configure> binding on the canvas widget.
##
##  - set_squares_color1   - called by the outline/fill1 button '-command' ---
##                           shows a color selector GUI and uses the user-selected
##                           color to set outline color (or fill-color1) for
##                           drawing the next sequence of N squares
##
##  - 'set_squares_color'   - called by the fill2 button '-command' ---
##                            shows a color selector GUI and uses the
##                            user-selected color to set the '2nd fill'
##                            color of the squares, to gradiate to, from
##                            fill-color1, as the square-number 'i'
##                            goes from 1 to N --- and redraw the
##                            squares on the canvas
##
##  - set_background_color  - called by background color button '-command'
##                            --- shows a color selector GUI and uses the
##                            user-selected color to set the background
##                            color for the canvas
##
##  - show_hide_fill_buttons  - called by button1-release on the outline checkbutton
##
##  - ReDraw_if_canvas_resized - called by <Configure> event on the canvas
##+#######################################################################


########################################################################
## proc ReDraw -
##
## PURPOSE:
##     Draws the squares on the canvas.
##
## CALLED BY:  - the 'set_squares_color1' proc
##             - button1-release binding on the outline/fill checkbutton
##             - button1-release binding on the 'p' scale
##             - button1-release binding on the 'N' scale
##
## NOTE: The 'x' argument is to avoid an error when the scale '-command'
##       passes a scale value as an argument to the command. This is in
##       case we ever want to implement the 'command' option on the
##       2 scale widgets for the p & N parms.
########################################################################

proc ReDraw {x} {

   global p N M outline0or1 \
      COLOR1hex COLOR1r COLOR1g COLOR1b \
      COLOR2hex COLOR2r COLOR2g COLOR2b \
      COLORbkGNDhex COLORbkGNDr COLORbkGNDg COLORbkGNDb

   ## Set the current time, for determining elapsed
   ## time doing the complete draw of N squares.

   set t0 [clock milliseconds]

   ## Get the current width & height of the canvas.

   set canWidthPx  [winfo width  .fRright.fRcanvas.can]
   set canHeightPx [winfo height .fRright.fRcanvas.can]


   ## Get the inital width & height of the squares 'aPx'
   ## --- the minimum of canvas width & height.

   set aPx $canWidthPx
   if {$canHeightPx < $canWidthPx} {set aPx $canHeightPx}


   ## FOR TESTING:
   #   puts "ReDraw > aPx: $aPx  canWidthPx: $canWidthPx   canHeightPx: $canHeightPx"


   ## Clear the canvas of the previously drawn polygons.

   # .fRright.fRcanvas.can delete TAGpolygons
   .fRright.fRcanvas.can delete all


   ## Set q from p.

   set q [expr {1.0 - $p}]


   ## Initialize the coordinates of the 4 corners.

   set AxPx 0
   set AyPx 0
   set BxPx $aPx
   set ByPx 0
   set CxPx $aPx
   set CyPx $aPx
   set DxPx 0
   set DyPx $aPx

   if {$outline0or1 != 1} {
      set rRange [expr {$COLOR2r - double($COLOR1r)}]
      set gRange [expr {$COLOR2g - double($COLOR1g)}]
      set bRange [expr {$COLOR2b - double($COLOR1b)}]

      ## For linear distribution of the colors.
      # set rRatio [expr {$rRange / $N}]
      # set gRatio [expr {$gRange / $N}]
      # set bRatio [expr {$bRange / $N}]
   }


   ## LOOP thru making the squares, from 0 thru N.
   ##   For outline0or1=0 (color-gradient), the colors will go
   ##   from COLOR1 to COLOR2.

   for {set i 0} {$i <= $N} {incr i} {

      ## Draw the first and subsequent squares --- wireframe or
      ## color-gradient, according to the setting of $outline0or1.

      if {$outline0or1 == 1} {
         .fRright.fRcanvas.can create polygon \
            $AxPx $AyPx \
            $BxPx $ByPx \
            $CxPx $CyPx \
            $DxPx $DyPx \
            -tag TAGpolygons -outline $COLOR1hex -fill $COLORbkGNDhex
      } else {
         ## For a 'power' distribution of the colors.
         set iOverN [expr { double($i) / $N }]
         set nR [expr {int( $COLOR1r + ($rRange * pow($iOverN, $M)) )}]
         set nG [expr {int( $COLOR1g + ($gRange * pow($iOverN, $M)) )}]
         set nB [expr {int( $COLOR1b + ($bRange * pow($iOverN, $M)) )}]

         ## For linear distribution of the colors.
         # set nR [expr {int( $COLOR1r + ($rRatio * $i) )}]
         # set nG [expr {int( $COLOR1g + ($gRatio * $i) )}]
         # set nB [expr {int( $COLOR1b + ($bRatio * $i) )}]

         set hexcolor [format "#%02X%02X%02X" $nR $nG $nB]

         .fRright.fRcanvas.can create polygon \
            $AxPx $AyPx \
            $BxPx $ByPx \
            $CxPx $CyPx \
            $DxPx $DyPx \
            -tag TAGpolygons -fill $hexcolor
      }

      ## FOR TESTING:
      #   puts "ReDraw > Drawing square $i with corners:"
      #   puts "  AxPx: $AxPx   AyPx: $AyPx"
      #   puts "  BxPx: $BxPx   ByPx: $ByPx"
      #   puts "  CxPx: $CxPx   CyPx: $CyPx"
      #   puts "  DxPx: $DxPx   DyPx: $DyPx"


      ## Calculate corner coordinates for the next square.

      set newAxPx [expr { round($q * $AxPx + $p * $BxPx) }]
      set newAyPx [expr { round($q * $AyPx + $p * $ByPx) }]
      set newBxPx [expr { round($q * $BxPx + $p * $CxPx) }]
      set newByPx [expr { round($q * $ByPx + $p * $CyPx) }]
      set newCxPx [expr { round($q * $CxPx + $p * $DxPx) }]
      set newCyPx [expr { round($q * $CyPx + $p * $DyPx) }]
      set newDxPx [expr { round($q * $DxPx + $p * $AxPx) }]
      set newDyPx [expr { round($q * $DyPx + $p * $AyPx) }]

      ## Reset the coordinates of the 4 corners.

      set AxPx $newAxPx
      set AyPx $newAyPx
      set BxPx $newBxPx
      set ByPx $newByPx
      set CxPx $newCxPx
      set CyPx $newCyPx
      set DxPx $newDxPx
      set DyPx $newDyPx

   }
   ## END OF LOOP  for {set i 1} {$i <= $N} {incr i}


   ## Make sure the text on the COLORS label widget
   ## is up to date --- and color the buttons accordingly.

   if {$outline0or1 == 1} {
      ## For outline-mode:
      .fRleft.fRcolors.labelCOLORS configure -text "\
Colors:
  Outline of squares = $COLOR1hex
  Background = $COLORbkGNDhex"
   } else {
      ## For fill-mode:
      .fRleft.fRcolors.labelCOLORS configure -text "\
Colors: Fill1 (outermost square) = $COLOR1hex
            graduating to
        Fill2 (innermost square) = $COLOR2hex
        Background = $COLORbkGNDhex"
   }

   .fRleft.fRbuttons.buttCOLOR1 configure -bg $COLOR1hex
   set sumCOLOR1 [expr {$COLOR1r + $COLOR1g + $COLOR1b}]
   if {$sumCOLOR1 > 300} {
      .fRleft.fRbuttons.buttCOLOR1 configure -fg #000000
   } else {
      .fRleft.fRbuttons.buttCOLOR1 configure -fg #f0f0f0
   }

   .fRleft.fRbuttons.buttCOLOR2 configure -bg $COLOR2hex
   set sumCOLOR2 [expr {$COLOR2r + $COLOR2g + $COLOR2b}]
   if {$sumCOLOR2 > 300} {
      .fRleft.fRbuttons.buttCOLOR2 configure -fg #000000
   } else {
      .fRleft.fRbuttons.buttCOLOR2 configure -fg #f0f0f0
   }

   .fRleft.fRbuttons.buttCOLORbkGND configure -bg $COLORbkGNDhex
   set sumCOLORbkGND [expr {$COLORbkGNDr + $COLORbkGNDg + $COLORbkGNDb}]
   if {$sumCOLORbkGND > 300} {
      .fRleft.fRbuttons.buttCOLORbkGND configure -fg #000000
   } else {
      .fRleft.fRbuttons.buttCOLORbkGND configure -fg #f0f0f0
   }

   ## Make sure the text on the INFO label widget
   ## is up to date.

   .fRleft.fRoptions.labelINFO configure -text "\
Biggest square's width=height= $aPx pixels
 Current canvas width: $canWidthPx  height: $canHeightPx pixels
    DRAW TIME: [expr {[clock milliseconds] - $t0}] millisecs elapsed"

}
## END OF proc 'ReDraw'


##+#####################################################################
## proc 'set_squares_color1'
##+#####################################################################
## PURPOSE:
##
##   This procedure is invoked to get an RGB triplet
##   via 3 RGB slider bars on the FE Color Selector GUI.
##
##   Uses that RGB value to set an 'outline' (or'fill1') color for the
##   sequence of squares to be drawn.
##
## Arguments: none
##
## CALLED BY:  .fRleft.fRbuttons.buttCOLOR1  button
##+#####################################################################

proc set_squares_color1 {} {

   global COLOR1r COLOR1g COLOR1b COLOR1hex
   # global feDIR_tkguis

   ## FOR TESTING:
   #    puts "COLOR1r: $COLOR1r"
   #    puts "COLOR1g: $COLOR1g"
   #    puts "COLOR1b: $COLOR1b"

   set TEMPrgb [ exec \
       ./sho_colorvals_via_sliders3rgb.tk \
       $COLOR1r $COLOR1g $COLOR1b]

   #   $feDIR_tkguis/sho_colorvals_via_sliders3rgb.tk \

   ## FOR TESTING:
   #    puts "TEMPrgb: $TEMPrgb"

   if { "$TEMPrgb" == "" } { return }

   scan $TEMPrgb "%s %s %s %s" r255 g255 b255 hexRGB

   set COLOR1hex "#$hexRGB"
   set COLOR1r $r255
   set COLOR1g $g255
   set COLOR1b $b255

   ## Redraw the geometry in the new outline color --- OR,
   ## if outline is turned off, starting from the 'fill1' color.

   ReDraw 0

}
## END OF proc 'set_squares_color1'


##+#####################################################################
## proc 'set_squares_color2'
##+#####################################################################
## PURPOSE:
##
##   This procedure is invoked to get an RGB triplet
##   via 3 RGB slider bars on the FE Color Selector GUI.
##
##   Uses that RGB value to set a 'fill2' color, to gradiate to,
##   from 'fill1' color, as the sequence of squares are drawn.
##
## Arguments: none
##
## CALLED BY:  .fRleft.fRbuttons.buttCOLOR2  button
##+#####################################################################

proc set_squares_color2 {} {

   global COLOR2r COLOR2g COLOR2b COLOR2hex outline0or1
   # global feDIR_tkguis

   ## FOR TESTING:
   #    puts "COLOR2r: $COLOR2r"
   #    puts "COLOR2g: $COLOR2g"
   #    puts "COLOR2b: $COLOR2b"

   set TEMPrgb [ exec \
       ./sho_colorvals_via_sliders3rgb.tk \
       $COLOR2r $COLOR2g $COLOR2b]

   #   $feDIR_tkguis/sho_colorvals_via_sliders3rgb.tk \

   ## FOR TESTING:
   #    puts "TEMPrgb: $TEMPrgb"

   if { "$TEMPrgb" == "" } { return }

   scan $TEMPrgb "%s %s %s %s" r255 g255 b255 hexRGB

   set COLOR2hex "#$hexRGB"
   set COLOR2r $r255
   set COLOR2g $g255
   set COLOR2b $b255

   ## Redraw the geometry going to the new 'fill2' color.
   ## (Make sure the outline switch is turned off, since
   ##  the user apparently wants to use the polygon-fill option.)

   set outline0or1 0
   ReDraw 0

}
## END OF proc 'set_squares_color2'


##+#####################################################################
## proc 'set_background_color'
##+#####################################################################
## PURPOSE:
##
##   This procedure is invoked to get an RGB triplet
##   via 3 RGB slider bars on the FE Color Selector GUI.
##
##   Uses that RGB value to set the color of the canvas.
##
## Arguments: none
##
## CALLED BY:  .fRleft.fRbuttons.buttCOLORbkGND  button
##+#####################################################################

proc set_background_color {} {

   global COLORbkGNDr COLORbkGNDg COLORbkGNDb COLORbkGNDhex \
          COLORbkGNDr COLORbkGNDg COLORbkGNDb
   # global feDIR_tkguis

   ## FOR TESTING:
   #    puts "COLORbkGNDr: $COLORbkGNDr"
   #    puts "COLORbkGNDg: $COLORbkGNDb"
   #    puts "COLORbkGNDb: $COLORbkGNDb"

   set TEMPrgb [ exec \
       ./sho_colorvals_via_sliders3rgb.tk \
       $COLORbkGNDr $COLORbkGNDg $COLORbkGNDb]

   #   $feDIR_tkguis/sho_colorvals_via_sliders3rgb.tk \

   ## FOR TESTING:
   #    puts "TEMPrgb: $TEMPrgb"

   if { "$TEMPrgb" == "" } { return }

   scan $TEMPrgb "%s %s %s %s" r255 g255 b255 hexRGB

   set COLORbkGNDhex "#$hexRGB"
   set COLORbkGNDr $r255
   set COLORbkGNDg $g255
   set COLORbkGNDb $b255

   ## Set the color of the canvas.

   .fRright.fRcanvas.can config -bg $COLORbkGNDhex

   ## Redraw the geometry in the new outline color --- OR,
   ## if outline is turned off, starting from the 'fill1' color.

   ReDraw 0

}
## END OF proc 'set_background_color'


##+#############################################################
## proc show_hide_fill_buttons
##
## PURPOSE: To hide/show the 'fill2' 'COLOR2' button on the GUI by
##          using the 'pack forget' command to hide it and by
##          usning 'pack forget' and 'pack' to insert the
##          button among the existing buttons.
##
##         This proc also resets the label text on the
##         outline/fill1 button --- the 'COLOR1' button.
##
## CALLED BY: button1-release binding on .fRleft.fRoptions.chkbuttOUTLINE
##+#############################################################

proc show_hide_fill_buttons {} {

   global outline0or1 aRtext

   if {$outline0or1 == 1} {
      ## We are switching from fill-mode to outline-mode.
      pack forget .fRleft.fRbuttons.buttCOLOR2
      .fRleft.fRbuttons.buttCOLOR1 configure -text "$aRtext(buttonCOLOR1)"
   } else {
      ## We are switching from outline-mode to fill-mode.
      pack forget .fRleft.fRbuttons.buttCOLOR1 \
         .fRleft.fRbuttons.buttCOLORbkGND \
         .fRleft.fRcolors.labelCOLORS
      pack .fRleft.fRbuttons.buttCOLOR1 \
           .fRleft.fRbuttons.buttCOLOR2 \
           .fRleft.fRbuttons.buttCOLORbkGND \
           .fRleft.fRcolors.labelCOLORS \
         -side left \
         -anchor w \
         -fill none \
         -expand 0
      .fRleft.fRbuttons.buttCOLOR1 configure -text "$aRtext(buttonCOLOR1b)"
   }

}
## END OF PROC 'show_hide_fill_buttons'


##+#############################################################
## proc ReDraw_if_canvas_resized
##
## PURPOSE: To make sure we are only doing redraws if the
##          <Configure> of the canvas resulted in a change
##          in the size of the canvas.
##
## CALLED BY: bind .fRright.fRcanvas.can <Configure>
##            at bottom of this script.
##+#############################################################

proc ReDraw_if_canvas_resized {} {
   global  PREVcanWidthPx PREVcanHeightPx

   set CURcanWidthPx  [winfo width  .fRright.fRcanvas.can]
   set CURcanHeightPx [winfo height .fRright.fRcanvas.can]

   if { $CURcanWidthPx  != $PREVcanWidthPx || \
        $CURcanHeightPx != $PREVcanHeightPx} {

      ReDraw 0
      set PREVcanWidthPx  $CURcanWidthPx
      set PREVcanHeightPx $CURcanHeightPx
   }

}
## END OF ReDraw_if_canvas_resized


##+#####################################################
## Additional GUI initialization, if needed (or wanted).
##+#####################################################

## Initialize the squares' outline/fill1 color, the
## fill2 color, and the background color for the canvas.

# set COLOR1r 255
# set COLOR1g 0
# set COLOR1b 0
set COLOR1r 255
set COLOR1g 255
set COLOR1b 0
set COLOR1hex [format "#%02X%02X%02X" $COLOR1r $COLOR1g $COLOR1b]

# set COLOR2r 255
# set COLOR2g 0
# set COLOR2b 0
set COLOR2r 0
set COLOR2g 0
set COLOR2b 0
set COLOR2hex [format "#%02X%02X%02X" $COLOR2r $COLOR2g $COLOR2b]

# set COLORbkGNDr 0
# set COLORbkGNDg 0
# set COLORbkGNDb 0
set COLORbkGNDr 255
set COLORbkGNDg 0
set COLORbkGNDb 0
set COLORbkGNDhex \
   [format "#%02X%02X%02X" $COLORbkGNDr $COLORbkGNDg $COLORbkGNDb]

## Initialize the widget variables, for a checkbutton
## and 3 scale widgets.

set outline0or1 1
set p 0.05
set N 50
set M 6


## Call 'ReDraw' to initialize the canvas.
## We need 'update' here to set the size of the canvas,
## because 'ReDraw' uses 'winfo' to get the width and
## height of the canvas.

update
ReDraw 0

## We need this command because ReDraw does not (re)set
## the background/canvas color.

.fRright.fRcanvas.can config -bg $COLORbkGNDhex


## After this script drops into the Tk event-handling loop,
## this bind command causes redraws whenever the canvas is resized.

set PREVcanWidthPx  [winfo width  .fRright.fRcanvas.can]
set PREVcanHeightPx [winfo height .fRright.fRcanvas.can]
bind .fRright.fRcanvas.can <Configure> "ReDraw_if_canvas_resized"
Here is an image that I made from one of the yellow-to-black spiraling-squares images above --- by making black transparent, and overlaying the image over a photo image.
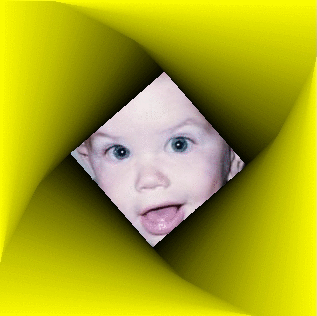
To make this image, I actually used my 'Title Block' utility, whose code I posted at the page A GUI for making 'Title Blocks' ... with text, fonts, colors, images.
The exact sequence of steps that I followed are:
   1) I used the 'mtpaint' image-editor program (on Linux) to crop the canvas image from
      the spiraling squares (yellow-to-black) GUI window capture above.

   2) I used one of my 'feNautilusScripts', which uses the ImageMagick command 'convert',
      with '-transparent' and '-fuzz' options, to make a transparent GIF, using black as
      the color to make transparent.

   3) I converted a JPEG photo of a face to a 256-color GIF file, again using one of my
      'feNautilusScripts', which uses the ImageMagick command 'convert', with '-palette 256',
      to make a GIF file from the photo.

   4) I started up my 'TitleBlock' utility and imported first the face-GIF and dragged that
      image to the middle of the canvas. Then I imported the yellow-shaded-GIF and dragged it
      over the face-GIF image.

   5) Then I did a screen capture of the 'TitleBlock' GUI with the 'gnome-screenshot' utility,
      on Linux.

   6) I took the captured image, in a PNG file, into the 'mtpaint' image-editor program to
      crop it. I saved the cropped image as a PNG file.

   7) I have found the PNG files from 'gnome-screenshot' to be rather large. So I used
      another of my 'feNatuilusScripts', which uses the ImageMagick command 'convert',
      with '-quality 100', to make a '.jpg' file from the framed-photo image.
It looks like a lot, but it only took a couple of minutes, thanks to my 'feNautilusScripts' and the 'TitleBlock' utility --- as well as thanks to 'mtpaint' and 'gnome-screenshot'.
Some Next Steps
At the end of each chapter of Ammeraal's book, he presents some exercises. At the end of the first chapter, he proposes "Write a program to draw a great number of triangles inside each other similar to the way in which the squares are drawn in the program SQUARES".
If I were to take on such an exercise, I think it may be more useful to draw pentagons, hexagons, or octagons. They would be more useful ---than triangles --- as photo frames and backgrounds for logos/icons/webpage-titles.
There are other interesting examples in the Ammeraal book --- especially in the area of 3D graphics. I may use some of those examples as food for thought for various 3D Tk GUI's. I plan to post some 3D Tk scripts here in coming months.